
The manual is a bit lacking, so I'm going to post some errors and suggestions for improvement. Please chime in if you have corrections or additions to the manual.
ASSEMBLY INSTRUCTIONS (p4)
Front wheel is already installed, no assembly needed there.
It would be helpful to mention how to install the rear wheel "plastic cover thingies," whatever they're called.
TECHNICAL SPECIFICATION (p5)
Charging time: 4 hours might be optimistic.
Top speed: More like 45-50mph, not 55mph.
Product size: Somebody mentioned that the specified length is not correct? I haven't measured my bike yet.
PARTS LIST (p6)
This should be 2 or 3 diagrams. It's hard to tell what's what from just 1 diagram.
G) Under seat storage is actually pointing to something up on the handlebars.
N) Center Stand is actually pointing to the front battery access door.
O) Kick Stand is actually pointing to the Center Stand.
FRONT DISPLAY (p7)
The parts are listed with letters, but the photo has no letters marked. But it is pretty obvious which part is which.
RIGHT HANDLE BAR CONTROLS (p9)
Speed switch: "Economical speed switch can ensure longer range and high speed switch provides bigger AMP for accelerating and climbing." I think it should mention which is which :-) On my bike, "0" is high-speed and "1" is low-speed.
The manual makes it sound as though the headlight switch actually turns the headlights on and off. But it is really the ignition key that does this.
The headlight switch that is pictured and described is a left-to-right switch, but on my bike it is an up-and-down switch.
BATTERY GAUGE AND CHARGING INSTRUCTIONS (p11)
"BMS charger ensure of balance Voltage on each cell battery." This is incorrect; the bike does not come with a BMS.
FREQUENTLY ASKED QUESTIONS (p15)
2) "speed from 0 to 55mph (88km/H) takes only 6 seconds" Hahahahaha, I wish!
3) "When the driver turns the ignition key, three beeps will immediately follow telling the driver that the vehicle is ready to drive." Hmm. My bike did this once or twice. It doesn't do it anymore.
11) "If one of the batteries has a problem do I need to change all the five batteries?" There are actually 20 batteries, not 5.
REAR COVER PHOTO
The photo here looks like it is from a different bike, maybe the XM-3000?


Dirtywater,
You got a manual with yours!?
HaHaHaHa
consider yourself lucky.
R
I guess I am one of the lucky ones! Did they at least put a sticker on yours that said "Good luck" or something like that? haha.
If this forum gains a wiki capability, we could start a collaborative instruction manual. Then when we're done we could print up 100 copies and send them to China :-)
Hi DW,
I think by then the bike might be built in a different factory with different parts and the manual would be outdated.
I read that the plastic moldings maker will be changed soon.
Mine came with a manual as well, with all the same issues. Although I thought that the yellow buttons on both the right and left side sounded the horn on mine. I'd have to check again, though. Also my battery guage does not appear to be working, but all of the wires on the dash are connected and fully seated. I did find one loose wire under the storage compartment tucked down the side (female plug with a red and green wire going into it) which I have an open ticket with x-treme on, but they didn't respond to it over the weekend (although I suppose they are not open on the weekends). To be honest their tech support is very slow to respond to anything anyway. Maybe I need to try calling them or something instead.
Lenny Zimmermann
Metairie, LA
http://visforvoltage.org/forum/4632-wikilike-features
Why not build a 'Handbook' ?? The 'Handbook' features already enabled are very close to what you'd want in a Wiki.
- David Herron, The Long Tail Pipe, davidherron.com, 7gen.com, What is Reiki
Let me add that a guide to the best ways to take the whole scooter apart, to taking apart only what you need to get to the battery compartment and one for wiring (by color code and such) would be phenomenal. I may see if I can put some of that together, but I really need to find a better digital camera for something like that.
Lenny Zimmermann
Metairie, LA
One of the other things I was wondering about is the clock as well. I figured out that the bottom button changes the display and, I think, if you hold it it lets you set the clock using the top button, but it moves between displaying three things. Obviously one of them is the time, but I have no idea what that second number is (and I forgot what it displays third, I'll have to look at it again later when I'm at home.) Anyone have any idea what the second item is? It just occurred to me that maybe its the date? I'll look again at that.
Lenny Zimmermann
Metairie, LA
I took 61 pictures (with my 9 megapixel camera) replacing the one bad battery. I had to almost completely disassemble it to get the battery out. I did not want to take a chance on breaking the batteries that seemed to be wedged tightly. The only issue is that the 61 pictures are around 150 meg. I am putting words to the pictures (not an easy task for me)
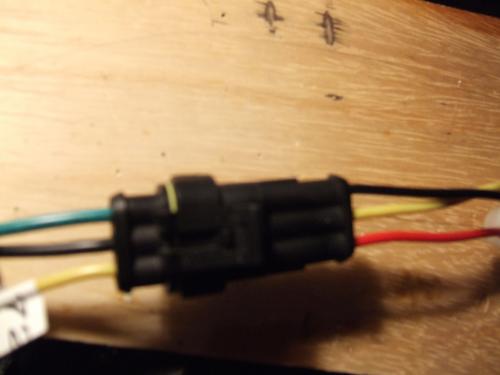
One thing I noticed on the DC DC converter is that the wiring connections are confusing. From the harness to the converter the wires are green connects to black, black connects to yellow, and yellow connects to red.
Henry-- I know what a pain in the ....to get the batteries out, I took someones suggestion and used a jack to expand the compartment and it also really helps to take a metal grinder and grind down the heads of the battery holders, you can get rid of at least 1/16" per side which comes out to about 1/8" in total width (Later I had to take one of those holders apart after I ground the heads down and I used a small needle nose vise grip pliers and that worked fine).
You can photoshop (hey guys what other software can he use?)those pictures and get each one down to a few hundred kb each and put on picasa or some other photo sharing spot. Best Mikie
mikie
I find Gimp to be pretty useful for image manipulation. (http://www.gimp.org/)
I also noticed the wiring is seemingly all over the place. I wired my Garmin Zumo 450 GPS into the headlight low beams (since they are always on and already at 12V and easy enough to splice into), but had a devil of a time getting it to work, until I realized that the positive and negative leads were the exact opposite of what I expected them to be.
Lenny Zimmermann
Metairie, LA