Submitted by DaveAK on Sat, 09/12/2009 - 15:59
Here's a mock up of the motor and battery layout:

before comments
Submitted by DaveAK on Mon, 08/31/2009 - 19:11
Here's a couple of pictures of the frame without the ICE, and a mock up of the sepex motor. It's a little close to the back brake, but I never use that anyway. :D


before comments
Submitted by DaveAK on Fri, 08/28/2009 - 21:07
So tonight I weighed the bike as a starting point. Totally non-scientific using a couple of cheapo bathroom scales, but it will do for what I need. It was 240lbs on the front and 265lbs on the rear. This will give me an idea of how much weight gets removed/added.
I also ran the bike for a couple of minutes, but it rattled quite a bit. I don't think I'll bother putting any effort into the motor, I'll just sell it as is. So next step is to remove all the junk I don't need and weigh it again.
before comments
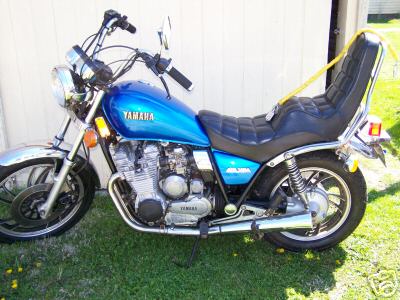
Submitted by DaveAK on Mon, 08/24/2009 - 22:32
Well I'm about to start my own conversion and I'll do my best to keep this blog up to date. Since my computer is also in the garage it might not be too difficult. :)
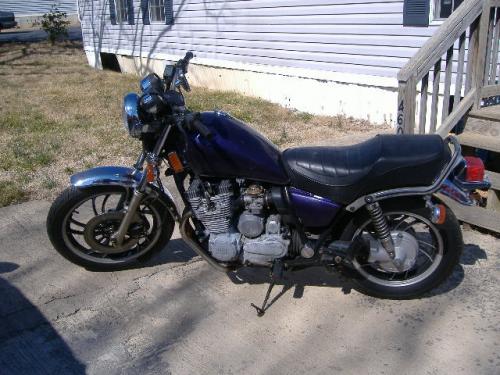
Right now I've just taken delivery of my donor. It's a 1984 Kawaskai Ninja 900R. In good shape for an EV conversion, but pretty crappy otherwise! But for $350 it can't be all bad.
Here's some pictures that the guy who sold it to me sent:

before comments
Submitted by racermike39 on Sun, 07/13/2008 - 05:02
Today was a great day. A big victory in my little EV world. I rode the CBR to my friends house. He just about flipped out. "Dude! Your NUTS! That thing is cool! You totally snuk up on me!" ( he was working in the yard when I silently drove up). :)
My 14 year old niece came over for the day to visit, and I gave her the very first ride as a passenger on the bike. Pretty neat. Then she drove every other EV we have, taking turns on each one all day long. It was a great EV day, and all 5 EV's were running great.
before comments
Submitted by racermike39 on Sun, 07/06/2008 - 04:48
before comments
Submitted by racermike39 on Tue, 04/29/2008 - 18:12
Over the past couple of weeks, some forward progress has been made. I was able to finish the re-sealing of the front forks. I had to special order some bolts that were destroyed during dis-assembly from the Honda dealer to finish the job. The new front tire has been mounted and balanced, and the front end is now back together. The D&D ES-15A motor arrived last week, and I spent the better part of Saturday making mounts. The motor mounts are done! The motor is in position and ready to be wired.
before comments
Submitted by JCinStaunton on Tue, 03/11/2008 - 18:04
First I have 2 motorcycles. Both are Yamaha 650's that I bought off ebay. I went to ohio for this bike...
Love the way it looks :) Just had to have it. Only thing needed is the carbs cleaned. They are being done now at the shop.
Went to Ct. for the parts bike. got to visit my brother when I was there and stayed over for the night.
This is the parts bike.
before comments
Submitted by HOPOIL-AMPS on Fri, 02/08/2008 - 16:19
Feb 8, 2008
I've started a project that I hope will have me commuting to work, when spring arrives, on an electrified motorcycle. I've owned a couple motorcycles and now ride a Triumph Bonneville 750cc. The Bonnie is a great bike, but I'd like something 'greener'.
I began by buying a Kawasaki 400 from someone here in Syracuse.
It has a disc brake up front and a moderately heavy frame which I think will accept the weight of the batteries. I've removed all of the ICE parts and gas tank hoping to sell bits and pieces. so far I've recouped 90% of my purchase cost.
before comments
Submitted by jdh2550_1 on Tue, 12/04/2007 - 20:50
I got my batteries delivered on Friday. I now have about 360lbs of lead to play with! Along with a whole bunch of other stuff and I need to fit it all in that poor, unsuspecting 750 frame...
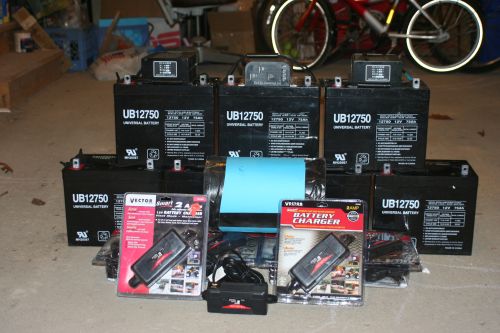
I went to the local metal supply shop and bought some 1/8" strap and some L shaped as well. I've been playing around with specific mounting strategies in my mind for a while - now it was time to try them out for real. So far, touch wood, I've been reasonably happy with my progress.
before comments
Pages