Really glad Mark recommended these, great the way they click together - can make a block connector for parallel charging / Series running batteries.
Firstly just a warning to UK people making overseas orders, my $29 customs return translated to £18.01, just a penny over the £18 limit meant I had to go and collect it from sorting office and Pay £12 which included UK VAT and a Post Office 'Handling charge'. Arrrggghhhh! So worth asking any company to fill in th slip with $28 max if possible!!
Anyway Mark can you advise me do you crimp or solder your wires into the metal clips that go inside the powerplug case?
Ive got the problem that when the metal insert is put in the case, it seems final as its hard to get out again! I did one as a test but tried to pull it out and it just snapped the wire out and left the metal insert jammed in- how do u get round this?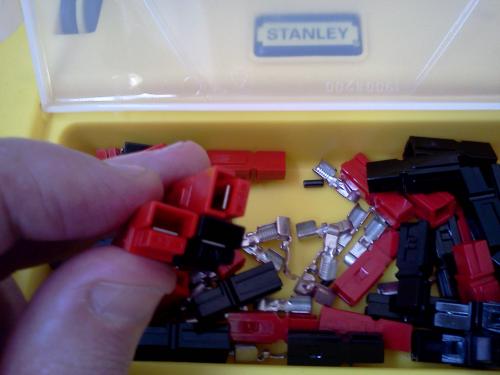


To DISASSEMBLE a powerpole without damage, you must insert a very small, hard (metal) object under the contact "tongue" from the (front) end opposite the wire, and work this object, (I use a small jewelers type flat-blade screwdriver)under the front of the contact, to un-latch it from the flat spring that resides underneath, while gently pulling the contact out the rear of the connector, by the wire lead.--With practice, it becomes quite easy!--Bob Curry
Robert M. Curry
I made a crimp tool from a pair of long handled needle nose pliers (Harbor Freight, $10.00?)
I filed two notch pairs in the jaw. The first notch pair catches the open sides of the contact and starts the bend. The second notch pair crushes the wire-holding area down to its final diameter.
To assemble a contact, I strip the wire, pre-flux the wire tip, crimp the contact on the wire, then solder the crimped contact. With some wires it is necessary to gently trim the insulation to fit inside the contact housing. It is VERY necessary to make sure the contact if FULLY inserted in the housing; there should be a very slight "click."
Mark
Mark,
do you have a picture of this home made tool? I ruined several Anderson contacts because I don't have the rigth crimp tool.
Thanks.
Two e-scooters 1500W 48V 30 Ah LiFePO4
Hello Mark..
I too would very much like to see a photo of your custom crimper if possible......
tri-lobe
I will endeavor to remember to take some photos tonight... My home-made crimper was intended to form the terminals around 10ga wire (with a dab of flux added). I then soldered the connection.
There's some discussion of PowerPole crimps at:
http://www.ntrak.org/ntrak_pp_compare.pdf
and
http://home.comcast.net/~buck0/app.htm
Most of these crimpers seem to dimple the barrel as well. This would be needed if using smaller gauge wire. They make the point that a successful crimp does not leave any metal outside of the circular profile of the connector.
MF70
Here's a closeup:
I started with a pair of needle-nose pliers (not the wire-cutting combo type). I drilled the two holes while clamping the jaws together. I then filed the taper in the preliminary slot. The mouth of the opening is just wide enough to capture the ears of the terminal, while the back of the opening is narrow enough to bring the ears together about 40%. The secondary slot is drilled to be the desired cylinder size to fit in the plastic carrier.
The Anderson PowerPole terminal is resting in the preliminary slot. When the jaws are brought together, the ears of the terminal will be brought about 40% together. Next, the terminal is transferred to the second slot, where stranded wire would be placed in the gap, with a whiff of electrical flux. On the second crimp, the ears will be bent over to complete the cylinder. I then finish the join by soldering.
If you are trying to get the terminals out of the plastic carriers, I recommend inserting a flat jeweler's screwdriver from the back to lift the flat steel spring that is locking the terminal in the carrier. See the cross section:
Hello mf70,
Thank you very much for the photo's and information....much appreciated...
tri-lobe
Thanks,
some pictures say more than thousand words.
Two e-scooters 1500W 48V 30 Ah LiFePO4
Updated picture: