MB-1-E Part Two: Progress ... (maybe)

Hello Again,
I've been thinking about this project a lot, probably too much, but these kinds of projects seem to take on a life of their own and become obsessions. By now, I have a pretty good idea of how to make this all work (thanks again to Eric Peltzer's great documentation), however, the one thing that was still missing in my plan was ... how to mount the motor/ jackshaft assembly so it wouldn't fall off at the first bump I hit.
I don't have a machine shop and I don't weld, so mostly I scrounge through boxes, linger in hardware stores and scratch my head to come up with ways of fabricating and attaching things other ways.
Since the bike has a rigid frame, front and rear, most of any road or trail shock is absorbed by the wide tires with a little bit of frame flex ... actually very little. The chrome moly frame is actually meant to do this to some degree.
The old school mountain bikes depended mostly on tire pressure, as mentioned above and the rider's legs and arms to absorb most of the shock.
This, however, means that any mass (like a motor and jackshaft and batteries) will need to be "one with the frame", in order to survive very long.
My first thoughts were to use my existing bike rack. It's pretty well made and supports a good deal of weight but it just isn't made to mount a motor on.
I was going to just use the motors flange mount (or whatever you would call it) and clamp it to the rack with some flatbar under and bolts thru the flange.
This seemed like it would work well, because doing it this way, I could move the motor foward or back to adjust the chain.
I've decided against that now. The motor, as noted in my previous blog entry will have the jackshaft mounted directly to it. The two together will be one unit or assembly. Belt adjustment will be made by loosening the jackshaft mounting bolts and slotted holes will allow the belt to tighten or loosen. Once the belt is properly tensioned and the bolts re-tightened, the motor and jackshaft will be one unit again.
The chain adjustment will be made by tilting the motor/ jackshaft assembly with the aid of of a an adjustable support rod in parallel with the chain.
So, I need a fulcrum point. One close to the frame to maintain rigidity. The bike frame is sturdy, so I'm not worried about that. I just needed a way to mount a pivot of some sort right at the frame. I went through every box, looked on, under and around the work bench, looked in the travel trailer, the back yard, in the pickup and didn't find anything that would do the trick.
So I put the dogs in the back of the truck and headed for the hardware store. After wandering through most every isle and being asked if they could help me find something several times, I stopped at the rack that has 3 ft long extruded aluminum and ended up getting a piece of 1x1x1/8" angle and a piece of 1x1/8" flatbar, some 5/16" bolts and washers and nylok nuts ... couldn't find the nylok nuts for a long time and, of course, couldn't find anyone to help me either.
Finally checked out and headed home.
I made a few measurement then looked up on the internet to see if there were any best ways to bend aluminum flatbar. Didn't find much, so went back out to the workbench and started bending. Don't know why I needed to look it up, but I figured there was some best formula for bend radii, heating (or not) etc.
Come to find out it is a fairly soft alloy so bending went fine and the radius kind of took care of itself when I put it in my wood vice and just bent it by hand.
Went back for more measurements then headed for the drill press. I drilled all the holes that I needed and rounded off all the sharp edges and corners then back to the bike. I made some special spacers (some fuel line actually) to go around the bolts and keep the mounting bracket I just made from sliding around. Dropped one of those and danged if I could not find it. Cut another one and back to the bike.
As I was putting it all together I dropped the second spacer and it fell right between the bottom bracket and the chain sprocket ... you guessed it, there was the other spacer I lost.
I tightened it all up and it just wasn't quite sturdy enough and bent one of the pieces of flatbar when I tightened it down. I took it all back apart and bent the flatbar back into shape and cut a piece of angle to back it up and reinforce it, drilled some more holes and back to the bike. I added another bolt on the outside of the frame on one side and tightened it all up. This time it was much better. I picked the bike up by the motor and it didn't even budge. (We shall see how it acts when the motor torqes, I hit a bump etc) ...
... but for now it seems pretty darn stout.
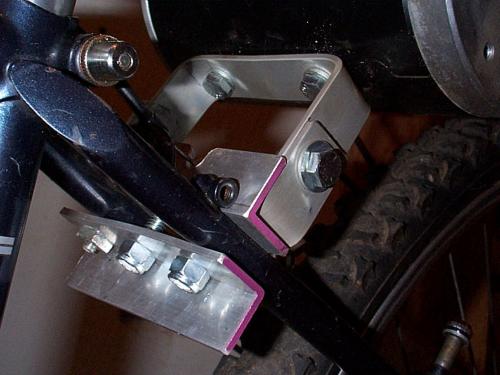
Here are a couple of pics of the mount, I'll probably end up making something similar out of steel later, but if the aluminum works then it helps keep the weight down.
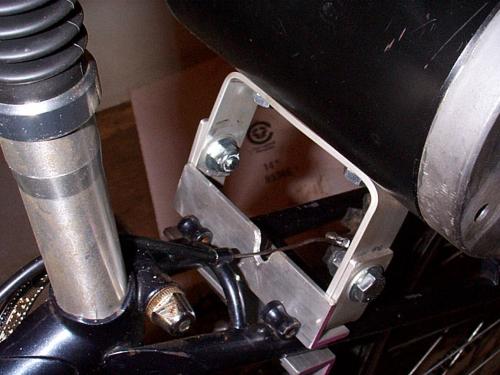
As you may have noticed, I don't have the brake mechanisms mounted on the bike right now. They are center-pull breaks and the angle I added was right in the way of the brake cable. This is the reason that I went with an open mount like this, was for the brake cable but when I backed up the flatbar with the angle, I realized that I had to take the mount back off and hog out the notch in the middle of the angle for the brake cable. Got it all back together ... again ... and grabbed the camara. I got in two shots before the batteries went dead. At least they are rechargables, I'd better throw them in the charger for next time.
Yesterday, I did get my jackshaft assembly special ordered. The guy at TuFF Industries was great and quickly answered my emails until we got all the details resolved. I shot off a PayPal payment and he said it would be shipping out on Monday.
I think this is going to work well. Like I said, I'll probably have to go another round with the motor mount but since I'm making my own kit here I need to do a bit of trial and error to get there.
Well, until next time ...
(Stay tuned, if I find some time, I'll be posting more pics and keeping ya posted on more fun and folly)
Dave
- MB-1-E's blog
- Log in or register to post comments

Who's online
There are currently 0 users online.
Who's new
- eric01
- Norberto
- sarim
- Edd
- OlaOst
Support V is for Voltage

Comments
Re: Progress ... (maybe)
Dave,
Beeps again,
Right above that angle, those are the, for lack of a better work, the bosses, bolt the motor to those. Your frame is chrome moly, you can't remove those with a chisel and a 3 lb hammer. I am looking at the last picture on Progress... (maybe)
Chuck
[b]AGM BATTERIES[/b]
Re: Progress ... (maybe)
Hi Chuck,
Ya think?
I started out thinking I was going to use those, so I
certainly considered it then I finally decided against it.
Just looked like there wasn't enough meat in the braze to hold it.
I did feel, however, that they would not shear, that's why I put the Al right under them.
I bet your 100% right though, it is a really well made CrMo frame.
Sure would be easier and a much more direct connection to the frame.
I have two stock socket head cap screws that thread right into those bosses.
You, of all people, would know how strong a braze will hold.
I think I'll trust your judgement and use them. In the process, I'll replace the aluminum on the motor side with some steel. That ought to holt it!
With two adjustable support rods, one on the jackshaft plate and one on the other end of the motor, the whole drive assembly should be really well supported and not budge when I do hit a bump or rack from torque.
Mine is only 3/4hp but that's a lot when applied all at once.
Yup, ya talked me into it.
I'm supprised how rigid it is right now, with the Al but this machine is bound to be subjected to constant stresses on the backroads. I do want it sound. Thanks for the tip!
Together we can do this ... :)
MB-1-E
Electric - Bridgestone MB-1 Mountain Bike
Dave B
MB-1-E
<a href="http://visforvoltage.org/book-page/996-mountain-bike-conversion-24v-3-4h... - Bridgestone MB-1 Mountain Bike</a>