
This saga began over a year ago when I thought "hey, it would be trivial to add an adapter to allow plugging in an extra battery pack to my charger bicycle and get more range" .. unfortunately I didn't count on the Trickster smiling upon me in the form of toasting the controller board. That led to a complete reconfiguration of the control system and replacing the bottom bracket which required surgery to the chainring etc.
A bit about the Charger bicycle ... it was designed by Aerovironment, the same company that designed the EV-1 for GM, and I think the same engineers might have designed (part of) both. It's a "pedelec" design meaning the controller senses when you pedal and fires the motor to match your pedaling. There's no throttle. There are four power setting buttons controlling how much assist is added. The controller is embedded in a battery box that fits between your legs. The motor is a REVCOR motor, the same model (but a beefier size) as the ones ZAP used on the Zappy and DX/SX kits.
The charger bicycle was purpose-built as an electric bike. It's got a good frame and good parts. It originally sold for (I think) $1500. The company went out of business and Sam Wonderly has all the remaining ones in storage. See him at http://www.electroportal.com
So with a toasted controller board ... I could have found a replacement board, and I contacted Sam. He was gonna charge me a big pile of money because there's no source of controllers other than the ones on the bikes he has in storage. Or he could have installed a different controller and he mentioned having to do something with the bottom bracket but I had no idea what that phrase meant, nor how much trouble it would cause me to not take him up on the deal he offered. I suppose by now he's worked out the steps for what I ended up doing, but at the time he wasn't quite ready and we didn't manage to make a deal for him to do the conversion for me.
For the controller I chose a 4QD Uni-8, 24 volt. They're a well-made unit that comes from the U.K. and I've also used one on the Vego I'm working on rebuilding. I worked out a way to mount the controller inside the battery box ... the battery box has a huge heat sink which the original controller was mounted on, so I drilled some holes, mounted the controller and an on-off switch.
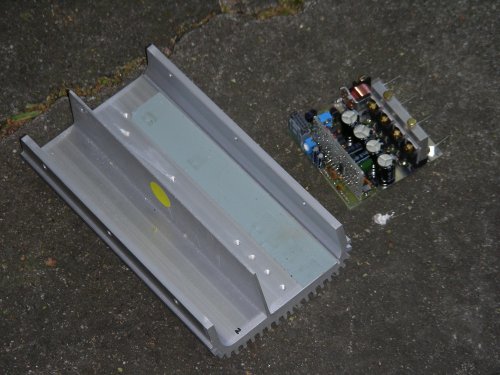

I thought that would be it. Just a matter of attaching the controller to the heat sink and wiring it to the batteries and motor.
But ... The motor and the pedals each have their own chain which goes to sprockets on the rear wheel. The rear hub is a Shimano Nexus internally geared hub, so there's no external deurailer etc. The two sprockets are on a common freewheel meaning that when one of the chains has power it ends up spinning the other chain. That means when the motor has power, it spins the chain coming from the pedals, and the pedals spin. This makes it real hard to ride the bicycle properly.
I posted about this on the VV.com site (hmm, I should try to find those postings and repost them here) ... and coincidentally someone else had faced the same problem and was able to tell me the solution.
There are some cranksets where the crankset does freewheeling. One version is the Shimano Front Freewheeling System (FFS) which was built for Schwinn and used in the Schwinn World Ladies bicycle of the 60's and 70's. The FFS may have also been used for tandem bicycles. Another possibility which I just recently learned of is the Vision, Independent Peddeling System which was also built for tandem bicycles. On a tandem bicycle it's important to allow either rider to pedal independently of the other, so the cranks need to freewheel.
I also read about rear wheels which have threading on both sides and you could install a freewheel sprocket on both sides of a rear wheel. Thus the sprocket on one side could be for regular pedaling and the one on the other side could be for the motor. But the Charger bicycle is designed a certain way, with both chains going to the same side of the wheel, and there wasn't any sprocket I could find that had two independent freewheeling sprockets. I did find a dual freewheeling sprocket, that could screw onto a rear wheel, made by White, but the shop that carries them says that the sprockets do not independently freewheel.
Anyway, back to my bike.
I eventually found the FFS crankset from a bicycle shop in Kansas City that specializes in used parts.
Unfortunately the chainring on the FFS is too large for the Charger bicycle frame. This really became like that childrens book .. Fortunately/Unfortunately .. fortunately I found the right crankset (FFS) but unfortunately it didn't fit the bicycle frame. By "too large" I mean the chainring intersected with some frame tubes and hence the crankset wouldn't be able to be installed all the way.
Sigh. That was last September or so and I've been puzzling over what to do ever since.
What I finally did was pure hackery. The chainring on the FFS is not removable so the option to replace it with a smaller diameter sprocket wasn't possible. However the one on the FFS has some holes which I thought might fit the holes of regular chainrings. I finally got up the nerve to do this ... it required cutting the FFS chainring so that only the minimum that provides a place to bolt on a regular chainring was there. I found a suitable chainring at an online shop, of the correct diameter, and it arrived a few days ago. Today I got out my grinder and cut up the FFS chainring grinding it down quite aways, and then bolting on this other chainring. I used some locktite in the bolts so that hopefully the chainring will stay in place.
It works. And suffice to say that I now know what a bottom bracket is, as the above involved replacing that thing.


sounds like your modification turn it into quite a clever bike. One advantage over other variable geared electric bike's is the ability to change the sprockets to a pedal cadence that suits you. Something you can't do with the Giant lafree for example. This gives the option of increasing either the voltage or current without making the bike too powerful to pedal along with.
I wish someone actually made bikes like this now! I look forward to hearing how it rides.
Like I said, Sam Wonderly @ http://www.elecroportal.com has a bunch of them.
- David Herron, The Long Tail Pipe, davidherron.com, 7gen.com, What is Reiki
Good to hear that someone else has a Charger Electric Bicycle. Aerovironment made a nice solid sturdy bike when they came up with that one. I bought mine from Sam in June of 2006 for $675 with some extras. Got a dark green mountain bike model. The only thing I changed right away was the seat. The stock one was thin and light. I need cushion!
Other than that, I've added a cargo rack and panniers, fenders, front and tail lights, a horn, a radio, odometer, and side mirror. I use it to commute 8.5 miles each way to work (including hills!) here in Sacramento, CA. Oh, and I bypassed the speed governor to allow it to go up to (my best so far) 28 MPH.
The thing truly is a tank. I could easily take out a car door going at full speed. I'll have to post some pictures on my profile at some point. I wish I saw more of these bikes out there. Like he said, there are more available!
kringle777
Red XM-2000
Moss Green "Charger" ebike
Sacramento, CA
Hi, I bought a non-suspended Charger about a year ago and after riding it for a couple of weeks, I decided I wanted to change it to a throttle type of motor/speed control. I bought a 500 Watt Curtis controller and 35amp circuit breaker from electricscooterparts.com for about $50 and a Magura twist throttle from the same folks. I also bought a simple 50 amp on/off switch from Napa Auto Parts. I know it sounds wierd but I mounted the trottle on the left side of the handlebar. With these installed, I was able to remove all of the speed limiting and pedal sensing electronics. I was mostly happy with the bike as it would do about 28-30 mph with heavy pedal assist. However, the 33 tooth original front chainring was too small as my cadence was over 100 revs per minute to maintain 28mph. So I changed out the pedal crank arms and chainring with a set of crank arms, the freewheel mechanism and 44 tooth chainring from the guys who sell the cyclone bike motor kit. (You do not need the longer bottom bracket spindel with the charger setup.) With the additional speed, I found that I needed front suspension. I then purchased a RST suspension fork, a 1 and 1/8 RST steer tube 200mm length, a bottom headset race and a package of 5 each 2.5mm aluminum steer tube spacers. I think I've got a good electric bike now.
Interesting, so basically the only original part now is the frame? Or I suppose you're still using the battery box but the original controller isn't there.
A question: The frame around where the crankset installs is such that the chainring can't be large diameter. How did you get around that without using a long spindle?
I ask because when I installed mine the chainring was too wide.. so I cut off the original chainring and bolted a narrower one in its place.
- David Herron, The Long Tail Pipe, davidherron.com, 7gen.com, What is Reiki
There are a few other original parts ie.,- the motor, front and rear wheels, handelbars, shifters, brakes, and seat.
With respect to the clearance between the chainring and the frame (specifically the chain stay), I found that the largest chainring that would fit was a 46 tooth with a set of Shimano LX crank arms. However, with the shimano crank arms, the clearance between the 2 chains was only about 3/16 of an inch. With the cyclone crank arms, the clearance increased to about 5/16 of an inch. This is with the chainring mounted on the frame side (not the crank arm side) of the freewheel mechanism. If you installed the chainring on the crank arm side of the freewheel mechanism, you could increase the clearance by another 3/16 of an inch but my concern would be that the chainline would be out of alignment. I have experimented with different sizes of chainrings and have found that a 44 tooth is ideal... anything larger doesn't climb very well in first gear and anything smaller drives the cadence to above 80 rpm to maintain 28 mph in 7th gear. With the 44 tooth chainring, I could not re-install the lower plastic shrouds.
My brother-in-law is expecting delivery on his $9,500 Optibike in about 2 weeks. His bike will obviously be better, but will it be $8,000 better? I don't know.