XM-2000 by JDH: A simple battery compartment modification

Mod: Moving the battery around
Benefit: More under seat storage
Cost: $0*
Complexity: Easy
* cost based on materials I had to hand
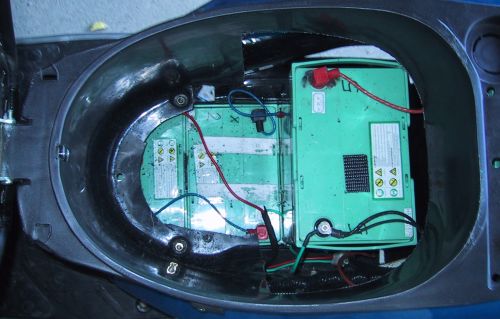
Well I completed my first simple modification. The original layout of batteries in the XM-2000 is "weird" to put it politely. My guess is that this layout was the cheapest way of taking their 48V model and making it 60V (even down to the point of minimum impact on the original wiring). The way the extra battery is installed puts it slap bang in the middle of the under seat storage and so they just put a "false floor" over the top of it - giving you just enough room for carrying the charger and not much else.
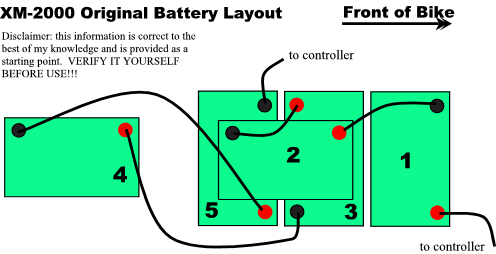
The original battery layout is, well, weird!
By simply rotating that top battery through 90 degrees and shifting it back so that it sits over the top of the last battery frees up about 2/3rds of the original under seat storage. I also changed the order of the batteries in the string - the new order lets me reuse all the original wiring with the new battery positions and to me it makes the wiring of the battery string much more logical.
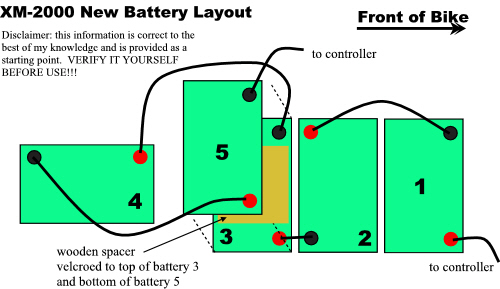
My new battery layout suggestion - it also re-orders the batteries in the string
Step 1: remove the bodywork and expose the batteries - see Kringle's [node:1426] (I'm getting good at this process now!)
Step 2: unwire all five batteries
Step 3: cut a length of wood to act as a spacer between the bottom back battery and the newly positioned top battery. I used a piece of scrap wood (4 by 1 or something similar). Affix the wooden spacer to the bottom battery with industrial Velcro - and then affix the top battery to the top of the spacer with more Velcro (I used a couple of two inch wide strips on each).
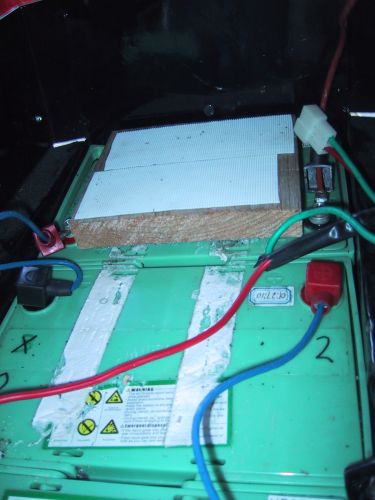
Battery spacer in place on top of what is now battery #3 awaiting battery #5 to sit on top of it
Step 4: Rewire all five batteries as shown in the new layout above. You can reuse the wires and you should find that they're plenty long enough (in fact the 2 -ve to 3 +ve lead is really too long - a bus bar would be better).
Step 5: You can test your work at this point - check that the voltage between battery 1 +ve terminal and battery 5 -ve is 63.x volts. If it's not then check your wiring.
Now it's time to cut bits off your XM-2000. Remember measure twice and cut once. I didn't - and I overdid it a bit. No great problem though.
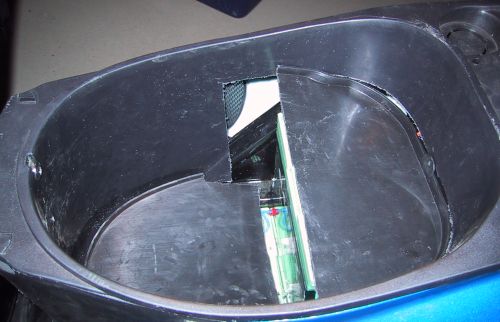
Step 6: Cut out the back and sides of the under seat storage unit. This is where I overdid things and cut away too much of the side wall.
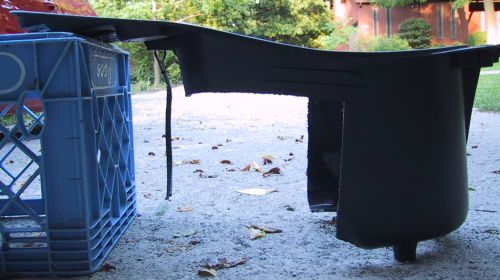
The "hacked" battery compartment - don't cut as much of the side wall away as I did
Step 7: Cut out the lip that sits around the hole where the top battery used to live - this will give a flatter floor for the new floor of your under seat storage compartment.
Note that I've cut away the lip to give a flatter floor for the new compartment
Step 8: Reassemble (reverse of disassembly)
Step 9: Take the original false floor of the battery compartment and cut it into two sections. The back section will cover the top of the newly positioned battery, the front section will go at the bottom of the battery compartment. The back part is roughly 1/3rd and the front 2/3rds. You will need to trim the front piece to get it to sit all the way down at the bottom of the storage area (the sides angle in and there are some parts of the frame you need to clear).
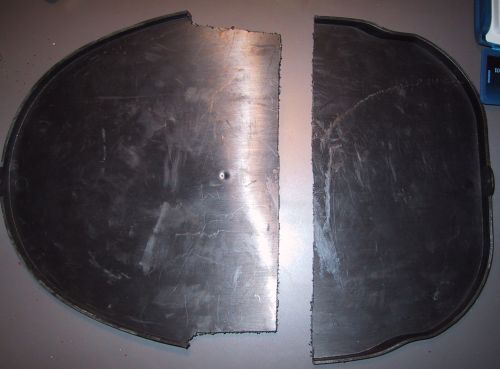
The old false floor cut in pieces to make a new false floor - but mine's split level - very 70's home design chic!
You could stop at this point (I did).
The (almost) finished project - see that honking great gap I created? I did it on purpose, improved airflow, honest...
Step 10: Strap the new top battery to the back of the bike. This will help stop the battery shifting during heavy braking. The Velcro is probably enough and is similar to how the top battery was originally secured. However, I recommend the strap. I plan on using an old tie down strap that had frayed through (see, I knew I didn't throw it away for a reason!)
Step 11: Make a back wall for the new battery compartment. I'd suggest using a plastic of some description or plywood. I wouldn't use cardboard - it needs to be reasonably weatherproof for splashes from the back wheel. This back wall isn't structural - it just stops crap from rolling back into the battery compartment (and if it's metal crap then you definitely need to keep it away from those batteries - right?)
All done. OK, so none of this was rocket science but it does give you more usable space - enough for a small bag of groceries.
Constructive criticism welcome.
Next Up
1) reinstalling my PowerCheqs with the new battery layout (plus I made a real hash of my first attempt at installing these)
2) installing my PakTrakr
3) installing a couple of 12V power sockets
4) installing my XM receiver and speakers for some much needed tunes (so I'll have XM on my XM!)
- jdh2550_1's blog
- Log in or register to post comments

Who's online
There are currently 0 users online.
Who's new
- eric01
- Norberto
- sarim
- Edd
- OlaOst
Support V is for Voltage
