
A Collaborative Handbook to collect, discuss and organise repair and service information for the Vectrix VX1.
This is a work in progress, potentially full of errors and wrong advice of all kinds.
Use it at your own risk!
Never attempt any repairs or modifications if you are not competent and qualified to do so.
Get someone who is suitably qualified to check the information first, and then let them do the required work for you instead.
Everyone is welcome to contribute, which is good on the one hand, but it also means that the content of the Collaborative Handbook is not quality controlled.


I think I found a way of making the handbook easier to find!
It is now located in the drop down menu under Handbooks >> Electric Scooters >> Over 1500W.
But it also appears in the "Recent Vectrix" list.
So now it will be easier to alert Vectrix readers of an update to the handbook by just "bumping" this thread!
I hope it works....
This information may be used entirely at your own risk.
There is always a way if there is no other way!
http://visforvoltage.org/book/ev-collaborative-hand-books/6747
This information may be used entirely at your own risk.
There is always a way if there is no other way!
Vectux now running on veggie oil!
This information may be used entirely at your own risk.
There is always a way if there is no other way!
Not sure if this will be useful for anything, but here are some logged CANBUS data:
http://visforvoltage.org/book/ev-collaborative-hand-books/6796#comment-39164
This information may be used entirely at your own risk.
There is always a way if there is no other way!
Lots of HELP needed to decipher the CANBus.....
http://visforvoltage.org/book/ev-collaborative-hand-books/6916
This information may be used entirely at your own risk.
There is always a way if there is no other way!
Hi Mik, could yo insert this as "Linklist battery-manufacturers" List of battery-manufacturers
greetings Mike
On the CANBUS Logging page I have added a link to the website of an Australian vendor where the PCAN USB adapter can be bought:
http://visforvoltage.org/book/ev-collaborative-hand-books/6916
This information may be used entirely at your own risk.
There is always a way if there is no other way!
More CANBUS logging results posted there: http://visforvoltage.org/book/ev-collaborative-hand-books/6916#comment-39956
This information may be used entirely at your own risk.
There is always a way if there is no other way!
HID light addition: http://visforvoltage.org/book/ev-collaborative-hand-books/7043
This information may be used entirely at your own risk.
There is always a way if there is no other way!
Description of CANBUS ID00FEF105 : Speed, Voltage, current draw: http://visforvoltage.org/book/ev-collaborative-hand-books/6916#comment-40025
This information may be used entirely at your own risk.
There is always a way if there is no other way!
A re-write of the ABCool device for the Handbook:
http://visforvoltage.org/book/ev-collaborative-hand-books/7054
This information may be used entirely at your own risk.
There is always a way if there is no other way!
http://visforvoltage.org/book/ev-collaborative-hand-books/7089
This information may be used entirely at your own risk.
There is always a way if there is no other way!
Some insights from a "secret source":
http://visforvoltage.org/book/ev-collaborative-hand-books/7216
Several pages rearranged into a new chapter: Vectrix VX-1 Lights - Headlights - Indicators - Taillight to enable finding stuff without developing an ulcer...: http://visforvoltage.org/book/ev-collaborative-hand-books/7217
Several smaller updates and cross-links added.
This information may be used entirely at your own risk.
There is always a way if there is no other way!
Give thanx to the secret source. It's these tech information that I really like to read and is very usefull. And I agree with him, when he says:
There is a little truth to using a high wattage headlite contributing to taillite failure. The tail/brake light consists of a string of LEDs driven by a step up DC/DC. By using a high wattage headlite the 12V will sag considerably when switched on or switched from hi to lo, lo to hi. This causes the DC/DC at the tail to try and draw more current, more than that transistor in question can handle...and poof. Even with the stock headlamp some of you may have experienced this 12V sagging affect when you turn on the scoot then immediately enable and accelerate before the headlite comes on. You may feel a little jerk in the scooter as the headlite comes on, drags down the 12V and causes a system reset.
Thank you for the explanation!
I'll try to transplant the discussion to the more appropriate place in the Handbook, so that it will be easier to find: http://visforvoltage.org/book/ev-collaborative-hand-books/7216#comment-41257
This information may be used entirely at your own risk.
There is always a way if there is no other way!
Shouldnt we add the "Gauge calibration" instructions by X Vectrix, to the Handbook? Its very usefull:
The calibration routine consists of two parts that must both be done to correctly calibrate the fuel gauge and charger. If the sequence is done incorrectly the first time you will have to perform the same routine multiple times to get it right. This is what happens: When the new code is loaded, the battery capacity and fuel gauge are set to a default capacity of 30 Ahrs. To begin the calibration you must discharge the scoot till the battery icon comes on (flag 1). It doesnt matter what the state of charge is before you do this, as long as the icon comes on. This discharge lets the charger routine get a fix on a known state of charge (ie. discharged, not deeply discharged). Then on the next charge the battery will charge as if it is 30 Ahrs (plus a little). You must allow the charge to complete (flag 2). On the next discharge (assuming flags 1 and 2 are set) the SW will measure the output of the battery if you discharge it till the icon appears (flag 3). This new capacity replaces the default 30Ahrs and is used to scale the gauge and to limit the subsequent charges.
What can go wrong? If you do your initial discharge, then charge, then wait too long before the next discharge (battery self discharges) you will get a too low of capacity on the discharge. Subsequent charges will not fully charge the batteries. If you get to flag 2 then do a bunch of shallow discharges/charges you will not get an accurate measurement at the next flag 3.
So, what do you do if it hasnt been done correctly? Do it again several times in a row. The capacity is averaged each time flag 2 is followed by flag 3. (flag 2 is reset whenever you plug in the charger). By doing several of these in a row you can quickly get to the actual capacity.
The battery does not require a deep discharge for the icon to appear. In fact you may still get several miles of good performance after the icon appears. The icon is programmed to come on when the battery can no longer supply 7KW w/o falling below a certain voltage. This is WAY different then on the old SW.
Things you might see on the dash occassionally when the battery and gauge are out of sync: If the battery level is higher than that indicated on the gauge, when the gauge reaches a little more than one bar it will stall until the icon appears (indicating the battery has caught up..or caught down) then it will decrease as usual. If the battery level is lower than that indicated by the gauge and the icon appears, the gauge will begin decreasing at a higher rate depending on how far off it is. If you cycle the power the gauge will clear.
OK I think this is long enough..
link : http://visforvoltage.org/forum/7247-sudden-drop-range
Rady
A search for Vectrix repair manual still does not come up with much that is useful!
Although the Collaborative Handbook is not a Vectrix repair manual, or a Vectrix shop manual, or a Vectrix Repair Handbook, or a Vectrix workshop manual, it is still likely to be of interest for people searching the internet for these key words.
Which other keywords could one use to find out more about how to repair a Vectrix?
Vectrix servicing instructions?
How to care for a Vectrix?
Any more ideas how to help Vectrix owners to find relevant Vectrix repair information?
This information may be used entirely at your own risk.
There is always a way if there is no other way!
Vectrix maintenance?
Le site des utilisateurs français (The French user's website) http://www.vectrix.fr/
that would be quite interesting, as i'm not entirely sure what needs to be done. I just know it's every 6 months.
I recently cut my hand while closing the trunk on the Vectrix. Upon closer inspection of the support spring I discovered that there were sharp pieces of metallic "threads" sticking out between the coils of the spring. I removed the spring assembly and found that one of the two steel cables that are threaded through the inside of the spring had broken. The end had frayed and was sticking out through the spring.
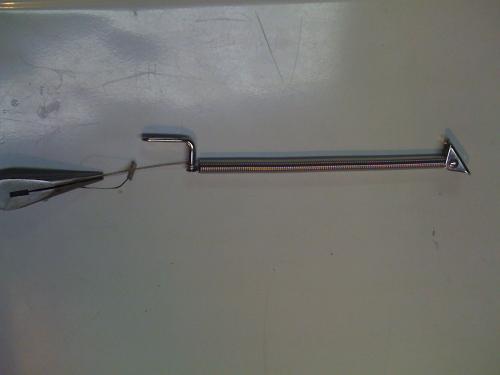
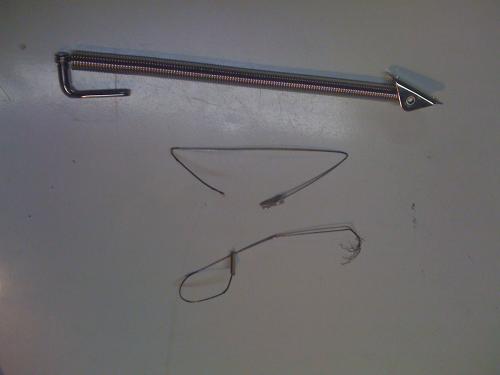
I removed the steel cables and replaced the spring assembly. The spring still appears to be working fine - I'm not sure what the steel cables were for.
Maybe a safety issue?? if one was to ride with the seat open,
but I took it out a year ago and often ride with it open,
and able to carry bigger objects
To: The GateMaster (or whatever you are properly called)...
Any chance of putting instructions on how to download the Vectrix workshop manual found here (under Member Reources) ... http://websd-vectrixscenecom.webs.com on the main Collaborative Handbook page?
Regards, MW.
Regards, Martin Winlow
Isle of Colonsay, Scotland
evalbum.com/2092
Wow! That worked great! It has always made me angry as I have two of these bike and neither have been able to stand the seat on that spring, but I never investigated what was going on. It took some fooling to get the metal bars (end pieces) out of the springs, but simply pulling the wire thru the bent spring allowed me to pull the bars out. First time I have been able to leave the seat up in all the time I have had this bike.
______________________
I also own a 2018 Tesla Model 3 and a 2012 Mitsubishi iMiev