MOTORCYCLE

Cafe Racer/Tracker build in New Zealand

After years of looking at motorbikes, riding some, dreaming about owning or buiding one, I have finally settled on building a cafe racer/tracker style electric motorcycle. I've just bought a 1986 Honda CBX250 rolling frame and am currently investigating all electric components.

I've looked into Lithium Ion batteries from a company called LifeBatt but the costs are high. The batteries are roughly $2000 NZ (US$1400) each and apparently also require a battery protection module (NZ$1000). They've also quoted NZ$2000 for a compatible charger. For my total budget of $5000 this is waay to expensive, so I think I'll have to go for deep cycle lead acid batteries. I'll keep investigating Lithium Ion possibilities but at the moment Lead is winning.

I've found a good site at EVAmerica for pretty much all the components required and even though frieght will cost almost NZ$1000 after tax it's still the best option.

Any help or suggestions are welcomed.

*complete.jpg

*frame.jpg

Electro-saki

Just a couple of corrections I needed to add:
The controller I bought is (not Kelly) Curtis PMC model 1204-412SU RATED at 48volts, 300 amps.
I think this is a good match with the GE brushed, motor.

AND I'd forgotten that this version of the KZ400 (1978) had a 6 speed gearbox. I just bought two new sprockets for the final drive; reduced the rear from 45 teeth to 43 so I'm thinking I can get up to highway speeds well enough.

Would still like to hear from anyone who can offer a suggestion for the gear ratio I might try at the DC motor - crankshaft.
-Jeff

racermike39's picture

HONDA CBR 600 F3 CONVERSION.....A LITTLE MORE PROGRESS

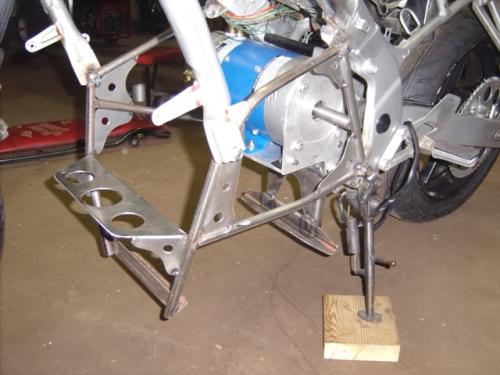
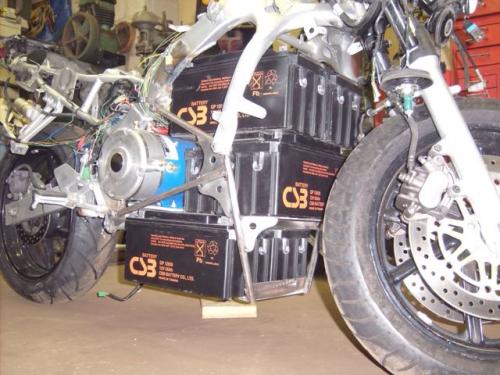
Well it's been about 3 weeks, and I haven't touched the bike for about 2 of the three. I finally had to stop neglecting all the other things I should be doing, so the bike has been back burnered for a while. I have completed the fabrication of the battery rack. Final welding still needs to be done.
batt_rack-mt.jpg
batt_rack_front.jpg
I have located most of the components and completed the preliminary wiring. I still need to wire the battery charging circuit and the PakTracr needs to be wired.
comp_loc.jpg
If you look close, you can see the fuse holder, contactor and controller. I have left the option open to run the 7th battery under the tank. This will be a plug and play additional battery. Two connectors will plug in to the main battery string and charging circuit. For now, the 7th battery will not be tied into the Pak Trakr.
The DC-DC converter is in the factory battery location, under this aluminum plate
DC_DC.jpg
Here is the throttle and the other side otf the 7th battery.
throttle.jpg
All this stuff still fits inside the bodywork pretty well.
right_bw.jpg
Next I need to double check the primary wiring, and do a power up and test. Then I will finish integrating the factory bike wiring to the controls and such. I will also be adding some HDPE sheet between all the batterys and mounting points as taught by "fire is BAD". Thanks for sharing that one!
I hope to power it up this weekend. I hope I can get the wiring correct, and the controller to respond properly. This is my greatest weakness. My confidence is low, as well as my skill level in this area.
Andrew, Frodus & JDH!!! Where are you all at now?????
Fill us in!!

racermike39's picture

HONDA CBR 600 F3 CONVERSION

Well this is my third EV project. I was so encouraged by the results of the Kawasaki 4-wheeler conversion, that I knew a daily driven street vehicle was within reach. I sold my ICE race car last fall, and decided to devote the $ to an electrtic vehicle. I calculated and researched cars, and decided that a car at this time was not within reach financially. With permission from my wife, I decided on an electric motorcycle. I researched this forum, the Austin EV website and many other links to nail down the voltage, frame and bike size. I was inspired by many, mostly by JDH2550's CB750 conversion. The information and links from his blog were most helpful.
I started looking at sport bike frames in the 600-750 range. My goal was to purchase a bike that had disk brakes, good aerodynamics, and stout enough to handle the weight and have room enough for a 84-96 volt pack. My first searches were for a cheap donor. What that led to was long drives to look at junk. I later upped my threshold of spending on a donor. In the end, I wanted a bike that looked good, was reliable, good part availability, supported well by the aftermarket such that when it was completed, it would represent a well designed and performing EV. I want to build a bike that could be sold for reasonable money, to possibly finance another EV, and sell it with confidence that it was with good quality, matched components.

Here are the goals.
96 Volt
26 mile commute with 8 miles highway, and 18 miles 30-45 MPH secondary roads. Charge at work.
50 mile range at approx 45 MPH.
70 MPH capable.
Rides to the beach with my wife. 30 mile round trip.

The donor search ended with the aquisition of a 1997 Honda CBR 600 F3. A very good running clean bike, only needing front fork seals, chain and rear tire. We found it on Craig's List. This is the night we brought it home.
cbr02WEB.jpg
We have removed the ICE, and work began to try and fit 8 UB12550 55AH batteries in this frame.
TEAR_DOWN1.jpg
TEAR_DOWN2.jpg
I was conviced I could model the bike in my CAD system (SolidWorks)and determine where all the batteries would/could go. What I quickly learned was they wouldn't fit. I did not want to eliminate or modify the factory body work such that it was obviously electric. I was also trying to maintain the aerodynamics. The SolidWorks model proved that it would not work. Also I was loosing patience measuring and modeling. Here is the SolidWorks model I used:
SOLIDWORKS_MC_FRAME.jpg
This is the configuration I will use. However, I did not arrive at this configuration as a result of the CAD model. I had to do the battery oragami as did JDH25550 did on his CB750.
As much as I tried to avoid this excersize, it was the only way to be sure it would work.
BATTERY_FOLDING.jpg
This confirmed what the CAD model was telling me. I realized I would have to modify the lower fairings to get all the batteries in. I found that the lower fairing needed to be widened 4-1/2" to allow the space to be filled with batteries.
SPREAD_FAIRING.jpg
From the side and even the front, the fairing did not look rediculous. This allowed the batteries to be positioned such that 8 (96V) would work. Up to this ponit, 72 Volts looked to be all this frame would handle.
96_V_-1.jpg
Here is a shot with the tank in place. The tank has not been cut out yet, so I will have additional room for the controller, contactor and DC-DC converter.
96V-2.jpg
The only modification so far was spreading the fairing, and trimming out a protrution that in the fairing that was costing about 2" of battery room.
FAIRING_MOD2.jpg

Next I was able to use the factory manual to get rid of the engine management computer and wiring. I also mapped out the wiring for using the key switch to activate the DC-DC converter, and the run/stop switch to activate the contactor. I think I stole those ideas from andrew on this forum.
The next step is to get the motor here and get it mounted. I will keep you posted as things develop.
Thanks again for all your help!

Syndicate content

Who's online

There are currently 3 users and 329 guests online.

Web-wide Electric Vehicle Search