Those grey connectors look huge! Mind getting a pic with something in it for comparison (coke can, your hand, pencil, etc.)?
The author of this post isn't responsible for any injury, disability or dismemberment, death, financial loss, illness, addiction, hereditary disease, or any other undesirable consequence or general misfortune resulting from use of the "information" contai
Finally finished the bike for the 2nd time a couple days ago. I'll put some comments in the next reply. The following changes were done:
-Implemented this parallel charging scheme
-Switched controllers, removed the curtis and finally put the Logisystems in!
-Removed the circuit breaker. Now the clutch cable activates a switch that de-energizes the Albright SW200 contactor
-Rewired the system some to accommodate the Logisystems controller, and other changes
-Changed drive sprocket to high-quality Martin 13T with slightly wider teeth
-Did running alignment of motors. This smoothed them out a lot by using motor vibration feedback
-Polished the controller, as well as controller aluminum mounting plate, and motor mounting plates to improve the look some
-Painted most of the fiberglass battery supports
Here's a wiring diagram. It was very helpful to draw something up quick and figure it out on paper before doing the rewiring.
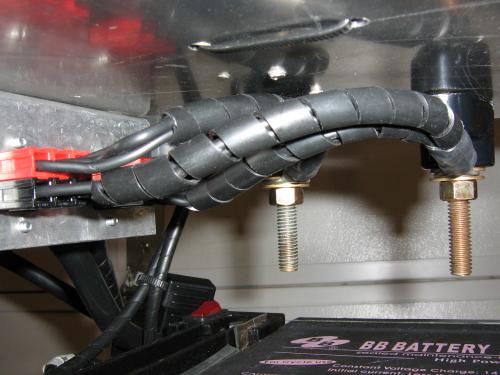
Here are the connectors to wire the batteries in parallel, with the terminal standoffs that I can bolt or clamp to, to get 12v power for anything.
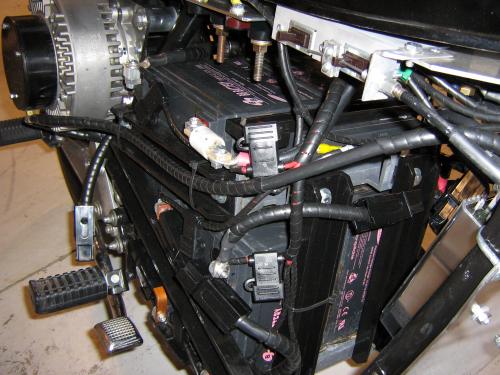
Here's the left side, showing the large Anderson PP-180s and copper buss bars that I had to make. Also shown are the fuses to each battery terminal. Finally, note the new controller.
(click for larger view, 2.2 mb size)
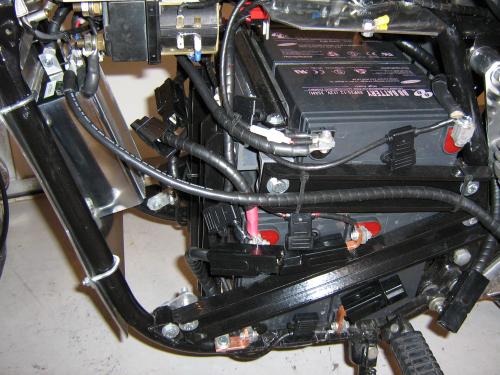
And, the right side. Note there's two switches for power on now (one for clutch cable disconnect, and a power on switch).
(Click for larger view, 2.17 mb)
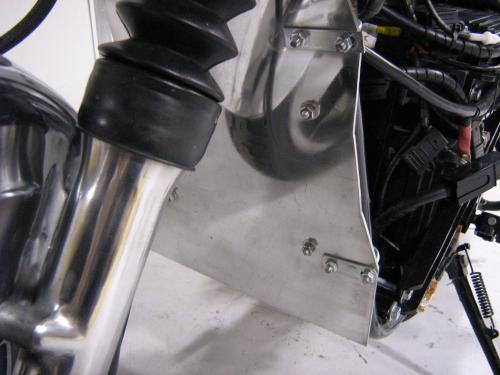
And, here's showing my mad polishing skills.
[url=/forum-topic/motorcycles-and-large-scooters/587-my-kz750-electric-motorcycle-project]KZ750 Motorcycle Conversion[/url]
[url=/forum-topic/motorcycles-and-large-scooters/588-fixing-my-chinese-scooter]900 watt scooter[/url]
Pic from http://www.electri
A few general comments followed by my take on the series/parallel switching below:
The bike is amazing to ride now! I haven't timed the acceleration but I think it's a bit better. This controller has such a smooth response, and is not getting very warm, even at very high amps. The old curtis didn't have as smooth a throttle response and also had a lower ramp rate. The new controller has a ramp of about 2 seconds to full on, which is good for safety. I really like the new controller. I can control the power much more precisely now. I can get just a few extra amps, or a few less amps if need be. I can keep the bike at low amps very easily now if the batteries are about done for. With the old curtis the power would jump if I moved the throttle just a little. And for $420! Amazing deal on this controller. The only down side is that there are no adjustments, so it better work out of the box.
The 13T drive sprocket puts the top speed up to about 65 mph, and I think the motors operate at a slightly more efficient part of their curve at most speeds now. With the running alignment done, they run smoother too. The small decrease in reduction would theoretically lower the max torque at the wheel, but I don't notice any reduction in acceleration. At 200 amps, it'll still accelerate very quickly. At 500-600 amps I am going 30 mph before I know what happened. The 0-15 mph acceleration may have taken a slight hit, but the 15-top speed acceleration has probably improved.
Series Parallel Switching
This was very time consuming to set up, and the cost of all of the connectors and fuses/holders really added up. I think I spent over $250. It is also very cumbersome to deal with the connectors after every ride for charging. Finally, a large block of even the small anderson PP30s are hard to insert. That's why I had to break my paralleling connector into two separate ones. I don't recommend doing this for a high-power system. With a lower powered system like a light scooter or ebike it would be a better option, and can be done in a simplified form like here.
That being said, it is nice to have it done. I had to charge from a car alternator the other day because I ran out of charge. It was really nice to have that option. I can charge really slowly from one B&D 10 amp charger to go easy on the batteries if I've hit them really hard and got them hot. Also, I can power a 12v inverter in the case of a power outage. And if my charger goes bad, no big deal. I have plenty of spares. I don't even need to keep a charger on the bike because I can just keep a charger at work and home, and if I need an emergency charge, then I can charge quickly from any car alternator. I'm also thinking of building a small LiFePo4 pack of 40ah 3.2v cells and a few 12v input and ~15v output DC-DC converters as an emergency range extender. It'll be a great way to test them. Just 4 of them at a cost of $400 could get me about 4 miles.
In summary, I like the advantages of doing this because I've already done it. I would not do it again, and I don't recommend doing this because of the time, expense, and hassle dealing with the connectors for charging every time. It is much better suited for a small scooter/ebike/pocket bike which not need as many and as large connectors.
[url=/forum-topic/motorcycles-and-large-scooters/587-my-kz750-electric-motorcycle-project]KZ750 Motorcycle Conversion[/url]
[url=/forum-topic/motorcycles-and-large-scooters/588-fixing-my-chinese-scooter]900 watt scooter[/url]
Pic from http://www.electri


Those grey connectors look huge! Mind getting a pic with something in it for comparison (coke can, your hand, pencil, etc.)?
The author of this post isn't responsible for any injury, disability or dismemberment, death, financial loss, illness, addiction, hereditary disease, or any other undesirable consequence or general misfortune resulting from use of the "information" contai
The gray connects are SB350, the back are PP180, and the small ones are PP30. I bought them all from power werx.
[url=/forum-topic/motorcycles-and-large-scooters/587-my-kz750-electric-motorcycle-project]KZ750 Motorcycle Conversion[/url]
[url=/forum-topic/motorcycles-and-large-scooters/588-fixing-my-chinese-scooter]900 watt scooter[/url]
Pic from http://www.electri
Finally finished the bike for the 2nd time a couple days ago. I'll put some comments in the next reply. The following changes were done:
-Implemented this parallel charging scheme
-Switched controllers, removed the curtis and finally put the Logisystems in!
-Removed the circuit breaker. Now the clutch cable activates a switch that de-energizes the Albright SW200 contactor
-Rewired the system some to accommodate the Logisystems controller, and other changes
-Changed drive sprocket to high-quality Martin 13T with slightly wider teeth
-Did running alignment of motors. This smoothed them out a lot by using motor vibration feedback
-Polished the controller, as well as controller aluminum mounting plate, and motor mounting plates to improve the look some
-Painted most of the fiberglass battery supports
Here's a wiring diagram. It was very helpful to draw something up quick and figure it out on paper before doing the rewiring.
Here are the connectors to wire the batteries in parallel, with the terminal standoffs that I can bolt or clamp to, to get 12v power for anything.
Here's the left side, showing the large Anderson PP-180s and copper buss bars that I had to make. Also shown are the fuses to each battery terminal. Finally, note the new controller.
(click for larger view, 2.2 mb size)
And, the right side. Note there's two switches for power on now (one for clutch cable disconnect, and a power on switch).
(Click for larger view, 2.17 mb)
And, here's showing my mad polishing skills.
[url=/forum-topic/motorcycles-and-large-scooters/587-my-kz750-electric-motorcycle-project]KZ750 Motorcycle Conversion[/url]
[url=/forum-topic/motorcycles-and-large-scooters/588-fixing-my-chinese-scooter]900 watt scooter[/url]
Pic from http://www.electri
A few general comments followed by my take on the series/parallel switching below:
The bike is amazing to ride now! I haven't timed the acceleration but I think it's a bit better. This controller has such a smooth response, and is not getting very warm, even at very high amps. The old curtis didn't have as smooth a throttle response and also had a lower ramp rate. The new controller has a ramp of about 2 seconds to full on, which is good for safety. I really like the new controller. I can control the power much more precisely now. I can get just a few extra amps, or a few less amps if need be. I can keep the bike at low amps very easily now if the batteries are about done for. With the old curtis the power would jump if I moved the throttle just a little. And for $420! Amazing deal on this controller. The only down side is that there are no adjustments, so it better work out of the box.
The 13T drive sprocket puts the top speed up to about 65 mph, and I think the motors operate at a slightly more efficient part of their curve at most speeds now. With the running alignment done, they run smoother too. The small decrease in reduction would theoretically lower the max torque at the wheel, but I don't notice any reduction in acceleration. At 200 amps, it'll still accelerate very quickly. At 500-600 amps I am going 30 mph before I know what happened. The 0-15 mph acceleration may have taken a slight hit, but the 15-top speed acceleration has probably improved.
Series Parallel Switching
This was very time consuming to set up, and the cost of all of the connectors and fuses/holders really added up. I think I spent over $250. It is also very cumbersome to deal with the connectors after every ride for charging. Finally, a large block of even the small anderson PP30s are hard to insert. That's why I had to break my paralleling connector into two separate ones. I don't recommend doing this for a high-power system. With a lower powered system like a light scooter or ebike it would be a better option, and can be done in a simplified form like here.
That being said, it is nice to have it done. I had to charge from a car alternator the other day because I ran out of charge. It was really nice to have that option. I can charge really slowly from one B&D 10 amp charger to go easy on the batteries if I've hit them really hard and got them hot. Also, I can power a 12v inverter in the case of a power outage. And if my charger goes bad, no big deal. I have plenty of spares. I don't even need to keep a charger on the bike because I can just keep a charger at work and home, and if I need an emergency charge, then I can charge quickly from any car alternator. I'm also thinking of building a small LiFePo4 pack of 40ah 3.2v cells and a few 12v input and ~15v output DC-DC converters as an emergency range extender. It'll be a great way to test them. Just 4 of them at a cost of $400 could get me about 4 miles.
In summary, I like the advantages of doing this because I've already done it. I would not do it again, and I don't recommend doing this because of the time, expense, and hassle dealing with the connectors for charging every time. It is much better suited for a small scooter/ebike/pocket bike which not need as many and as large connectors.
[url=/forum-topic/motorcycles-and-large-scooters/587-my-kz750-electric-motorcycle-project]KZ750 Motorcycle Conversion[/url]
[url=/forum-topic/motorcycles-and-large-scooters/588-fixing-my-chinese-scooter]900 watt scooter[/url]
Pic from http://www.electri
Pages