I am in the process of wiring up a brushless Etek to a Sevcon Millipak for my electric mountainbike conversion. What guage of welding cable would you guys recommend? I was looking at the stuff from electricvehiclesusa.com. I will be running 100 amps continuous and up to 250 amps for a 30 second burst. The batteries I am using are three B&B HR22's, for a 36V system. Thanks!
Who's online
There are currently 0 users online.
Who's new
- eric01
- Norberto
- sarim
- Edd
- OlaOst


Awhile back I'd done some yahoogling for normal recommendations and there are charts out there saying that for a 100A current you need 00 welding cable (I think). However it seems those recommendations are for days-on-end "continuous" and somehow that doesn't apply to an EV.
On my Lectra I'm using 4 gauge wire and run current like what you say. This works fine. I'm using a different motor and controller however I think that those aren't important and what's important is that a given wattage corresponds to a given wire thickness.
- David Herron, The Long Tail Pipe, davidherron.com, 7gen.com, What is Reiki
4 AWG should be fine. My question is, how are you possibly going to draw 250 amps at 36v on a bicycle for 30 seconds? Are you gearing it for over 60 mph?
[url=/forum-topic/motorcycles-and-large-scooters/587-my-kz750-electric-motorcycle-project]KZ750 Motorcycle Conversion[/url]
[url=/forum-topic/motorcycles-and-large-scooters/588-fixing-my-chinese-scooter]900 watt scooter[/url]
Pic from http://www.electri
Yee hah! 250Amp * 36V = 9 kW = 12 HP. On a mountain bike?
You might want to see the thread where folks are defining how fast is too fast. Oh, and I recommend you take out a good life insurance policy as well...
;-)
John H. Founder of Current Motor Company - opinions on this site belong to me; not to my employer
Remember: " 'lectric for local. diesel for distance" - JTH, Amp Bros || "No Gas.
I didn't catch that mountainbike part. That's crazy! Seriously, we're having to start modding parts once we hit about 5kW peak. There's a YouTube video of a guy who did something like that. They were having problems with the chain snapping.
The author of this post isn't responsible for any injury, disability or dismemberment, death, financial loss, illness, addiction, hereditary disease, or any other undesirable consequence or general misfortune resulting from use of the "information" contai
eep! mountain bike? ohmygosh. This is the "Motorcycles" section, not "bicycles".
- David Herron, The Long Tail Pipe, davidherron.com, 7gen.com, What is Reiki
Whilst we are at it:
Is there a 200W rated bicycle motor that can produce a lot more power than that?
I'm thinking about having the option to use several battery packs in parallel for range on the road (200W legal limit in Oz) and switch them to series once on private land.
If using a good quality mountain bike with disk brakes it should be reasonably safe....
Mr. Mik
This information may be used entirely at your own risk.
There is always a way if there is no other way!
Tommy, you go, dude! However, you need to go to http://www.electricrider.com/custom/index.htm and look at the Insane-A-Cycle videos. The Insane-A-Cycle is/was powered by a (brushed) Etek, and you need to consider gearing and robustness when you build your bike. Otherwise, the dropouts become ripped-out, if you get my drift. An Etek / Mars motor has a ton of go, so make sure you also mount sturdy 200mm discs on your bike, so you can stop, too.
Willie
Wow I didn't expect this much of a response! 4 guage welding cable it is then! I thought my bike was going to be the first build of its kind, but it's pretty cool to see the insane-a-cycle and know that it can be done. That is one awesome bike, I would like to get some more information on the build specs (especially how he mounted his rear sprocket).
The bike I am starting with is a 1998 20" Cro-moly Steel Trek Antelope 830. I will be fitting 8" Avid BB7 mechanical disc brakes up front, and sticking with the rim brake in the back, as most of my stopping power will come from the front, and the rear disc mount will be used to mount the sprocket. I think this brake setup will be plenty powerful as the bike will weigh 270lbs with me on it.
The bike will be geared for a top speed of around 45mph, I want it to have plenty of torque since it will be used in the mountains of Boone, NC.
As far as snapping parts goes, I plan on gusseting the rear dropouts to keep them from snapping. The rest of the frame is plenty sturdy since it is a hearty cromoly mountain bike. I am primarily concerned with the rear sprocket setup. I am not worried about the hub grenading, since it is a solid chunk of aluminum, and the power won't be transferred through the hub pawls, but straight through the hub body. I am mainly concerned with the 6 small bolts that hold the sprocket to the hub. I am afraid they might shear under full load, but I think as long as I can find a quality set of grade 8 bolts, I will be good to go. I am also concerned with the integrity of the spokes and nipples, but I will stick with the original spokes and rims until I see any hints of problems. Do you guys think I will need more than a #35 chain?
While the threat of a serious crash is there, I think as long as I am sensible and I build it right, I should have no more worries than any other pedaler or motorcyclist. I have been riding mountain bikes and dirtbikes for the last 10 years, so I guess I have that going for me. :D
I will get some pictures of the project up as soon as I can. The motor, controller, line contactor, and tensioning mount is supposed to arrive on Thursday, so I will start mocking it up then. Thanks for the encouragement Willie!
-Tommy
Bringing High-Performance Electric Trikes to the People!!
www.FFRtrikes.com
If you have access to Solidworks CAD software, I can provide you (for your own personal use only) with exact dimensional models of the Mars brushless motor, Thundersky 90AH batteries, and even front and rear bicycle wheels. Recently, I discovered that they make 165mm-wide rear MTB hubs with a disc mount, which is perfect for a hybird: normal derailleur drive on the right and a motor drive (and even disc) on the left.
I've been designing something vaguely similar (a trike) for some time now.
Willie
Tommy:
You are doing the same thing that I am, namely using the ISO 6-bolt disc bolts to hold on a sprocket. That is 44mm circle of M5 bolts, each of which is about 75% the area of a 1/4" bolt. A grade 8 1/4" bolt has a tensile strength of about 5000 lbs, so the tensile strength of the M8 bolt should be ~3750 lbs. A common rule-of-thumb is to rate the shear strength of a bolt at 60% of the tensile strength, so each M5 bolt should be good for about 2250 lbs in shear. The Mars brushless can output 200 in-lbs of torque max, and say you are geared 4:1 with a 2" driver sprocket and an 8" driven sprocket, you arrive at (roughly) 800 lbs of shear at the 44mm bolt circle. The 6 M5 bolts would yield at 6 x 2250, or about 13,500 pounds, so the bolts will hold. Will the hub? The spokes? This is left as a exercise for the student. MechE 101 is over for the day ;-)
I would recommend at least 13ga spokes and 3 cross lacing, though. 12ga spokes are available (but would probably require your hub to be drilled) and 4 cross lacing is even stronger in torque. Keep an eye out for loose spokes, since that would indicate a nipple that has stripped.
Let me know how it works!
Willie
PS - I'll also be interested in how you mount the motor!
Tommy - keep us posted - I'd love to see your finished product. I'd even like to ride it. It sounds like a hoot. Ignore us folks in the peanut galleries!
John H. Founder of Current Motor Company - opinions on this site belong to me; not to my employer
Remember: " 'lectric for local. diesel for distance" - JTH, Amp Bros || "No Gas.
I know people have seen this bike, and it is basically an etek powered 20 inch wheeled downhill mountain bike without pedals.
http://www.thunderstruck-ev.com/jackal_base.htm
I'd be concerned about the 26 inch mountain bike wheels. They built the jackal with motorcycle grade 20 inch wheels as the smaller wheels are stronger.
I like the idea, but wonder if a free-ride or downhill bike might be a better choice to convert. That Trek bike, does it have any suspension? None on the rear, right? Hitting a bump hard with the rear tire at 45 MPH with no suspension could get interesting.
I've got a lookup table, and for 20% duty cycle, you can do 280A on 6Ga and 358A on 4Ga. If you go 30% it drops to 228A and 292A respectively. At 60% it moves to 161A and 207A. 100% is 125A and 160A.
Go here:
http://www.cableyard.com/catalog/images/radaflex.pdf
Its page 4. Its roughly what you're going to get with copper cable.
____________
Travis Gintz
1986 Honda VFR Conversion
www.evfr.net
It's also helpful to calculate the power loss due to resistance to help make a decision, and give an idea how much the wire is going to heat up.
6 AWG: .0003951 ohms/foot * [wire length, 10 ft guess] * [current=250] * [current=250] = 247 watts at 250 amps, and 39.5 watts at 100 amps.
4 AWG: .0002485 ohms/foot * 10 * 250 * 250 = 155 watts power loss at 250 amps. ~25 watts at 100 amps.
2 AWG: .0001563 ohms/foot = 62.8% power loss of 4 AWG or 97.5 watts at 250 amps, and 15.6 watts at 100 amps
1 AWG: .0001239 ohms/foot = 77.3 watts power loss at 250 amps, 12.5 watts at 100 amps.
So you can kind of see that the advantage of going to larger and larger wire size gets smaller for a given amount of current flow in terms of power loss and heating. And, wire can really handle a lot, it'll just heat up, and waste some power. I bet even 8 AWG would work fine in your application, it would just heat up some and waste power. Take my motorcycle:
2 AWG .0001562 ohms/foot * 18 feet * 600 * 600 = 1021 watts loss at 600 amps, or 56 watts/foot. It gets nice and warm, but it does the trick. If I went to 1 AWG this would be 810 watts at 600 amps, and or 45 watts/foot, and 0 AWG would be .0000983 ohms/foot or 643 watts at 600 amps, and 35.7 watts/foot.
Not worth it for me to go to the larger wire size at 600 amps. On the other hand at 1100 amps these figures go to:
2 AWG: 189 watt/foot or 3402 watts
1 AWG: 149.9 w/ft or 2698 watts
0 AWG: 118.9 w/foot or 2141 watts
I think it'll get pretty hot, but maybe it won't melt. We'll see. I'll need to upgrade the batteries before that'll happen, as the B&B's would melt at 1100 amps.
Sorry for the rant, just my 2 cents on wire sizing.
[url=/forum-topic/motorcycles-and-large-scooters/587-my-kz750-electric-motorcycle-project]KZ750 Motorcycle Conversion[/url]
[url=/forum-topic/motorcycles-and-large-scooters/588-fixing-my-chinese-scooter]900 watt scooter[/url]
Pic from http://www.electri
Willie- I'd love to get everything laid out on solidworks, but I don't have the software, and I have a mac, not a PC, so no such luck. Yesterday I went ahead and mocked up all the components the placement using cardboard, and everything worked out pretty well.
The bike is a hardtail, but I'm using a quality 100mm fork up front. I would like to convert a downhill frame, but there are a few downfalls: 1. cost 2. Lack of battery space in the frame 3. Aluminum tubing that I am not capable of welding. I will probably run the rear tire at a slightly lower psi than normal in order to keep the bumps to a minimum.
Today I made a relatively major change in plans as far as the drivetrain goes, I decided to use a centerlock type downhill hub for the rear instead of a traditional disc hub. I just cannot find a strong enough hub for a reasonable price with the standard ISO 6 bolt pattern, so I decided to opt for the Shimano Saint Centerlock disc hub with the Sun Rhyno Lite rim. It uses a solid axle, so I don't need to worry about snapping a QR skewer at 50mph. Here is the one I bought: 2007 Shimano Saint, Sun Rhyno Lite Disc Rear Wheel M800
That Saint hub has some meat to it! The Sun Rhyno Lite rims are also nearly bulletproof, and the spokes are done in a three cross pattern.
This link shows how the disc works in a centerlock hub: http://elitecycling.biz/page.cfm?PageID=55&action=details&sku=BR8098
I plan on removing the outer stainless rotor ring and using the black center ring to bolt up to the 6 hole sprocket using Grade 8 bolts.
Here are the specs of all the componentry so far, I included the prices just in case anyone wants to do the same setup, they can know what they are getting into ahead of time.
"T-Wreck" Specs
***Anything in bold hasn't been ordered yet, so I'm open to suggestions (wrong part, cheaper price, etc.)
Tommorrow I'm picking the bike up from the bike shop where they pressed in a threadless headset so I can mount a newer fork with a threadless steer tube and international standard disc mounts. I'm also picking up a beefy Easton EA30 stem and oversize handlebar.
Thanks for all the great information on choosing cable guage! That's some good stuff. I'll try to get some pics of the cardboard mockup and the bare bike that I'm starting with online tomorrow.
Talk to you then.
-Tommy
Bringing High-Performance Electric Trikes to the People!!
www.FFRtrikes.com
I upgraded some components today:
1. Installed threadless headset
2. Rigid Cro-moly disc fork
3. Easton EA30 oversize stem and bars
Here are some pics of the bike that I am starting with:
Here is my low buck cardboard pizza box mockup (components true to actual size). The more I look at it, I think I will mount the motor right behind the seat, where the controller is mounted in the picture. I'm going to mount the onboard charger and controller on opposing sides of the rear triangle, to keep the center of gravity low and balanced.
This one really shows the nice, slim profile of the 3" wide BB batteries:
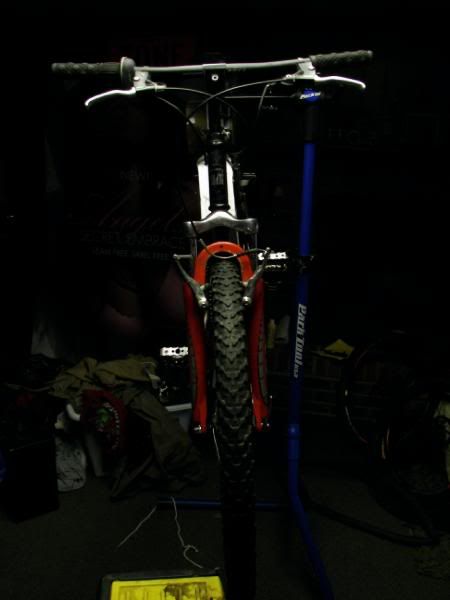
The third battery will be mounted below the bottom tube, keeping a nice and low center of gravity. Believe it or not it fits well down there!
The motor, controller, contactor, and mount are to arrive tomorrow, can't wait!
-Tommy
Bringing High-Performance Electric Trikes to the People!!
www.FFRtrikes.com
Well I recieved the motor, controller, contactor, and tensioning mount from Team Delta today. Dan at Team Delta is the man!
Does anyone know where I can get a cable actuated potentiometer that I can use for rear regen braking? I think this one would work: http://www.electricvehiclesusa.com/product_p/th-bnl-103.htm but it doesn't look like they don't sell them anymore. As far as wiring the pot for regen, could it just go where the reverse switch would normally go since I'm not using reverse?
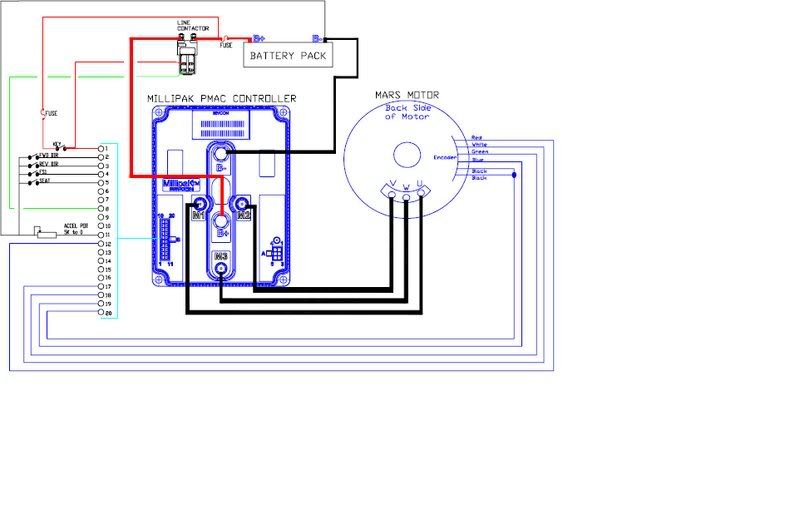
Here is the wiring diagram for the Sevcon Millipak PMAC: http://www.teamdelta.com/products/prodimages/Millipak_PMAC_Controller_Wiring.pdf
Owners manual: www.electricmotorsport.com/store/pdf-downloads/Millipak_PMAC_User_Manual_April_2006.pdf
Here of some pics of the mockup with everything but the real batteries, I'm really happy about the fairly low center of gravity and slim profile.
I hope to start gusseting the frame this weekend. Does anyone know if mild steel will weld right up to chromoly steel? Or do I need to use chromoly plate? What about stainless?
As soon as I get the batteries, I will be getting this thing bolted together.
-Tommy
Bringing High-Performance Electric Trikes to the People!!
www.FFRtrikes.com
Mods could you move this to the Bicycles and Pedalecs forum? I originally posted in here because I figured there would be more knowledge about the Etek in here, but since it has turned into more of a build thread, I think it would be more relevant in the other forum.
Thanks!
-Tommy
Bringing High-Performance Electric Trikes to the People!!
www.FFRtrikes.com
Well I have recieved basically all of my parts, now I just need to go metal shopping. I think I will just go with standard hot rolled steel. I had a slight setback with the batteries, the ones I ordered from batteryspace.com that appeared to be BB batteries turned out to be some generic 20Ah Tysonic copies, so I ordered the real BB's from zbattery.com for $58 a piece and I plan on returning the tysonics, unless someone on here wants the three of them for $150 + shipping.
After I get done metal shopping today, I plan on getting my sprocket mounted up to my rear wheel. I am not going to be doing nearly as much welding on the frame as I originally intended because I've been doing a lot of research and it appears that cromoly loses a lot of its strength if it is even slightly overheated, so I don't want to take that chance. Instead, I am going to make a frame out of steel that integrates 3 battery boxes, a controller, contactor, and ANL fuse mount, then I am going to u-bolt that structure onto the triangle of the bike. We will see how it turns out.
As for the rear, I am going to build a a mount similar to those aluminum racks, except out of steel. To mount it, I plan on using the seat post bolt, v brake post mount, and axle as its mounting points, and build off of that. It should be pretty sturdy, and I'll probably run an arm off of the mount down to the chainstays to reinforce that structure. (I know a picture would be helpful.)
Here is the wiring diagram for the controller that I will soon tackle (thanks to Dan @ Team Delta for the image):
That's about all for now, I post some pics up soon.
-Tommy
Bringing High-Performance Electric Trikes to the People!!
www.FFRtrikes.com
Tommy:
Using the V-brake (I still call them cantilever) bosses for a motor mount is very resourceful. Will you be able to mount a rear disc brake?
Willie
Thanks, I will not be able to mount a rear disc brake because that's where the sprocket is mounted, which I got bolted up yesterday. I'm really happy with how the motor sprocket set up on the centerlock disc mount. I am still going to use the rear cantilever bosses for v brakes, and for the mount as well, there is room on the stud. I figure with 203 mm discs up front, I won't need too much in the rear.
I'm heading to the shop tomorrow to start welding up the bracket and battery boxes, I'll let you all know how it goes. I talked to Dan from Team delta yesterday and he informed me that the fuses in the system can be eliminated, as the ANL fuse between the battery and the contactor will only serve to protect that short run of cable, and do nothing to protect the controller or motor. So that's $30 I could have saved on skipping the fuse and holder, oh well.
Sorry I didn't get those closeup motor shots to you yet Willie, I don't own a digital camera, so I have to borrow my friend's camera when I want to take some shots. Whenever I take the next set of pics for the bike, I will get those shots your way.
Till then, keep zinging
-Tommy
Bringing High-Performance Electric Trikes to the People!!
www.FFRtrikes.com
Mods: Would you mind changing the title to: "Etek-powered mountain bike buildup" since this is changing into a build thread.
The motor is mounted. Now on to mounting the batteries, I will try to get some pics of the mount tonight.
-Tommy
Bringing High-Performance Electric Trikes to the People!!
www.FFRtrikes.com
Tommy, it's our policy generally to not change titles because this can be confusing to readers. Also, the initial focus of the thread is geared toward the original title, so this will not make much sense for new readers.
It is perfectly ok to make another thread, and repost whatever you want from this thread. Also, it might help to put a link to this thread in.
[url=/forum-topic/motorcycles-and-large-scooters/587-my-kz750-electric-motorcycle-project]KZ750 Motorcycle Conversion[/url]
[url=/forum-topic/motorcycles-and-large-scooters/588-fixing-my-chinese-scooter]900 watt scooter[/url]
Pic from http://www.electri
Alright, no problem.
Well here are some new pics of the progress:
First off, a full shot of the bike as it sits now. Beefy Maxxis Hookworm tires mounted, rear sprocket made and mounted, 203mm front brakes, rear rack made and mounted, motor mount done.

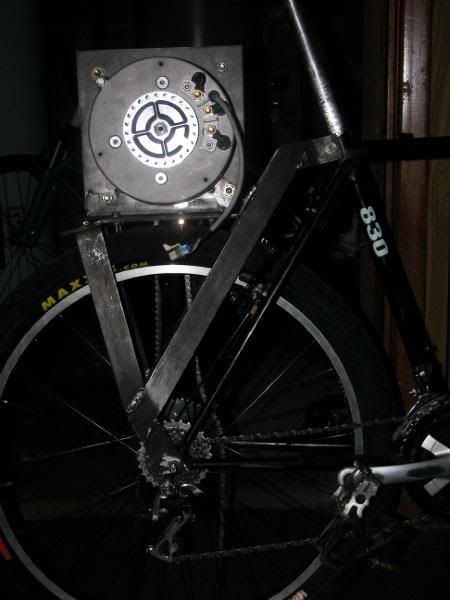
Here is a close up shot of the motor mount and rack, the chain is close but it clears!
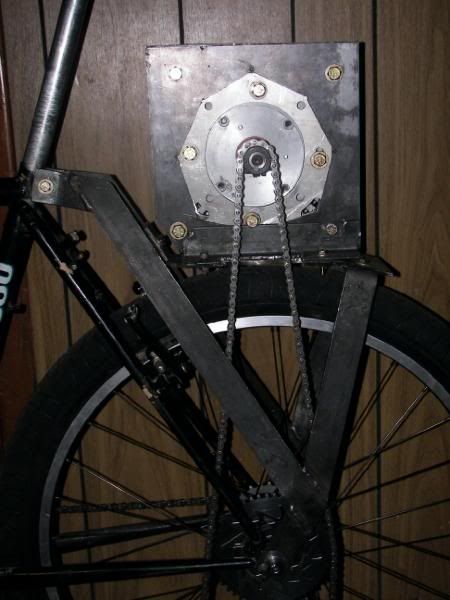
Here is the rear shot of the motor, all bolted up. It turns out to line up with the sprocket, the motor needs to be offset to the right a good bit. I will make up for the weight imbalance with an onboard charger on the left side.
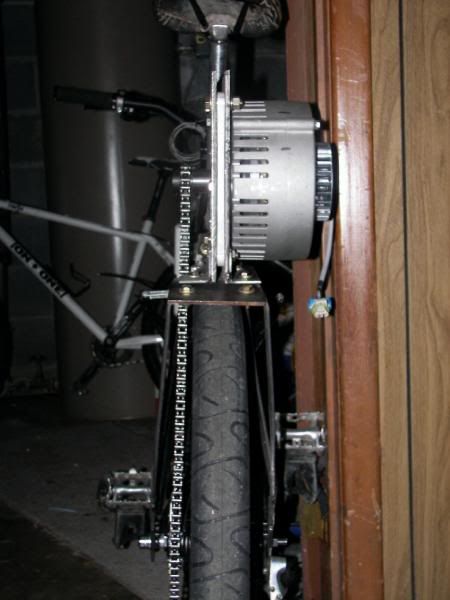
Here is the shot of the back side of the motor, I am thinking about drilling some holes in the rear rack to shed some pounds. The steel is thick and heavy! Does anyone know anything about welding mild steel braces on chromoly frames?
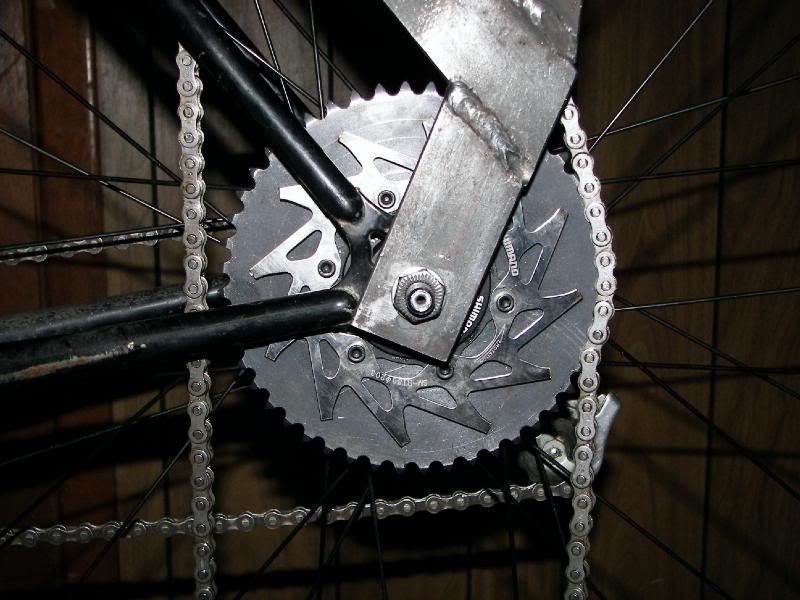
Here is a close up shot of the sprocket, I'm really happy with how it turned out. It is a 48T that has been bored out in the center to fit over the centerlock hub, drilled for 6 bolt holes, then I used the center aluminum piece off a shimano centerlock rotor to essentially make the sprocket bolt right in place to where the disc used to be. I used what was left of the rotor as a big washer. I am happy with how it turned out, getting the bolt holes true was a challenge.
The rear motor mount system is a little rough right now, so I plan on cleaning it up, then I will move on to the battery boxes and controller bracket up front.
That's all for now
-Tommy
Bringing High-Performance Electric Trikes to the People!!
www.FFRtrikes.com
Willie,
Did I get the pics you need of the motor? Let me know if you need a closer shot or different angle.
-Tommy
Bringing High-Performance Electric Trikes to the People!!
www.FFRtrikes.com
Tommy:
One of your shots above gets me exactly the info I was looking for (the stator fixing bolt locations on the fan side of the Mars brushless). Thanks. Good work. I look forward to the results of all your hard work.
Willie
Nice work, but are you sure about that chain? I mean, that's a beast of a motor you've got there. I'm not sure a bike chain could take it. Might have breakage problems.
The author of this post isn't responsible for any injury, disability or dismemberment, death, financial loss, illness, addiction, hereditary disease, or any other undesirable consequence or general misfortune resulting from use of the "information" contai
Glad to help you out Willie. The pics must be decieving, it's actually a #35 chain so it should be good to go. I ran into a pretty big stumbling block today, I got the chain on, and spun the motor to find out that the sprocket must be slightly out of true, as the chain goes from very tight to loose as it spins. I will either have to find someone that can make me a custom one in a machine shop, or I will have to wait another 2 weeks to get a blank one in the mail to give it another try. Oh well.
-Tommy
Bringing High-Performance Electric Trikes to the People!!
www.FFRtrikes.com
Well, I got the bike all together this weekend, I'm very happy with the way it turned out. Still plenty of cleaning up to do, but I got to take it for its first run last night, I was very surprised by the awesome amount of torque and top speed. I managed to pull 42mph out of it today, limited by motor rpm. I think it is easily capable of over 50mph with the right gearing.
One thing I'm not too happy about is the weight. At 140lbs, this thing is light by motorcycle standards, but not by mountainbike standards. I have 30lbs of steel bracketry onboard right now that I think I can cut about 15lbs off of with the milling machine. I also have 45lbs of battery weight, and I will be able to cut off 25lbs of that with a 20Ah LiFePO4 I am looking at from foxx battery. Here's the page on EValbum with all the specs and a couple pictures: http://www.evalbum.com/1618
Is 37 volts right on for a set of fully charged B&B AGM's? I thought it would be a little higher than that.
I can't get over how awesome the power delivery is on this thing, it feels like it will snap in half if I give it full throttle from a stop. It flies up the steep grade to my house without pedaling, over 20mph!
Next big plans are to make some sort of plastic fairing to cover the sides, and get some of this metal on the mill and get it painted. Where can I get an affordable ammeter that can handle 200 amps?
That's all for now, I need to go to bed. If anyone wants to see any pictures or has any questions, let me know.
-Tommy
Bringing High-Performance Electric Trikes to the People!!
www.FFRtrikes.com
37V sounds a little low. Should be like 39V or a little higher.
The author of this post isn't responsible for any injury, disability or dismemberment, death, financial loss, illness, addiction, hereditary disease, or any other undesirable consequence or general misfortune resulting from use of the "information" contai
Pages