
Does anyone know more about the "encodr" error message?
There have been several posts on V about it:
http://visforvoltage.org/forum/5482-canbus-and-yellow-wrench#comment-36928
http://visforvoltage.org/forum/5482-canbus-and-yellow-wrench#comment-36936
....
I got this "encodr" error message today, several times.
At first I noticed that the yellow wrench telltale was lit whilst riding. I slowed down, and as I was approaching a place to pull over the wrench disappeared again. I accelerated up to 70km/h again, but it came back a minute or so later.
I pulled over, it disappeared, I rebooted the Vectux, and drove off gain. The yellow wrench reappeared and then the "encodr" message appeared as well.
I continued to drive on at speeds between 70km/h and 85km/h and the "encodr" message disappeared a few more times, but was more on than off. The yellow wrench was almost always on but did disappear once or twice.
The "encodr" was never on without the yellow wrench also being on.
The scooter was otherwise behaving completely normal.
.........
Because I am planning to attend an AEVA meeting on the Vectux tomorrow, I am wondering if I can fix this quickly or if I can ignore it for a while longer. I have been planning a 200km return trip with multiple recharges for tomorrow and do not want to cancel it for no good reason.
..........
The most likely cause of the error seems to be dust build-up on the encoder mirror in the motor.
......
My questions:
A) Did anyone receive advice from a knowledgeable source to continue riding with this error message until a service can be performed? How long can you safely ignore this? Or was anyone told to stop riding immediately?
B) Can the encoder mirror be cleaned without removing it from the scooter? Maybe blowing it out with compressed air could clean it enough to work again. Or is the encoder mirror accessible to gentle wiping with cotton-bud sticks, without changing its alignment?
AFAIK special alignment tools and software are needed to install the mirror in it's correct position and to re-program it.
C) Is there any other way to fix this without the special tools?
D) Does anyone have these tools, or their exact measurements and is willing to share?
Thank you very much for any help you can provide!


I think I fixed it!
Well, at least a 6km road test showed no more error messages, and the inside of the encoder housing sure needed a clean...
It contained a lot of black dust which was very easy to blow away. I am not sure where it came from and if it is in any way toxic. Better to blow it out outside I guess! (Oooops...I should have vacuumed it out, or at least most of it, instead! What a Vandal I can be sometimes...)
You have to be very careful to not bend the encoder disc. It is a thin piece of metal, perforated with slots and holes. It appears that a light source shines through the holes in the rotating disc and a mirror reflects the light back to a sensor on the PCB somewhere. This "blinking pattern" is then interpreted by the motor controller in order to figure out the exact rotational position of the motor. Many motors use Hall sensors for this purpose.
The "programming" (which is apparently needed if the parts are removed and then re-assembled) might be due to the disk changing it's rotational position. It might be as if the hall sensors in other motors were all being rotated and stopped in a random position. The motor controller then needs to learn once where those slots and holes on the encoder disk are located relative to the actual motor windings. Just guessing, but I guess I'm at least close to it. If this is correct, then it might be possible to mark the position of the encoder disc relative to the wheel, and reinstall it in the exact same position. Then, no re-programming would be needed. Feel free to be the Guinea-pig and then let us know how it went, please!
I did not have to remove the mirror or the disk or the Encoder PCB to clean it. Wearing magnifying glasses, I could see that even just blowing at the encoder was removing a lot of dust. The dust sits very loosely on the surfaces, which is why it also collects at the bottom of the encoder housing. But I used an air compressor anyways to make sure the dust gets blown out of the corners. I tried to control the air blast by just gently pulling the trigger and by keeping a bit of a distance, but I saw at one stage that the encoder disk was bending due to the air stream hitting it. It appears to have some elasticity and it snapped back without obvious damage. But who knows...
I might still find out later that I stuffed something up, but so far it all works beautifully!
Check out the thumb nailed photos, they tell the story better than words.
Until we know what the black dust is, I would recommend this sort of "service" every 6000km or so, to prevent the dust from building up too much. It might also be appropriate to just wait for the eventual error message. The pictures were taken after about 8700km riding in total, and are roughly in reverse order:
This information may be used entirely at your own risk.
There is always a way if there is no other way!
happy to see that you've solved it.
and interesting to see the technology..
btw.. do you always service your vectux on a carpet, seemingly indoors? :-)
"doing nothin = doing nothing wrong" is invalid when the subject is environment
I took it outdoors to clean out the dust today, and the pain on the elbows was exquisite when I was taking pictures and having a close look, lying down on the bitumen!
That carpet comes in handy again and again, and without greasy, oily, stinky parts it's just a much nicer workshop that way!
This information may be used entirely at your own risk.
There is always a way if there is no other way!
Hi Mik, you did another great job!! Thank you for the Info and the Photos.
My Vectrix is still on repair, but i can use another Vectrix from my dealer.
Greetings from Austria to Australia Mike
Mik,
excellent job done! I was afraid even touching anywhere near the motor encoder. But with your pics and guide it seems like a straight forward maintenance task. I never had the encoder message myself but surely now I know how I could repair it. For the moment I still prefer Vectrix doing this job, but hey, do we know how long we can rely on their service. That brings me to my question, there must be a Vectrix service handbook somewhere. Wouldn't this be crucial for all the Vectrix service/dealerships?
Norman
I regularly have the encodr message - tallies up nicely with what Vectrix told me about dust on the encoder strip. I never knew where it was, and now I do for future repairs :D
Cheers Mik!
It seems to work OK so far, I'm on recharge stop Nr.2, no error yet.
Over 40km high demand riding, it sure seems to be fixed!
This information may be used entirely at your own risk.
There is always a way if there is no other way!
Hi Mik, Hows your distance these days?
I had a weird clitch last week, While riding
at acceleration the fuel bars would drop, and on de-acceleration bars would go up... and at regen go to the top
it work similar to a vacumn gauge in a car and the Estimeter read zero the whole time no amount of rebooting solved it.
at night I plugged in ....No charger, fail again! same as last year. I separated battery connectors to kill the scooter, then reconnected, and gauges are normal again and charger is working. PHEW! that saved a month wait.
In answer to your question on charging at CP only,
I get an extra 10klms from the batteries,if I charge to 13/17, and meters are more accurate, I think by topping them up further some of the higher cells may go into reverse charge, what do you reckon?
I assumed this, because the scooter is weaker when fully charged. and the meters are inccurate.
It may even be software related, I have noticed a lack of performance each time I get newer versions
Incidently the software, firmware and connections are for sale, and I will be going back to the first version, too many clitches in the latest
I cannot explain the paradoxical range increase.
Maybe low capacity cells are concentrated somewhere in one of the
segments monitored by the stock BMS.(Cells 1-27 and 76-102)
If the battery is fully charged then these cells produce heat at the
end of charging.
They end up hotter than the others and self-discharge faster.
If you then ride until the weaker cells come close to empty, the BMS
might "see" an imbalanced pack and reduce available power.
If you only charge as long as all cells can actually absorb power,
then they will remain at a more even SOC until all cells are
actually empty.
And the weak cells will not get over charged and heated and aged.
There you go, an explanation after all!
It might of course be hogwash!
.
Regarding my range: I'm going for 180km total today!
Because I have the Manual-BMS I can limit the range and speed to the
requirement of the weakest cell in the battery.
I always still have full power available at the very end of my range
even if I am voluntarily travelling at crawling speed to protect the
weakest cell.
Normal driving on hilly country roads and city mix: 30km
Babying it but flowing with traffic: 40km.
This information may be used entirely at your own risk.
There is always a way if there is no other way!
I'm back home, 187.3km traveled on the Vectux in a single day! No encodr error messages at all, it's definitely fixed!
If that keeps happening, then it might be worth to install a contactor and inrush current limiter so that the battery can be disconnected and reconnected without ANY fuss. That would be better anyway.
What do you mean? Can you buy the Scooter diagnostics installation program and the various .hex and other data files containing the various software versions? Where, how, how much?
This information may be used entirely at your own risk.
There is always a way if there is no other way!
thank you for sharing this and taking the time to shoot the pics, Mik! That is sure to be a repair project that will effect all Vectrixes sooner or later, and if it occurs later than warranty service is available, many of us will have to rely on your demonstration to get ourselves through the project.
Many thanks, my friend!! I have downloaded all 20 of your pics, and your text to a service folder for future use!
So does this mean that it is OK to continue riding despite the encodr error message?
Here is an additional bit of advice: It is not necessary to undo the cable connector. I just took it off to get a better look and take photos.
Next time I will just open the cover, wipe the large dust collection at the bottom away with a moist cloth, and then blow compressed air around the disk and the mirror sitting on top of the disk. Holding a vacuum cleaner hose nearby would suck up most of the dust dislodged by gentle air cleaning.
This information may be used entirely at your own risk.
There is always a way if there is no other way!
Wow! Thanks for the detailed repair photos, Mik!
I've received three Encodr messages in the last few weeks, and the last time I noticed that the motor cut out for a fraction of a second (as if power had been removed to the motor very quickly and then restored). I'm guessing that it's related, and now that I'm coming up on 5000 mi I should probably expect some issues like this, right?
For those of us who still have intact warrantees, has anyone had this repair done at a dealer?
was done on mine, problem solved
Thank you for trying it out and posting!
Good to hear that it does not just work for me and the Vectux....
Time to add it to the Handbook:
This thread has been added to the Vectrix Collaborative Handbook, please stay on topic!
Please add in more details if you can, I most likely left out some which might be important.
Any idea what all that dust is, anyway?
This information may be used entirely at your own risk.
There is always a way if there is no other way!
I got the spanner telltale and encodr message again, almost 2000km after the cleaning of the encoder disk.
The error message popped up repeatedly one day, but was gone again the next.
Before I open up the encoder housing cover again, I'd like to know what the dust is.
It clearly comes from inside the motor, I believe it is abraded material from the permanent magnets.
Any ideas what it is, or how to test the dust?
This information may be used entirely at your own risk.
There is always a way if there is no other way!
Altho it is conceivable that it is rotor dust it is not likely. The only way to tell would be to remove the encoder disk and check if there is a build up around the shaft seal. There is grease on the inside of that seal so I think its unlikely that dust could get by it. Is the disk rubbing on any part of the mirror housing? There is only about .040" (sorry I cant do metric) of clearance for the disk. Also make sure the shaft isnt moving axially (parallel to itself) causing the disk to rub. Other than that just make sure it is sealed with RTV when reassembling the encoder cover.
I think the dust must be from inside the motor because there is no such dust in the environment around where I live. Lots of dust is around in winter, the dry season, but it is all yellow.
The dust inside the encoder housing is black-ish, and collects mainly in the lowest part of the housing, but it also sits as a thin film on all vertical surfaces inside the housing. It is very easily blown away.
.
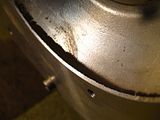
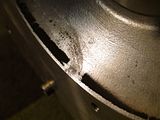
The first photo shows a horizontal finger wipe mark going through the dust collection which is stuck on the almost vertical surface area.
The second photo shows a wipe mark through the area of thickest dust in the bottom of the housing.
.
.
I did also notice a kind of rattling and scraping noise from the motor a few weeks ago whilst I was sitting next to the Vectux with the rear wheel lifted up (battery box on a rock), staring at the Canbus messages flickering by on a laptop running CanHacker.exe software. I wanted to be able to analyze the CANbus throttle signals during riding, so I put the Vectux on the rock and spent a while (or two) playing with the throttle, brakes, side stand etc.
At random intervals this noise would occur when the motor and wheel was spinning up due to throttle input.
As it is with noises, it's hard to describe, but it sounds to me like there is a piece of light but hard material (hard plastic, aluminum or thin steel) lying on the bottom of the motor housing, and it sometimes gets picked up and then goes around and around, scraping the motor housing wall. When I stop the motor and then start it again, the noise is slightly more likely to re-appear than after an episode of spinning without the noise; but the noise is more likely to be absent then to occur, even after it just occurred. But when it's there it usually keeps going as long as the wheel does not stop.
The noise occurred in about 1 out of 10 or 15 episodes of spinning the wheel "on the rock".
I think something has fallen off and sits there in the lowest point of the motor housing, occasionally taking a ride on the "merry go round" inside the motor. It's probably not a magnet, I'd think that would firmly attach itself somewhere and cause either no noise or continuous noise.
The noise is not loud enough to be heard reliably with the helmet on whilst riding.
I decided to just wait and see, because opening up the motor would be a rather elaborate procedure, beginning with the making of templates to enable re-fitting of the encoder sensor in the correct position etc.
And reprogramming of the encoder would be impossible, as far as I know, without the Vectrix software.
It might not even be possible to open the motor up without special tools, I don't know and I'm not keen to find out as long as the Vectux is my only EV and running OK! I read a bit about other motors, and it can be extremely difficult to replace magnets in some of the design because of the sheer force of the magnetic fields involved. If the Vectux motor gives up the ghost, then I'll probably give up on it and cannibalize it for parts.
This information may be used entirely at your own risk.
There is always a way if there is no other way!
Thats alot of dust. Actually the motor cover is not that difficult to take off. Carefully remove the encoder disk reflector with small needle nose pliers. Remove the disk. Its not that difficult to realign and you can do it in the field w/o SW. Remove all the motor cover bolts. Gently pry off the cover. Make note of the spring washer position when you open it. See if anything is rattling around. You would not want to attempt to replace a magnet. Good luck.
Thanks! I can see a project coming up...
Would it help to mark the disk and the encoder PCB to allow accurate re-alignment?
I imagine it might be enough to use an indelible marker pen to draw the outlines onto the housing so that they can be visually realigned without tools.
Can the disk be rotated and fixed in various positions, or is it notched, so that the encoder programming will remain intact because it ends up in the same rotational position each time?
Would it be possible to adjust the encoder and disk position by trial and error until the motor runs well, or will running the motor with misaligned disk / encoder do damage?
This information may be used entirely at your own risk.
There is always a way if there is no other way!
Hello Mik, I would mark the disc ect. I have seen a seal fail and leave a dust. Make sure nothing rubs when you rebuild. Take care when opening the throttle the first time after the rebuild as they can sometimes run backwards!
The motor will not run properly if at all if not aligned but will not damage it. The pcb can be left in place.The disc is simply held in place by a tapered bolt
Edit due to reading the last post again
You could mark it if you want, but for every 1 mechanical degree that you are off during reassembly you will be off by 6 degrees electrically. The main thing is to set the disk at the correct height above the face of the motor cover so it doesnt rub on either side of the reflectors. Then you do the magic sequence and it aligns itself.
The disk spins freely on the shaft until you tighten it, there is no registration. By trial and error you could get it to run but you would never know if its at its peak setting or not. Altho acceleration and range would decrease. If you are way off the motor could run backwards or just sit there and make ugly noises.
.....because the pattern repeats six times on each full turn! Got it:
Can the correct height be set without special tools?
This information may be used entirely at your own risk.
There is always a way if there is no other way!
Yes it can be set w/o special tools. Just make a shim that is 0.134" thick to space the disk. Set the spacer on the encoder cover, drop the disk on to it, then tighten the bolt.
Dont remove the PCB however b/c that does require a tool to set.
Thank you, that is great news!
This information may be used entirely at your own risk.
There is always a way if there is no other way!
Here is a related quote from another thread:
See: http://visforvoltage.org/forum/7391-yellow-wrench-and-canbus-message-while-riding#comment-42358
This information may be used entirely at your own risk.
There is always a way if there is no other way!
I think I have now been riding for about 1000km with the yellow wrench and "ENCODR" message coming on more and more frequently; it's almost constantly on now, but no other obvious adverse effects are noticeable.
It's really getting time to open up and have a look.
Another dust storm has been predicted for today, how fitting! The Australian topsoil flying off into the pacific...
I'm not sure at all how to make that shim to allow setting the encoder disk at the right height.
In metric it needs to be: 0.003404m = 3.404mm thick.
I don't understand the mechanism that holds the disk in that position once set.
This information may be used entirely at your own risk.
There is always a way if there is no other way!
The shaft the encoder is mounted on is not a solid 'pipe' it is split ito two halves. The mounting bolt is tapered, as you screw it in the shaft is splayed out forcing it to tighten on the encoder.
Thanks! I found (after wasting a lot of time rigging up metal washers to make a spacer) that the type of prototype circuit board which I have lying around is exactly half the required thickness. Looks like I'll have a encoder disk installation tool soon...just need to throw it into boiling water and then compress the two layers so that the hot melt glue gets totally flattened and squished into the holes.
I cleaned the dust out of the encoder housing again today. It's only been 2500km since the last cleanup, but there was a lot of dust in there again. Not as much as the first time. I think there is also a new noise (high pitched) emanating from the motor when turning the wheel by hand. Need to open it up to check whats going on!
This time I vacuumed the dust through a coffee filter, so that I now have a small specimen to test. But the old school chemistry is very rusty.
So far all I know is that the dust is not being attracted to a magnet...
This information may be used entirely at your own risk.
There is always a way if there is no other way!
I know what the dust is and it is absolutely hilarious:
It's the dust seal disintegrating!
Without the black dust seal there would be no black dust in my encoder housing.
Any ideas how to make a new seal out of more suitable material?
This information may be used entirely at your own risk.
There is always a way if there is no other way!
Pages