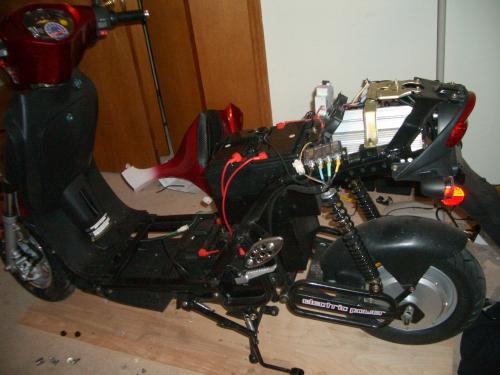
I just got my Z20b yesterday, did a short test to make sure everything was working, then brought it inside where it’s warm and took off most of the covers.
I have the following goals with this tear down:
1) Install bank charging
2) Install PakTrakr
3) Check for loose/missing screws & nuts. Add washers where needed.
4) Check & fix cable routing and any loose electrical connections.
5) Silence that ugly noise that the turn signal makes.
6) Learn all that I can about this EV scooter, and EV’s in general.
7) Check the size of the power cables and upgrade if needed.
I wanted to do this all at once so I’m not taking on and off the covers all the time. Now that the covers are off, I’m glad I’m doing it this way because I don’t think the plastic covers on the Z20b could handle being taken on and off a bunch of times, especially the nose – I already broke off a small portion of a tab. Of course, it would be a lot easier if I had a maintenance manual! But I’m not holding my breath for that one. I’m hoping that there will eventually be a VifV maintenance manual based on our shared experiences.
Some preliminary observations: I found several loose and one missing fastener. In case of the missing fastener it was pretty funny. I was trying to take off the black plastic liner that surrounds the batteries under the seat. There are two nuts down low in the front. These nuts are hard to see because they are down in a well and very close to one of the batteries. I managed to get one of them out OK, but I could not seem to get my socket onto the other nut. What the hell is going on??? I could see that shiny nut on the black threads attached to the frame, why wouldn’t my socket grab it? Because the nut was really a washer! There was no washer under the other nut, so apparently the assembler was having trouble getting a nut on there because of how close the battery tray is to the bolt, and decided to put a washer on there instead! I’m guessing that the battery trays were welded a little too close to the bolt, and he just was not able to get it on there. I’ll know more when I try to put things back together.
The Z20b nose is difficult to take off. I had to learn by trial and error. The following pictures may help. I removed the nose as part of removing ALL of the covers, so don't take this as a tested procedure if you are just trying to remove the nose. Hopefully it will help.
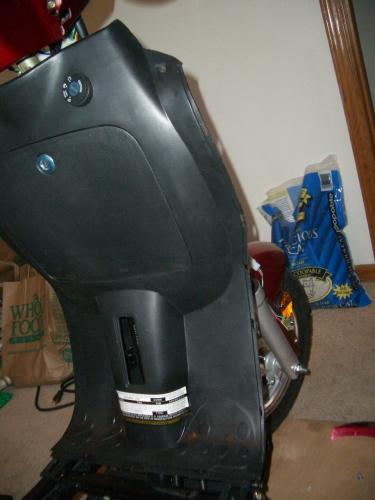
Note slots on the edge; You might be able to see the slots better in the shadow. Tabs in the R/L nose fit into these slots.
Note the screw on the center midline of the right nose piece. You must take the center nose piece off before you can get to this screw. This means the center must come off first. You can also see the black frame member that accepts the screw for the left nose cover; it's difficult to see because of the black background. BTW, on left and right, this screw was VERY loose and would of probably fallen off after a little riding.
The center piece has tabs on the edge that will require that the center move up to disengage from the right and left nose pieces. There is a lip you can see in the upper right corner of the photo; that lip must be removed from the bottom of the center section before the center section will move.
There are 2 screws on the bottom/front of each L/R nose piece, plus one on the top/rear. There is also a large machine screw on the bottom side or L/R nose that must be removed. These are all pretty obvious and easy to get at.
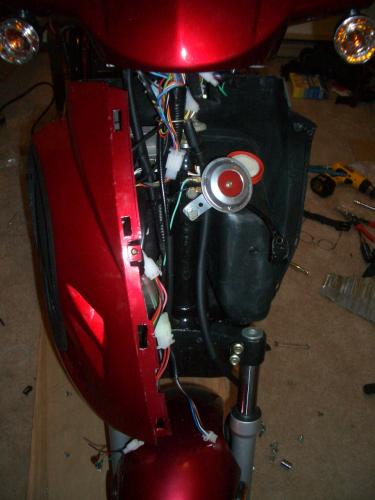
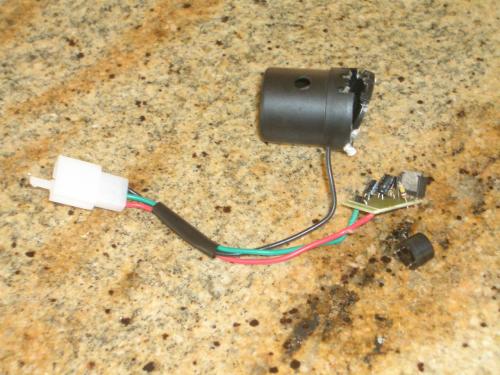
Getting rid of the turn signal screech is easy once you have the cover off. The turn signal won't work if you just unplug it. Here is a photo of the unit disassembled.
Procedure:
1) Open up nose and locate the offensive piece.
2) It's attached by double sided tape. Rip it off. You will have to use a new piece of tape to reattach. (Note - it might be possible to pry of the housing and do all of this work without ripping off the double sided tape. If you do this, let others know).
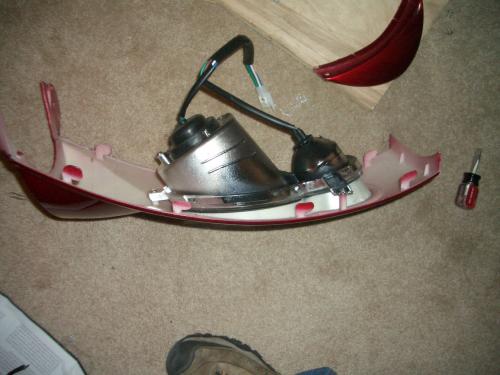
3) Pry off the bottom of the unit where the wires come out. In the photo, I have partially reinserted the bottom. The black wire is unused.
4) Carefully remove the wires and the small circuit board from the housing.
5) That black cylinder in the lower right is the screecher already removed. Turn over the board and use a soldering iron to remove it. I pry gently on the screecher while applying the soldering tip until if comes loose; then repeat for the 2nd leg of the screecher.
6) re-assemble and reattach.
I’m new to EV’s, and might need some help from other members. Right now I’d like to hear opinions about where the best place would be to located the terminal strip for the bank charging and PakTrakr connections. I want a place that will stay dry, and hopefully allow for battery replacement without having to move the terminal strip.
It looks like the Z uses 8AWG wire. Rewiring would be a lot of work, but if I want to get more speed out of it, it may be worth it. Replacing this wire would be where I need the most help.


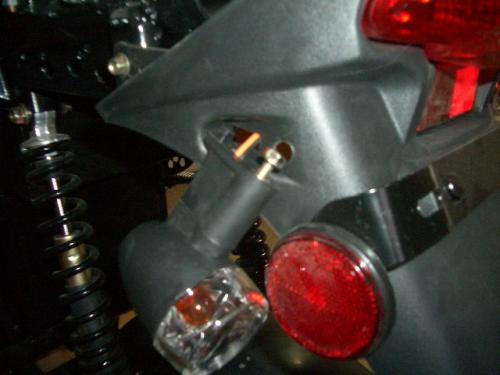
I almost forgot about the rear turn signal mounting problem. When I was maneuvering the scooter into my house, I bumped the rear turn signal housing. It popped out without much force applied. The nut that holds it on is only slightly bigger than the hole the bolt goes through. It needs to have a washer put on underneath the nut. I suspect Z20a has this problem too, unless it was just an assembly problem on my bike only.
I still have not found a good place for the terminal block. I may end up wiring PakTrakr/Bank Charge wires direct to the battery if I don't find a good spot.
Now I'm off to get some 6 AWG wire. I've decided to just replace the power cables where they are easy to get to, and not worry about the controller and motor wires. This means all of the wires between the batteries and from the string to the terminal block on one side, and the breaker on the other. If any of you more experiences EV'rs think this is a bad idea, let me know.
ZEV 7100 Alpine
Fort Collins, CO
Missing pieces and things that aren't connected... This is all a part of the Z-20 Experience I would suppose. Fernando told me yesterday that there wasn't any standardization when it came to putting these things together. Of course this probably doesn't surprise many people on this board and the fact that Fernando admitted to the lack of standardization is probably making USAtracy turn over in his grave. Apparently this "hand-made" non-standardized process was also at play in the creation of the controllers and the motors. With this in mind we are to expect some variation in performance.
I think it is a really good call that you are going through all this trouble, I'm not to that point yet. I'm just imagining that my bike, as opposed to yours was made by someone who knew what the hell they were doing.
As far as manuals are concerned I wonder if the people building the bikes even had one...
Don Cristobal
EVTA Z-20b
---
Ohm is where the heart is.
Thanks for posting this info. My Z20B has one of the tail lights pointing off to the side, and I hadn't had a chance to see why. Now I know. My headlight are pointing low so you picts and instructions will help me get to the adjusters.
thanks again,
Overload in CO
Overload in CO
Astar,
Can you give more detailed instructions on how to remove the rear exterior? I can't seem to get those two bolts way down low near the batteries. Even if I could, I'm not sure I can get them back on when I reassemble the darn thing. What tools did you use (pictures?). Can you take me through a step-by-step? I looked up the Z-20a disassembly how-to by mlh, but the z-20b seems to be slightly different with the bolts.
Any help you can provide would be appreciated.
Weee,
I used the instructions from mlh's thread. It was as described, although skipping over a couple of steps that probably seemed obvious to him, but slowed me down a little. Right now it sounds like you need a socket set. You will need it to get to those 2 nuts, and it's a good thing to have anyway. Get metric or metric and english. Try to follow mlh's instructions after you get the socket set, and e-mail me if you get stuck. You could also try pulling up on that black plastic piece under the seat - maybe your assembler left off BOTH nuts!
-= Alan
ZEV 7100 Alpine
Fort Collins, CO
Astar,
No doubt I need to get a socket set. However, I think the area under the seat on my bike is different that the ones shown by mlh. Here's a picture of what I see in the bottom front of the area under my bike's seat.
The bolts are further off to the side (in the corner between the batter and the edge of the bike), and are recessed about a 1/2 inch into the bottom of the seat tray. Even with a socket wrench, I'm not sure if I can get to these. Was your Z-20b like this, or more like mlh's picture?
Thanks again.
Yeah, sorry. I edited that quote out of my post when I realized that one was for 12v power only. Might be confusing to other readers, but usatracy was quoting me in the previous post - what he quoted was deleted before he posted. Definitly, don't use it.
Weee, mine looks like yours. If you look closely at the plastic, you will notice that it was cut with a saw by hand. I'm assuming this was a part from the ice version that they modified for the electric version. I ended up taking the battery out in order to get good access to the nuts. I might have been able to get them out without doing that - not sure. I thought I had a nut on one of them and took the battery out to get a closer look. Your picture is pretty good, and I can see the hex pattern, so you have both nuts. Try the socket first, and if it does not work, then try removing the battery. Make sure the circuit breaker is turned off, and be carefull when dealing with batteries and cables attached to them - there's no off switch on a battery . . .
One more thing. Get a socket set, not a "socket wrench". i.e. not a wrench with a box end on it. It will have a ratchet, at least one extender shaft, plus a bunch of different sized sockets.
Here's an example, you can get a smaller/cheaper set.
ZEV 7100 Alpine
Fort Collins, CO
Thanks for posting the wiring diagram. Should help out alot.
From what I can see looks like the "L/W" blue/white wire running between the controller and the alarm is supplying the five volts for the throttle. There isn't any mention of it in the wiring harness. Maybe they saved some money not using a connector. :)
Bank Charging set up is finished, and it's almost done with the first bank charge.
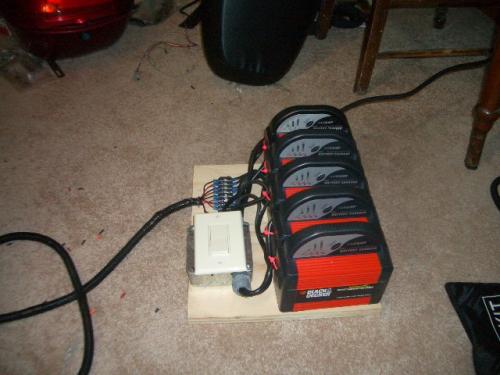
I took the tray off of each bank charger so it would be a smaller. I had a fantasy it would fit into the trunk, but it's still a little too big at 14". I cut off all of the plugs and wired up a light switch to turn them all on and off together.
Still naked bike getting some juice.
ZEV 7100 Alpine
Fort Collins, CO
Thanks. I was pretty sure that it was just the already defective controller manifesting a more serious problem, but it's nice to have some confirmation. I've spent a lot of hours working on this scooter lately, and need a little break, but I will take out the controller and open it up in a day or two and post a picture.
ZEV 7100 Alpine
Fort Collins, CO
Here is a picture of the inside of the controller. Note the burn mark on the cover plate. Also, there is something that looks melted between the two tall cylinders. I'm not sure it is melted though - it feels like caulk.
Here is a picture of the underside of the board showing where it fried. It's sitting on the bottom half of the case and you can see the burn marks there. It looks like the burning is confined to a single phase to my untrained eye. Does that imply a motor problem also, or only a problem in the controller?
There are no markings I can see as to who the manufacturer is. Soldering looks like it was done by hand, and not really very pretty. The case was difficult to open; I ended up cutting off part of the top to get it apart.
ZEV 7100 Alpine
Fort Collins, CO
Looks like trash to me, once those cheap circuit boards start to burn, they become conductive. There is no repairing that one.
Philip, Z20b owner.
Philip
2011 Nissan Leaf SL
Yes, It's trash. What I want to know is has it always been trash? And will the new one that EVTA sends also be trash? I'm looking at non-EVTA options like a Kelly Controller, or one that usatracy has been testing. So far I have not heard of any motor failures, but who knows. It would be interesting to know what the EVTA motor would do with a decent controller. Maybe it would actually reach 45 mph as advertised.
ZEV 7100 Alpine
Fort Collins, CO
Unlike brushed motor,brushless motor controller is the most difficulty of all.We fail in 2005 the whole year before it came mature.
Just checking up.
Astar - you mentioned on 2/25/08 that the controller would come in about 1 week (EVTA's estimate). Any word or update from EVTA?
I can't say that I expected them to hit that estimated date, but that doesn't mean I'm any less eager to get our new controller.
Thanks for any update you can give.
I got an e-mail from Andy on Friday. Here's a snippet:
I think the one week stated previously was for them to arrive in Florida, not to be received by customers. I do think EVTA will make good on fixing the controller problems. Based on the history so far, it will take far longer for them to deliver than they promise. I do hope they get it right, and soon. The weather is getting warmer, and I want to be riding regulary in 6 weeks or so, if not sooner. I have decided to buy a Kelly controller since I don't want to depend on EVTA. I just ordered it last night, and I will post when I get it installed. Part of my motivation is that I want to go faster, and if EVTA just fixes the quality problem, it might still be the same speed. I'm hoping the kelly controller will allow me to go faster and accelerate harder. Range is less of a concern for me than for others.
ZEV 7100 Alpine
Fort Collins, CO
Whick Kelly Controller did you decide to go with?
I went with the KEB72451, which is basically the same as the KBL72151: $329 plus $44 shipping from China. You won't find the KEB on their web site, look for the KBL; I e-mailed and they told me about it. The KEB does not have the J1 connector, (download the manual and you'll know what this means), but I was not planning to use any of the J1 functions anyway. You can program limits via RS-232. They also wrote this:
"Yes, KEB72451 sounds good. Sorry we haven't published it. It is similar to KBL72151, but output higher take off current, limit to lower battery current. As said, no J1.
Basic spec: 18 to 90V oepration, 200A take off, 80A continuous, <100A battery current.
Yes, you may order it. Special price $329. Non regen model KEB72450 is $299. (Actually, it's just wiring and calibration difference from KBL72151)"
The one I ordered has regen; It's probably a waste of money, but I wanted it anyway.
ZEV 7100 Alpine
Fort Collins, CO
Controller is nothing to do with speed.
Meanwhile,different structure motor should match with different controller and programme should be write.