HONDA CBR 600 F3 CONVERSION...FORWARD PROGRESS

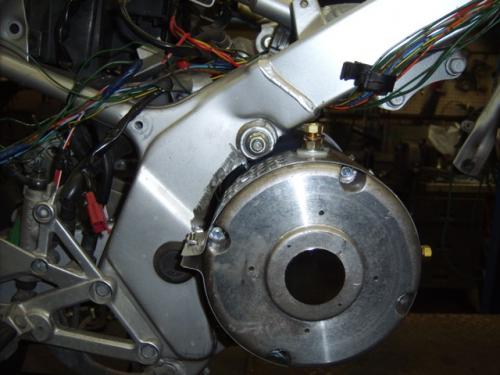
Over the past couple of weeks, some forward progress has been made. I was able to finish the re-sealing of the front forks. I had to special order some bolts that were destroyed during dis-assembly from the Honda dealer to finish the job. The new front tire has been mounted and balanced, and the front end is now back together. The D&D ES-15A motor arrived last week, and I spent the better part of Saturday making mounts. The motor mounts are done! The motor is in position and ready to be wired.

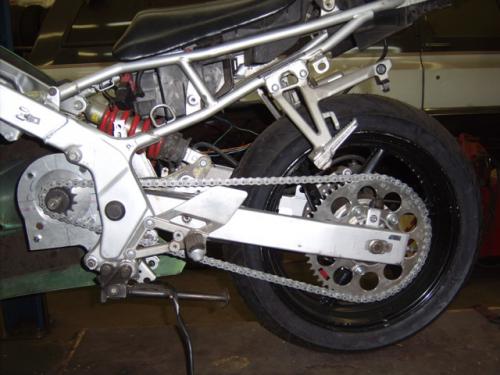
The chain has been cut to length. I purchased a 520 motorcycle chain so it would fit the rear sprocket correctly, and modified the #50 pitch front sprocket to fit the chain. .100" had to be removed from the width of the #50 sprocket, and the slight angle on the tip of the teeth had to be redone.
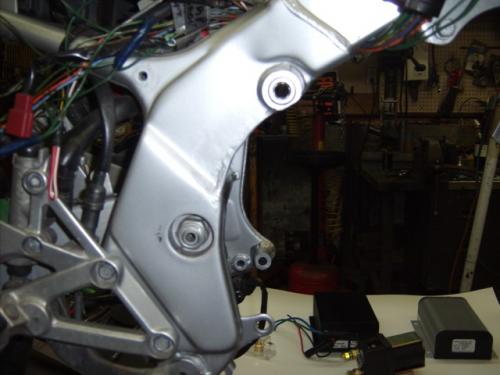
To get the motor shaft exactly in line with the swing arm, I had to notch the frame 1/4". I did not want to do it, but now that it is done, it was worth it.
I welded in a piece of steel to put the strength back in, and painted the affected area.
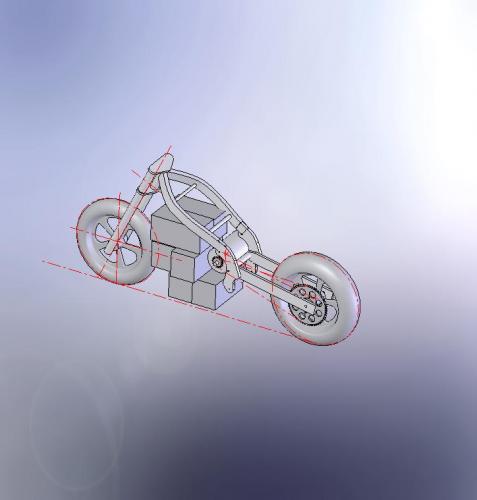
The motor fits nice, and looks like it belongs there.
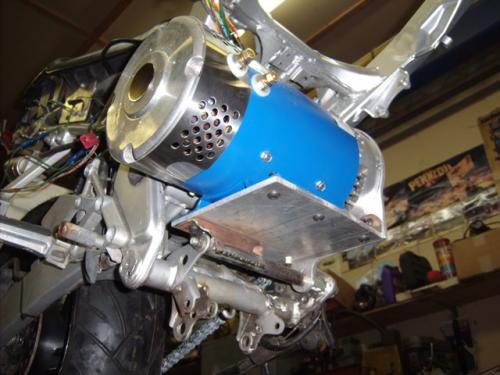
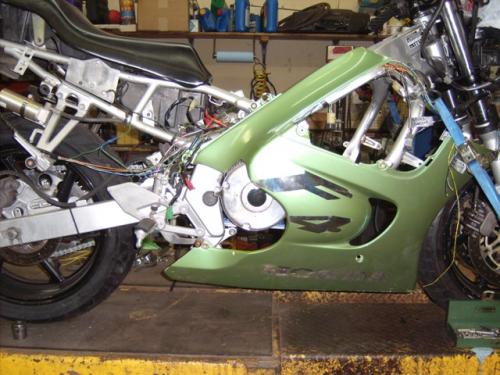
I had to modify the fairing just a little to clear the motor. The motor does not stick out any further than the ICE, it is just raised up a litte higher than the ICE transmission case was.

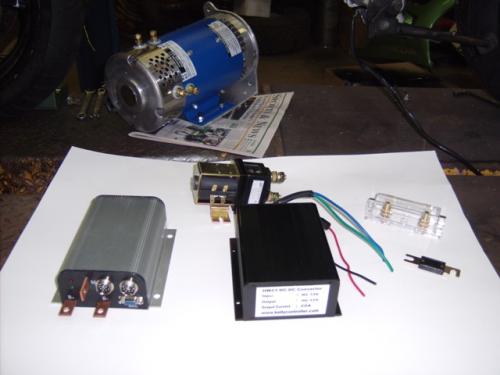
All the electronic arrived Saturday. I ordered everything from Kelly Controls, and it all was shipped from China. It only took about 2 weeks from order placement to arrival. I was very pleased. Now it is time to mount all of this stuff.
After reading through the instruction guide for the controller, I realized the throttle input on the high power Kelly controllers needs a 0-5 Volt throttle. OOPS. I waisted some time and money on the PB-6. I have found a 0-5 Volt potentiometer used in race car data aquisition systems. It is very rugged, and easy to adapt to a throttle cable. It's a little more $ than a PB-6. But it should last forever. That's it for now. I hope to get to mounting the electronics and get some basic wiring done this weekend. The next major plung will be batteries and chargers. Just wanted to thank all who have helped with info and encouragement, and interest! This is getting very exciting. A test ride could be just a week or so away!
- racermike39's blog
- Log in or register to post comments

Who's online
There are currently 0 users online.
Who's new
- eric01
- Norberto
- sarim
- Edd
- OlaOst
Support V is for Voltage

Comments
Re: HONDA CBR 600 F3 CONVERSION...FORWARD PROGRESS
Looks good so far! Lets see who gets their bike moving first, you or frodus?
BTW, what is the black box in the last pic?
[url=/forum-topic/motorcycles-and-large-scooters/587-my-kz750-electric-motorcycle-project]KZ750 Motorcycle Conversion[/url]
[url=/forum-topic/motorcycles-and-large-scooters/588-fixing-my-chinese-scooter]900 watt scooter[/url]
Pic from http://www.electri
Re: HONDA CBR 600 F3 CONVERSION...FORWARD PROGRESS
kelly's website says "Standard Throttle Input: 0-5K ,5-0K ohms,0-5 Volts,5-0 Volts."
I just finished my motor mount and am 30 min away from putting the chain on and running with our prototype controller on the rear tire stand.
You made use of the lower engine mounting bolt, as did I... and your motor fit in pretty similarly, and had similar clearance.... look at my pic... hahaha
Yours is turning out really good as well. Keep posting progress. I'm interested how you'll mount batteries... I have 12 to mount (smaller Ah, but same kWh as a 72V 36Ah pack).
I think he'll likely win, he's using off the shelf electronics, I've still got to help develop the battery balancing/charging system (which will eventually be a product for sale).
Great pics!
____________
Travis Gintz
1986 Honda VFR Conversion
www.evfr.net
Re: HONDA CBR 600 F3 CONVERSION...FORWARD PROGRESS
Thanks Andrew and Frodus!
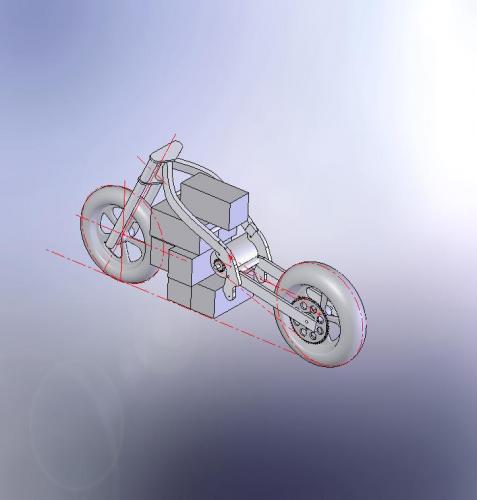
Andrew, the black box is the DC-DC converter. It is 72 Volt to 12 Volt, 25 amp, 300 watt.
Frodus, If you look at the PDF file for the KDH controllers, there is no mention of a resistance (0-5K Ohm) throttle input. The smaller controllers can use either. The J2 picture on the Kelly website is fairly new. I don't remember seeing it before I ordered the parts. I saw your latest update earlier yesterday with the motor/chain and sprocket picture, and I too laughed out loud because I am at the same exact point. I actually posted the picture of the chain just for you ;).
I just shipped out the cooling system I removed from the bike. The sale of the ICE parts now is withing $20 of the donor purchase price. I am very happy with that.
Thanks again.
Racermike
5 years ago I met Jesus and he total ruined my life. I have never been happier.
Re: HONDA CBR 600 F3 CONVERSION...FORWARD PROGRESS
haha, thanks for posting that pic, its almost the same angle, same shot, showing the same thing. I laughed, I did a double take at first.
Isn't it great that you JUST ABOUT evened out on the original cost of the bike? I sold everything I didn't need and just about broke even, and I've got 2 bikes now ;) and two twin motors. Can we say "back to back lifepo and sla test"?
Anyway, about the throttle, that "port" on the KLH has +v, com and signal. You connect one end of the pot to +v, the other end to COM, and the wiper to the signal input. This gives you either 5V-0V or 0V-5V depending on which "end" you connect to +v/com. If you're still insure, call kelly controller and ask. It shouldn't hurt anything if you hook it up to those 3 pins wrong, it just won't do anything on the output.
Also, make sure that when testing, and you close the contactor, that the motor is solidly mounted, because I don't know about kelly's safety. If you start up and the throttle is full, it shouldn't EVER start the motor. That way if its wired backwards, you'll know. Just make sure when you wire it up, that the "wiper" when the sprung back to zero throttle, that it measures 0ohms or close to it between com and wiper.
had the same issue with my 48V GE controller we tested, throttle was in wrong position, but we reversed it and it worked. There's a safety lockout, it won't start unless it starts up with throttle in the off position.
Thats a HUGE DC-DC. We found a DC-DC that's 250W, and its 2" wide, 3-4" long, and 97% efficient, for under 100 bucks. I'll see if I can get you info on that as well. I"m just using some Vicor modules right now, until we test the new DC-DC. We bought a 140W version, 1"x2.5" and 1/2 inch thick @95% eff.
____________
Travis Gintz
1986 Honda VFR Conversion
www.evfr.net
Re: HONDA CBR 600 F3 CONVERSION...FORWARD PROGRESS
I have aquired some batteries! My original plan was to use UB12550's because they are 41 lbs each, and would provide 20 Mile range at 45 MPH. (6) 55AH batteries would have kept the bike close to the factory wet weight. For increased range, I could add up to 2 more for a 96V combo that would put the bike about 80 lbs over weight. I was comfortable with that. I also considered using the 75AH version, but 6 of these would put the bike at maximum capacity with one rider. I went through the exersize of making cardboard mock-ups, and proved I could fit the 75AH in the bike because the 75AH range was about 35 miles. I went to the battery store ready to purchase the 55AH batteries, and they showed me a CSB 12650 65AH battery. This battery weighs in at 48 Lbs.
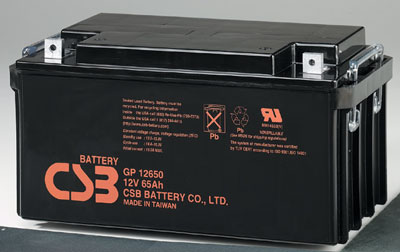
I had looked for something like this before, but it seemed it was a special order, and very expensive. I was not sure they would fit because they are long (13.5"L X 6.75H X 6.5W). After some trails fitting that profile in, I found a configuration that will work. Some minor modifications to the frame are necessary, but I decided to go for it.
The offset battery is to clear the power posts on the motor. I was not happy about doing this but I realized later that this will help balance the bike out due to the motor weight being offset in the other direction. Believe it or not, this configuration will fit inside the factory body work.
I can add one more battery for an 84V combo, and after the tank is cut out, it will fit nicely under the tank.
So the weekend was spent fabricating a battery cradle. That was a painful ordeal, but I think the effort will be worth it. I think I have 12 hours into the fabrication of the battery box alone. It still needs final welding and painting. I'll post some pictures tonight. After this fabrication is finished, It's onto mounting the electronics and wiring.
Racermike
5 years ago I met Jesus and he total ruined my life. I have never been happier.
Re: HONDA CBR 600 F3 CONVERSION...FORWARD PROGRESS
Are you sure there is enough ground clearance so you can get over kerbs etc?
Mr. Mik
This information may be used entirely at your own risk.
There is always a way if there is no other way!
Re: HONDA CBR 600 F3 CONVERSION...FORWARD PROGRESS
I kept the ground clearence the same as fatory. The factory GC is only 5-1/4" at the lowest point. The lowest point is the factory fairing just behind the front tire. I'm sure it will scrape once in a while in certain situations. I WILL have to be careful. When I was building the battery box, I strapped the bike down to the lift such that the bike was at the correct ride height and angle (Suspension loaded). That should ensure the batteries are at the correct height and parallel with the ground. (That was the plan anyway). With all the batteries in the bike and me sitting on it, it looks like it will be OK. Maybe I'll have to jump off the curbs, or wheelie onto them? ;)
Racermike
5 years ago I met Jesus and he total ruined my life. I have never been happier.