In post #9 of the tread: “First CuMoCo C130 delivered to a customer,” MikeB put a great picture of the instrument panel. I am aware that changes have been made and are still being made with this panel, but I trust the basic structure of what is in this picture is unchanged.
I have a C124 on order. It is my intention to get a mounting assembly for my Magellan Meridian GPS.
Here is one complete assembly: cradle and mount.
http://www.mountguys.com/product_p/ram-b-149z-ma2u.htm
I know I can buy the cradle separately but do not see how I would attach any mount to the bike. Has anyone done this?
CuMoCo has yet to tell me when my Maxi-Scooter will be ready but I'm buying what I can in accessories from a local motor sports shop that is closing up by the end of the year. Hope to get some bargains on some items.
Derby


Derby,
There's a couple paths to take, but I think I may have found the simplest one. You need a RAM-B-272U, which is essentially a RAM ball with a 9mm hole on a tab. The bolt for holding the mirror goes through the hole. Attach a short arm to that, and a gps mount (for whatever specific unit you have) to the other end of the arm.
You can also find a ram base that attaches to the top of the brake reservoir, looks like RAM-B-345U is your choice for that route. The top of the left brake reservoir appears to be exposed enough for this to fit.
The mounts that screw to the front of the brake reservoir won't work, neither will the ones that wrap around the handlebar: there's plastic pieces in the way.
My electric vehicle: CuMoCo C130 scooter.
Thanks Mike,
No luck today getting what I need at a discount but with your post I'll know what to order online. I will go for the first one you suggested.
Derby
After checking a few on-line sites, I found that GPSCity has good prices for these mounts. They sell the RAM-B-272U you suggested along with a 3" arm and the diamond plate as a package. It is priced less than the three parts separately. I still had to add the appropriate cradle for my Magellan Meridian GPS. I did so and placed the order two days ago. It just came in the mail and looks exactly to be what I need.
Thanks, MikeB, for your great advice.
Derby
PS, I was notified this week that my Maxi-Scooter is in production so it will not be long before I get to mount my GPS on it. And, of course, be able to ride it.
It has been nearly three months since I wrote the above comment and stated I had my GPS mount and my C124 was in production. I did take delivery of the scooter less then two weeks later. For reasons I won't go into here, I just got around to installing the GPS mount and used the GPS on the bike for the first time on this last Saturday.
MikeB's suggestion to use the RAM-B-272U bracket with the arm and appropriate cradle proved to be an excellent choice. (Thanks, Mike). However, I did have some minor problems in the installation so I thought I'd spell them out here for anyone else doing a similar add-on.
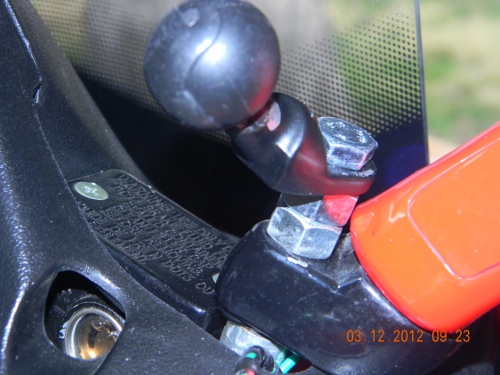
The RAM-B-272U bracket is attached by removing the mounting bolt from the mirror of choice (right side for me) and replacing the bolt by first going through the hole in the mount bracket. Remove the bolt using a 13mm open end wrench as there is no clearance for a socket between the bolt head and the housing for the mirror arm.
Removing the bolt caused the first problem. The bolt (which is 50mm in length) went though the arm of the mirror, three spacers and one lock washer before reaching the female threads where it secures. Be careful in removing the bolt as you could lose the washer and spacers in the process. I had the washer and one spacer fall off the bolt before I realized the problem. I was able to retrieve the two pieces but the washer took some time to locate and recover.
To avoid the problem I know I would have during reassembly, I placed the three spacers and the lock washer on a screwdriver. Then I took a short piece of 3/4” cellophane tape and wrapped it around the four pieces. Then removed the “assembly” from the screwdriver and it held together during the next step.
Placing the bolt through the GPS bracket, the mirror arm, and the four taped items, I was able to hold it all together while I fed the bolt into the female threads. The bracket made it an even tighter fit for using a wrench to tighten the bolt. In addition, there was less thread available to hold it all. When I had tightened the bolt as good as I could, I was not happy with the result.
To resolve this issue I purchased a longer bolt with the same thread. The size is M8-1.25 X 70mm. I reassembled in the same order as above except I added two 3/8” nuts between the GPS bracket and the mirror arm. This gave me plenty of clearance for an open end wrench and the added threads to properly tighten the bolt.
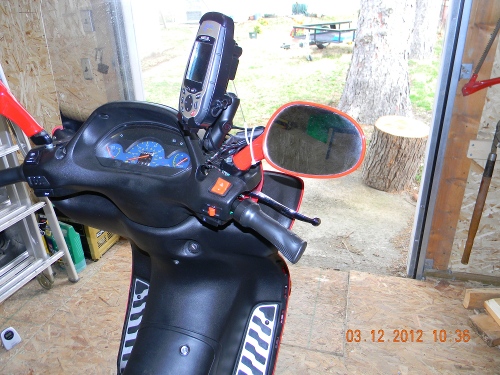
The pictures show the mount bracket and the fully mounted setup. In the second picture the excess cable (about 6') is tied up using cable ties. There is a black box included there that holds the circuitry for bringing the 12V down the what is required for the GPS. I'm working on moving that under the seat and having very little exposed cable at the front.