
It's Alive!
It took a while to convert my '07 Vectrix from NiMH to Li-ion, but it's finally done and it's working.
I'll share with you some of what we learned along the way - to help you when you convert your bike.
The batteries:
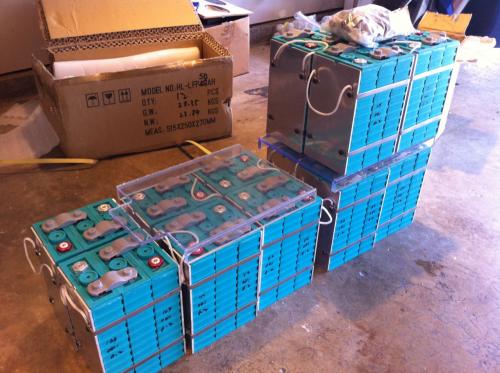
I ordered the 50AH batteries from CHL in China. Since there are some tricky import rules to deal with I paid Randy at FalconEV $200 to help me with the import stuff (customs, forms, etc.) However, there was mass confusion between CHL, FalconEV, and myself regarding how to import, where to send, etc., so Randy has already declined to help others with this import process. The gentleman at CHL that made the arrangements to export the batteries from China is named Joey Zhong (chlbattery [at] gmail.com). He seemed very helpful and answered all emails promptly. Although his export experience is… well… anyway… he may be able to export the batteries without a middleman, if you want to try that route.
FIRST PITFALL
CHL was under the impression that I was ordering the batteries for my "business", rather than just for my own bike - this delayed the import by several weeks. Make sure that you make it clear that you are importing them for yourself, and NOT a business - otherwise the import process will be delayed (they will ask for business license info/company address, etc.) We had to literally stop the process and start over with new paperwork, otherwise US Customs was threatening to slap a $5,000 fine for not providing all of the correct "business paperwork"! Once we changed from the company to the personal name/address we were able to get through customs without any further problems.
SECOND PITFALL
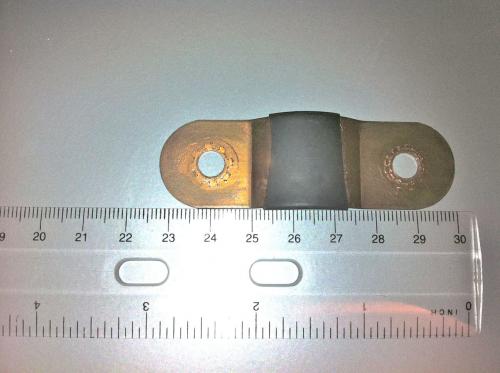
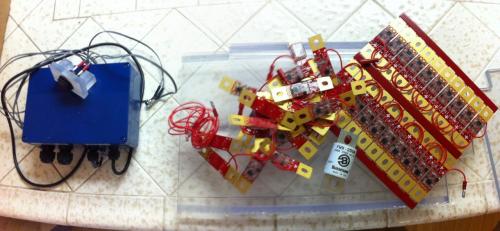
When I ordered the batteries I didn't know how many battery interconnects came with them. Joey from CHL didn't know how we would configure the 42 cells. Long story short - we came up 10 interconnects short. They didn't charge extra for the interconnects, so ask for 42 (I think I used 41, but why not have a spare?) This delayed my conversion by a week or so (and added another $100 to the cost), as you cannot simply go to the local Radio Shack store and buy them - you have to go to a machine shop and have them manufactured to exact specifications.
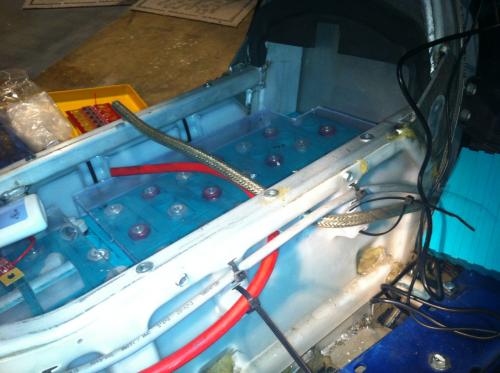
Removal of the old batteries:
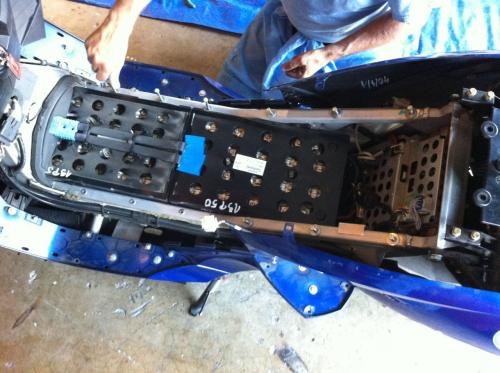
We found that a hand-ratchet chain hoist, hooked over the garage rafter was adequate (but necessary) to remove the old battery packs. To connect the hoist to the pack you will have to improvise (as in the antiscab conversion video). This part really requires two people, to guide the pack out of the battery box, so it doesn't swing one way or the other - and so you can move the bike out of the way to lower the pack onto the floor.
Installing the new cells:
BUY AN ANGLE GRINDER if you don't have one. The smaller the disc, the better (I bought a 4 1/2 " angle grinder). The 50AH cells won't fit into the battery box without grinding out the extra aluminum welds in the corners at the back of the battery box. I also had to grind off the overlapping lip at the front of the battery box. I started to try to do the grinding with a Dremel tool, but found that I needed something more more heavy duty (again - I wasted hours trying to grind off just a few millimeters of aluminum and went through several grinding bits - only to finally give up and go buy an angle grinder!)
THIRD PITFALL
The battery management system (BMS) modules that came in the kit from antiscab are soldered together, but the soldered connections are quite fragile. Several of the small red wires had broken loose during shipping and had to be re-soldered to the module boards. Others came loose during installation and had to be re-soldered. You will need a soldering iron and some solder. ALSO: the top battery layer BMS strings did not line up with the cells, as shown in the video - you will have to remove one board from one end of the string and solder it to the other end for them to line up with the correct polarity of the cells (maybe the 40AH cells in the video are configured a bit differently than the 50AH). This was easy…if you know how to solder, but it had us scratching our heads for awhile.
ASK antiscab to email the diagram of the BMS connections - this helped tremendously.
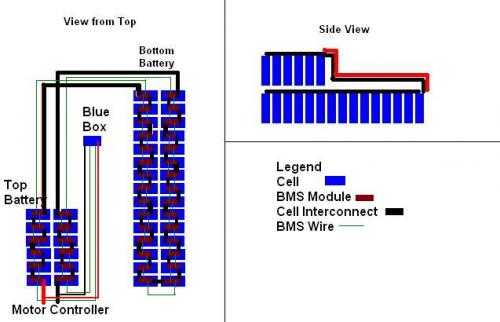
ONE IMPORTANT OMISSION FROM THE CONVERSION VIDEO: in the bottom layer of the battery pack, the BMS line must connect from the right side of the pack, across to the left side between the two rear cells to make a complete circuit. Antiscab makes a verbal reference to this in part 8 of the video, but it is not shown in the video . Again - the diagram makes it clear how the BMS lines need to be connected.
FOURTH PITFALL
The poly-carb divider that sits vertically in the middle of the battery box to keep the top layer of batteries from shifting forward is made for the 40AH cells. If you use the 50AH cells you have to modify this divider a bit (I used the Dremel tool to cut an inch or so of plastic off of each side). Since the 50AH cells are taller, this divider only provides a few centimeters of restraint across the bottom of cells of the top layer. To help strengthen the top layer we wrapped a couple of large wire ties around the cells - 18", or 24" connected together should do it - this also came in handy later for support of the Cycle Analyst shunt.
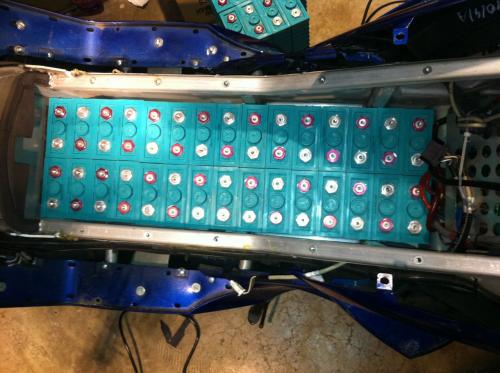
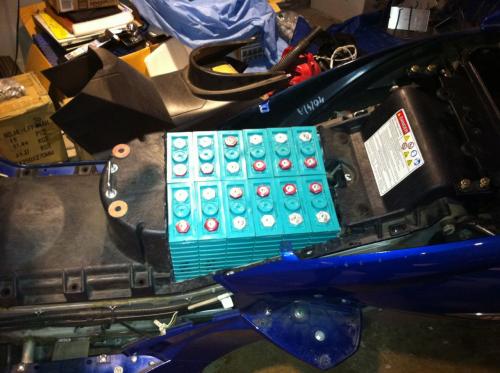
Wiring up the new cells:
Watch carefully where to start placing the cells in the battery box. The cells in the antiscab video have different indications of positive/negative (the center part of the terminal was red for positive, while the 50AH cells have a red ring around a silver central area). In the bottom layer, if you start from the front of the pack on the right-side of the bike (the throttle side) the terminal in the corner of the battery box should be the positive one. Each cell is placed in the opposite direction as the one next to it, as you go from the front to the back of the battery box. On the left side of the battery box the cell will have the negative terminal in the front corner.
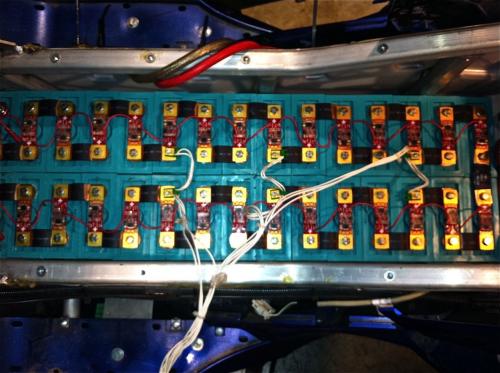
In the top layer the pattern is the same if you start from the front and work your way back, the positive terminal on the first cell will be on the right (throttle) side of the bike.
FIFTH PITFALL
Make sure you place the polycarb divider into the battery box before installing the top layer of cells - as you cannot put it in place afterwards.
SIXTH PITFALL
Make sure to double and triple check that each and every bolt is tightened and each BMS line is secure to each board before continuing onto the top layer. Somehow we failed to tighten two of the 60 bolts in the bottom layer and had to completely disassemble the top layer and find the loose bolts.
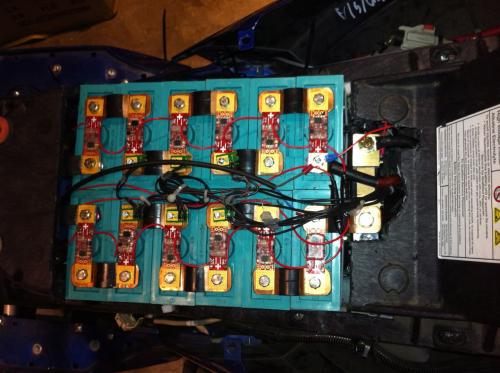
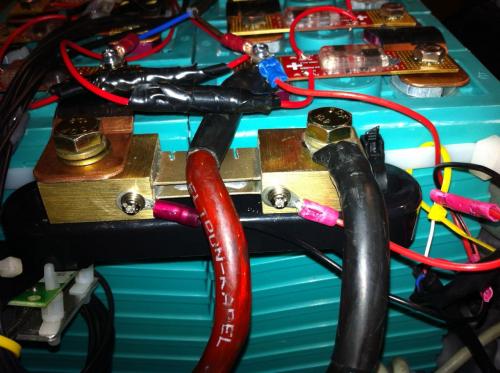
Cycle Analyst Installation:
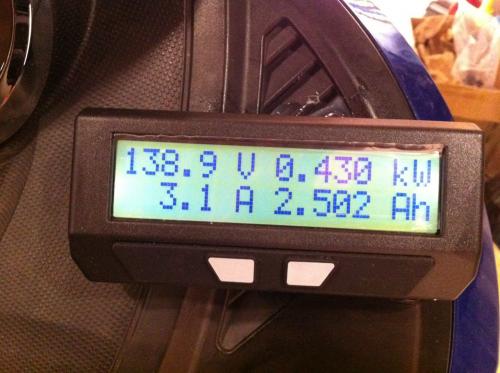
Antiscab's instruction video for the Cycle Analyst installation should be watched BEFORE finishing the battery conversion - as you will have some different wiring to do at the back of the top layer of cells. Also, you don't want to hook up the main power lines (Anderson Connectors) until after the Cycle Analyst is installed - otherwise you will end up just disconnecting and reconnecting the Anderson connectors unnecessarily. Although it is optional, I HIGHLY recommend installing the Cycle Analyst (order the high-current version - Model # CA-LHC). The Cycle Analyst was easy to install and proved invaluable in confirming that all was hooked up correctly and in diagnosing problems when it wasn't. (Also it's really cool to see how much current you are drawing under heavy acceleration!)
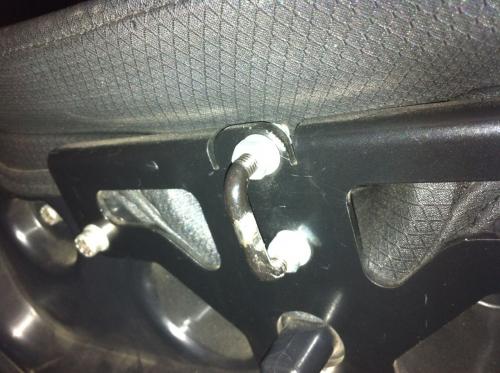
We were a bit concerned about the extra weight of the Cycle Analyst shunt on the negative terminal of the left-rear cell, so we used wire-ties to support the far end of the shunt by connecting it to the large wire-ties that we strapped around the top layer of cells.
SEVENTH PITFALL
The model of Cycle Analyst in Antiscab's video has three wires to connect while the one I received had four - follow the instructions that come with the Cycle Analyst.
EIGHTH PITFALL
The Cycle Analyst wires were just about 12" short of reaching from the dash of the bike to the rear of the top cell layer - you will have to splice some wire to lengthen it a bit. (However, I placed the Cycle Analyst wires along the outside of the battery box on the right-side of the bike, rather than through the middle of the battery box, just to avoid having so many wires running through the same area. I believe antiscab ran the Cycle Analyst wires through the battery box - the wires are probably long enough to do it that way).
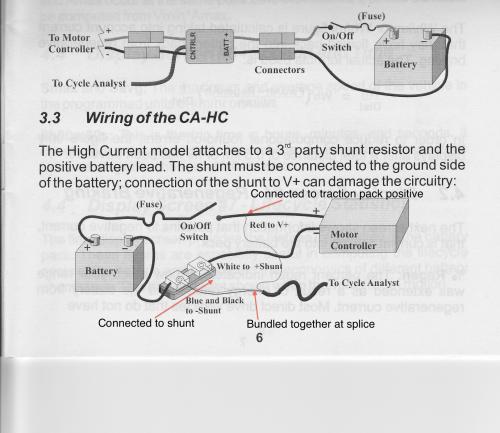
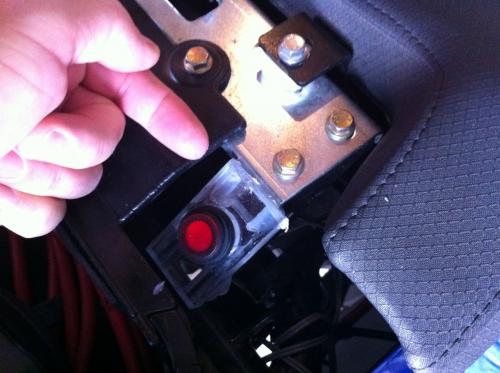
Reset Button Installation:
The reset button is set in a piece of polycarb that fits nicely between the two thin sheets of metal on the right side of the bike, near the trunk-latch. You can use some silicon glue to secure it there.
NINTH PITFALL
The large steel plate that contains the trunk-latch will not quite fit with the reset-button poly-carb piece. I used a Dremel tool to cut a few millimeters off of the poly-carb piece.
The Blue Box:
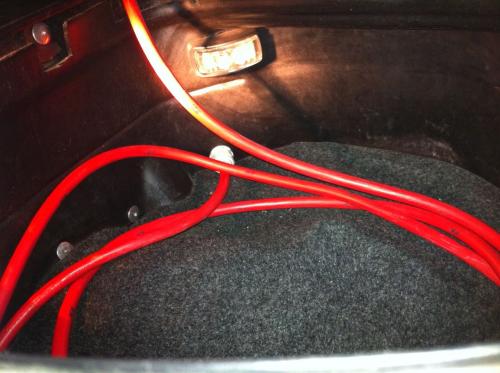
Don't miss the opportunity to extend/replace your charging cable - I bought a 25' heavy duty extension cord and cut off the female end and threaded it through where the old charging cable was - no more need to carry around an extra extension cord!
IMPORTANT STEP NOT COVERED IN THE CONVERSION VIDEO (For 120V systems)
This is the charger wiring diagram from the Vectrix Service Manual:
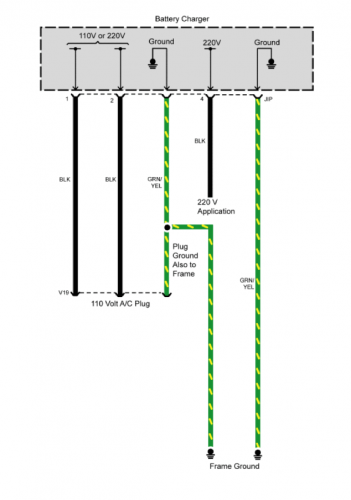
To do the wiring correctly in The Blue Box for 120V charging you have to know which of the black wires to use. Looking at the wiring from the charger down to the new blue box -there are four wires inside the bundle, three black ones, and a white one. One of the three black wires isn't used with the 120V bikes, We figured it out by disconnecting the power cable from the charger (the gray connector unsnaps - it is the one that is closest to the front of the bike) and using a volt meter to check continuity.
The wires are numbered, although they don't exactly correlate with the numbers of the pins inside the gray connector that plugs into the charger. If you look closely at the female side of the gray connector you will see that one of the holes is blocked - I imagine that this was done for the 120V bikes. Once you've determined which one of the black wires does not connect to the charger, you can eliminate it from the blue box (we didn't cut it off like antiscab… just in case… we taped the end of it and curled it up inside the blue box).
Our check revealed that:
Wire #1 connects to Pin #1
Wire #2 connects to Pin #2
Wire #3 connects to Pin #4
Otherwise we followed antiscab's video for the wiring inside the blue box, although we decided to solder the power cords to the terminals, rather than use the crimp-connectors.
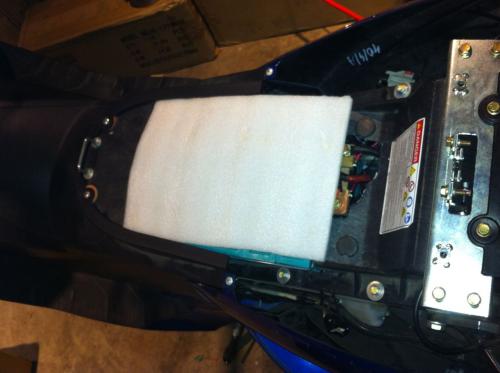
Final Touches:
After wiring the two layers of cells and the Cycle Analyst into place you have to modify the battery box cover. For the 50AH cells you have to cut it completely open. BUT, leave the thin strip along the sides as they contain the holes for the bolts that hold the whole thing in place.
TENTH PITFALL
The seat actually rests on top of the battery terminals of the top layer without modification - I placed a layer of foam packing material on top of the batteries - and then I placed some spacers beneath the seat brackets to raise it up about one centimeter. This should keep the weight off of the battery terminals, but it will result in preventing the trunk from locking. I believe it's possible to remedy this by extending the trunk catch by cutting and splicing a one centimeter length of metal rod into the "hook" that fits into the trunk lock. I haven't done this yet - I will post again after I get it fixed.
Charging:
When I originally ordered the batteries and the kit I didn't know that the onboard charger isn't capable of charging the 50AH battery pack. For now I'm using the pack as if it were 32AH (the maximum that the charger will put into the pack based on the original firmware programming). To solve this problem antiscab has been working the The Laird on firmware changes. I've opted to wait until some testing has been done, as firmware modifications are quite risky and can cause permanent damage if not done precisely. Another option would be to connect an off-board charger to the pack, as antiscab does with his 60H bike.
Riding:
I haven't pushed it too far yet - as recommended by antiscab - I'll ride and recharge 20 times to make sure the cells are balanced before pushing them to the limit. So far I've ridden and recharged five times. At the end of each charge the Cycle Analyst shows that more and more AH's are going into the pack. I believe it is already close to being balanced, but I'll ride it a bit more each time until I no longer have to hit the reset button (i.e. when the BMS is happy with the ebb and flow of current within the pack).
Today I took it onto the freeway for the first time. I rode first north and then south on Highway 99 near my home. When I got back home I'd used 18AH and had almost 30 miles on the trip odometer. Although the Vectrix fuel gauge showed only one bar left, I experienced no loss of power, no red battery light, no problems whatever. This is how it should have been done in the first place. Imagine how it will perform once the 50AH pack can be fully utilized.


I forgot the picture of the spacers - these are nylon about a centimeter thick:
And last, but not least:
Hi oobflyer,very informative thread. Thanks for the share.
Greetings Mike
Good job !
Sorry for troublesome you during importing because this is CHL first exporting to USA and we have no experience on complicated procedure.
Now we know what to do.....
By the way,what's the top speed at 138V ?
The top speed is governed to 110Km/hr (68 MPH). The new batteries didn't change that. The increase in range is what I was looking for. It's already better than the original bike, but will be even better when I can charge the pack to it's full capacity (50AH).
Nice thread Oob, and congratulations! I just finished my own 50ah LiFePO4 upgrade, so I know the thrill you are feeling. The upgrade made the Vectrix into the bike I hoped it was when I bought it, enjoy.
-JD
what's the weight after convert into lithium ?
Dave,To protecr battery,remember to set BMS at 2.8V low voltage to cut off the power.
Our battery curve drop sharply during 2.5V-2.9V,there is almost no capacity during these zone.
The BMS in the conversion kit trips an alarm when any of the cells get below 2.5V, but it does not cut power - so I wouldn't know when that happens while riding.
However, if the batteries are balanced (and it seems like they are) then the voltage that is displayed on the Cycle Analyst should let me know what the average voltage is per cell, based on the pack voltage. For example - while riding on the freeway today, the pack voltage never got lower than 136V, which is 3.2V per cell. On the other hand, if the pack voltage drops to 118V, then the average voltage per cell will be at the 2.8V range. I've never seen it that low. I'll make sure that I never do - thanks for the warning.
The old NiMH pack weighed about 86 Kg. If the new cells are 2 Kg each (total 84 Kg) then the bike weighs about 2 Kg less now.
I mean when you are doing full range testing later,be sure to adjust the protection voltage.
2.5V alarm is too late,the voltage might drop to 1.8V or 1.5V even lower in few minutes,pls adjust alarm on 2.9V and cut off power at 2.8V,no one can ensure 42 cell would be exactly the same.
Cut off at 2.8V and 2.5V only 3-5kms range difference,but a lot of protection on battery !
Thats one of the reasons to limit discharge to 40Ah, when using 50Ah cells
It's also why its best to limit discharge to less than this, until all cells are confirmed full by the BMS not disconnecting the charger.
When a single cell falls first, whether due to imbalance, or lower capacity than the rest, the effect on pack voltage is slight.
So you may only see a small fall in loaded voltage, say from 136v to 134v, before a cell reverses.
As there is no low voltage indication at the cell level, another approach is needed
Limiting discharge to 40Ah in general means there is a capacity buffer.
That means you will probably be stopping when the battery voltage is still 126v
During acceleration, voltage may go below that, thats ok as long as you are below 40Ah, as you know none of the cells are completely discharged.
As the battery gets older, it would be a good idea to revise the discharge limit, by doing a capacity test while inside the garage.
It's good practice to do it once a year.
Using the present Master module, its a bit tedious and time consuming (as you have already discovered).
I'm working on a newer version that will make the process a bit more automated
Btw - don't use the full 40Ah until the BMS does stop disconnecting the charger, it takes a long time to correct a large imbalance.
Unfortunately there is no way for the BMS to stop discharge when a cell is low, not yet
The BMS is mainly there to prevent overcharge.
During discharge if a cell is reversed, than it needs replacing, however the damage is limited to that one cell.
During charge, if a cell is overcharged, it can lead to a fire, particularly if the charger software has locked up, and it is continuing with voltage limit.
Matt
Daily Ride:
2007 Vectrix, modified with 42 x Thundersky 60Ah in July 2010. Done 194'000km
So that such PCM only performance like bank charging ? right ?
Actually big discharge current damage more on cell that overcharge.I think DAVE need a smart active BMS to protect our battery.
I thought your cells could do 5C continuous?
The Vectrix can only draw ~230A (4.6C) max, or 100A (2C) continuous @ 70mph/110kmh uphill
Out of curiosity, why do you think you need an active BMS if your cells are of good quality?
The self discharge rate of Thundersky cells are not even measurable, so much so that once in balance they stay in balance, as long as they are never overdischarged
There is no way for a BMS to stop discharge when a cell is low on the Vectrix, unless you have a copy of the source code, and can modify the program within the motor controller
A BMS can't reduce the discharge rate, only the rider can do that (by going slower)
Matt
Daily Ride:
2007 Vectrix, modified with 42 x Thundersky 60Ah in July 2010. Done 194'000km
Yes,my battery could bear 6C constant discharged,but good quality cells don't means well picked up in group,for 42 cell group battery,it is very difficulty to ensure every cell exactly the same character. Although we have try our best to organize the most consistency.But under 2.7V or 2.6V situation,the voltage difference would be badly enlarged under 230A current. So that if you can't cut off the power based on individual cell voltage,don't drop battery under 2.8x42=118V would be saftey solution.
Since Vectrix' software already takes care of that, by illuminating the red battery telltale at 118V, I think that can be a nice solution.
Hi Dave,
I've been meaning to post a response
These are the interconnects I use:
http://www.evworks.com.au/index.php?product=BAT-EVW-BCI-50-6
http://www.evworks.com.au/index.php?product=BAT-EVW-BCI-60-6
They are quite pricey, but are thicker (50 sqmm total conductor area) and designed for Electric Cars.
So they will do 150A continuous before things get too hot.
Unfortunately, they are too thick to use with the special bolts that are used for the temp sensors.
So to use those, either the temp sensors need to be eliminated, or, the thinner copper leaf interconnects are needed for the connections where the temp sensors are needed.
Incidentally, I discovered the temp sensors don't actually have to be connected to any cells at all, they just need to be plugged into the CAN bus.
The copper leaf interconnects are big enough for a Vectrix with 40Ah or 50Ah cells, as you are unlikely to be able to maintain a high enough current for long enough to cause issues (it helps that nominal voltage is 134V)
Getting the old nimh batteries out can be a pain
It's not so much that they are heavy, as much as there are silicon "blobs" adding friction to hold the batteries in.
Where I don't have access to a hoist, I do this:
1) cut away the silicon I can get to with a knife
2) remove the top layer cell racks
3) clamp 2 x vice grips onto the threaded rods on the battery
4) a friend and myself both try to pull the rear battery out (brute force needed)
5) once front battery is removed, cut away all the silicon holding the back one in
6) slide the back battery forward
7) use vice grips to remove this battery aswell
This I will add to the necessary tools list
That one was my fault,
There are two possible ways to have the cells wired up, the difference is where the positive and negative ends up.
I did the video one way,
and later soldered the BMS boards for the kit the other
I recommend laying out the BMS boards, and arranging the cells to match the layout of the BMS boards.
If I have really stuffed up and wired the BMS boards for the bottom cells one way, and the top the other, than some soldering will be necessary, I apologise.
The BMS boards from the initial run (which Dave's kit was from) have all been shipped.
I will double check them all before shipping in future
Another issue with that intial run of kits, they came with red crimp on connectors that were supposed to make installation easier.
Unfortunately the guage of wire the connectors were crimped to was too small, and most of them fell off after shipping.
In Later kits I have pre-soldered all the BMS boards into the order in which they are too be connected
When I was doing the video, I was also doing a group of conversions at once (with the help of their owners)
Alot of later part of the video was done on the last bike to be converted.
I forgot to get me wiring the last bottom two cell modules on video.
In later kits, the BMS modules all come prewired, including to the blue box, so I probably won't redo the video for a while.
The Diagram Dave refers to is this:
I may have to rethink the forward restraint when using 50Ah cells
That may have to come after the newer kit for bigger cells is here.
Where there are unbalanced cells, the BMS will bring the cells closer in charge by ~0.1Ah per cycle.
If you are buying new cells, they should all come at exactly 50% SOC as a result of the selection process
The selection process is where every cell is individually full recharged, then fully discharged with capacity and internal resistance noted on the discharge cycle.
Thundersky cells these days come with a ~1% variation in actual capacity, if bought either from the factory or factory outlet.
If bought through a retailer, the variation will be greater, as you may get cells that aren't matched by capacity.
Where you are buying brand new cells (whether from the factory, or a retailer), the variation in charge needed to get all the cells to full charge isn't likely to be greater than ~2Ah.
Thats why I suggest 20 charge/discharge cycles
If after 20 charge/discharge cycles the BMS is still disconnecting the charger, it means the battery is still not balanced out (not all cells are at 100%).
Dave's was a special case where new cells were bought, but one was at a very different state of charge to the rest.
If you are using second hand cells, you will also encounter this issue.
The solution is to use a single cell charger to fully charge every cell before installing them.
I have ordered this charger for myself, but it has not arrived yet, so I haven't tested it:
http://www.ebay.com.au/itm/110633118587?ssPageName=STRK:MEWNX:IT&_trksid=p3984.m1497.l2649
If using second hand cells, I recommend doing a capacity test aswell, by fully charging, then doing a discharge test with a West Mountain Radio CBA II or III
If doing a capacity test, you don't have to recharge again, as you will know that all cells are at the same state of charge (all at 0% SOC).
It will mean the BMS disconnects the charger once the smallest cell reaches full, however, you will know that the capacity is there.
Matt
Daily Ride:
2007 Vectrix, modified with 42 x Thundersky 60Ah in July 2010. Done 194'000km
Ah yes, this makes sense
With all cells starting full, 45Ah would need to be removed to reach 2.8v average
This is ok as only 40Ah is recommended to be used
Daily Ride:
2007 Vectrix, modified with 42 x Thundersky 60Ah in July 2010. Done 194'000km
I took the trunk latch off today to see about modifying it... and got lucky. There are nuts on both sides of the anchor plate - I loosened the nuts on one side and found that there was enough room (barely) to extend the latch to the point where it catches and locks now.
I rode for about 25 miles this morning and watched the Cycle Analyst carefully - after about 25 miles of riding (and about 18AH of battery usage) I was cruising along at about 50 MPH (80KPH), which corresponded to about a 40A load - and the voltage easily dropped to below 118V. I should be able to continue riding for at least another 15AH or so, but I was worried about the voltage drop.
When I plugged back in - the BMS had tripped, so I had to hit the reset. This means that at least one of the cells dropped to below 2.5V, correct?
Curious... if I shouldn't push the pack below 118V (2.8V/cell) - then I can't use more than 18AH...
What do you think Joey? Matt?
Thanks
What was the ambient temperature you were riding in? The colder it gets, the more it slows down the electrochemical reactions in LiFePO4 cells, and drawing the same current as in warmer temperatures will cause a higher voltage drop in the cells. Even fully charged I have to reduce the throttle setting during acceleration at 5 to 7°C temperatures in order to keep my battery voltage above 65V (I only have 24 cells aboard), thus a mean of 2.7V per cell. So the really usable capacity of such cells drops sharply at around and below freezing temps because they can no longer muster sufficient voltage (and thus current) under load to move our vehicles adequately.
My rides:
2017 Zero S ZF6.5 11kW, erider Thunder 5kW
It was a bit cool this morning: around 6 degrees C.
OK then, that could explain the reduced voltage and range. Even though the CHL cells boast a far smaller impedance than other LiFePO4 cell manufacturers currently specify for their products, but they still suffer similarly from the woes of low cell temperatures, albeit on a slightly higher level...
My rides:
2017 Zero S ZF6.5 11kW, erider Thunder 5kW
The voltage will usually fall below 2.5v during acceleration, particularly while its cold
It would be concerning if just one cell was sagging, however, with a total pack voltage of 118v, its all of them
going below 2.5v during acceleration is not a problem, although going below 2v is
However, with a balanced pack, the motor controller won't let you sag the pack below 2V average (108v/42 = 2.57v average), unless you have pulled too many Ah out
Acceleration and/or top speed won't be affected until the voltage at load gets to 108v
The 50Ah cells should be large enough to power the bike at freeway speeds below 0 deg C
how far below time will tell
Matt
Daily Ride:
2007 Vectrix, modified with 42 x Thundersky 60Ah in July 2010. Done 194'000km
Could you Cycle Analyst read each cell voltage ? it is hard to make conclusion before we know the exactly voltage !
The Cycle Analyst does not read individual cell voltage - only the pack voltage. It also provides info on Amp-Hours, kiloWatts, and current (Amps), etc.
It may be some cell "sleeping" after several months transportation,try to find out the low voltage cell when it drop to 118V and charge it seperated with mobile phone charger.Try to wake it up !
I haven't had any problems with the batteries - but I ordered the single-cell charger just to make sure.
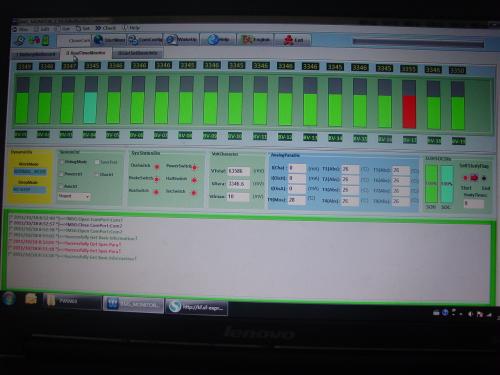
I had set the Cycle Analyst to the wrong resistance settings (thanks for noticing that Matt!). The Cycle Analyst shunt has a specific resistance rating:
Purchase Details-----------------------------------
Description:1 x CA-LHC, 1 x Shunt0.5
I changed the settings to 0.5 mOhm and now the numbers make more sense.
I opened the battery box back up so I could install the red BMS alarm light into the dash.
Now if a cell drops below 2.5V I should know right away :-)
When you use a thermoscud you will need to find a higher up spot for the light. Otherwise it will be hidden in the winter ...
Once you go EV, Gas is history!
Pages