
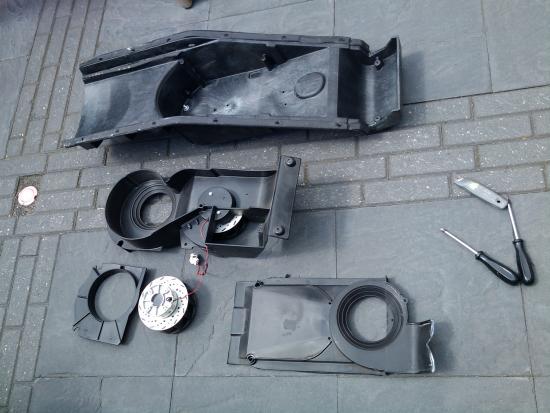
Today I did the modification to remove the stock cooling fans of the battery and replace them with silent computer fans.
Purpose: The stock fans made too much noise and I got complaints from the neighbours...
Warning: Do not do this modification unless you are running the custom firmware as developed by The Laird!
This only applies to VX1 with NiMH batteries. (Li is already silent)
Materials used:
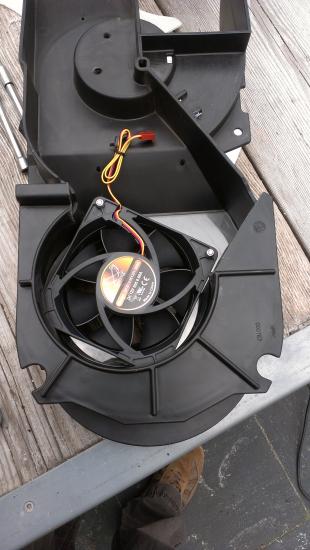
Fan: Scythe DFS123812H-3000 ULTRA KAZE 120mm Case Fan
Fan plates: Cut from a Lexan sheet
Bolts, washers, Locknuts: M4
Why this fan?
The fan I used is high power and quite robust. I selected this fan for its high airflow and sturdy build quality. It is almost twice as thick as regular case fans.
It needs to be a 120mm fan and there are hundreds of types available. Not many have such high airflow though and although The Laird commented that the airflow is less relevant with his firmware I opted to go for the best airflow possible.
Fan plates?
I chose to mount the fans on fan plates to create a flat surface for the fans and avoid that air could start circulating. Without the plates there is an opening such that air could escape from the sides of the fan.
Locknuts?
I do not want nuts or washers to end up between the battery cells.
Step 1:
Open your bike up and take out the complete fan assembly. Plenty of youtube video's around to help you with that.
Step 2:
There is some black foam tape on the edges which runs across both parts of the fan assembly. Use a hobby knife to cut it in order to separate the two halves. (picture 1)
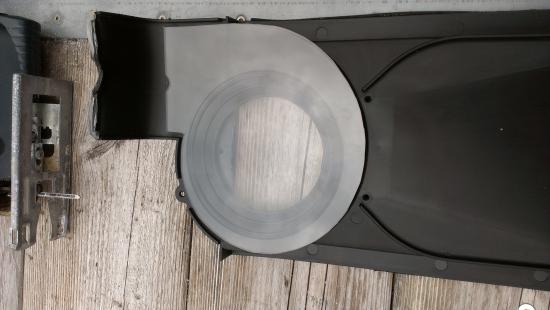
Step 3:
Disassemble the fan assembly. Mine had one part glued together, I use a knife to cut through the glue. (picture 2)
Step 4:
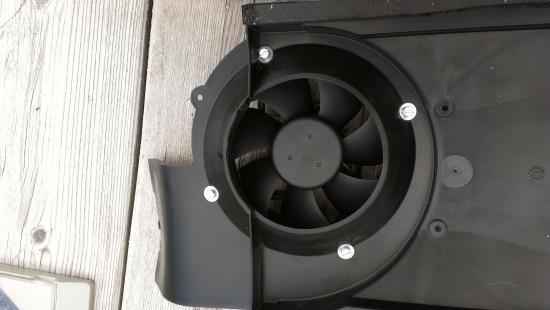
Cut the Lexan mount plates such that they fit as good as possible over the holes where the old fans sucked up the air. Do not cut out the centre part yet. See picture 3 and 4
Step 5:
Remove the protective sheets from the Lexan so it becomes transparent. Position the fan such that it is exactly over the hole where the air must be sucked through.
Step 6:
Mark the fan mounting holes on the Lexal plate while it is positioned correctly and drill 4mm holes through the Lexan and the fan assembly black plastic.
Step 7:
Fit the fan to the Lexan only and mark the centre hole to be cut out such that the air flows freely. See picture 5
Step 8:
Cut out the centre hole. Use a large drill to make a starting hole. Afterwards I used some sandpaper to remove any sharp edges.
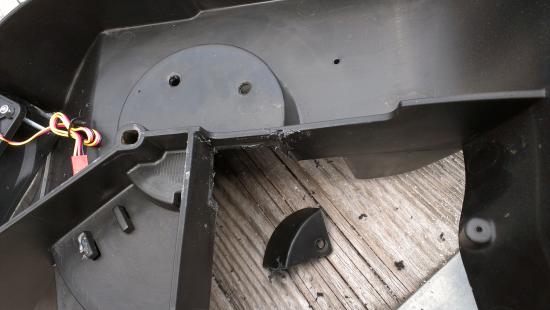
Step 9:
Cut away some of the black plastic on 3 places of the fan assembly. This is required to improve the airflow. The stock fans blow the air out to the side. The computer fans blow to the top. This means a bit of creative cutting to remove some bits that would obstruct the airflow. See pictures 6,7 and 8
Step 10:
Mount the fan plates and fans to the fan assembly using 50mm long M4 bolts and washers. The bolts go through the fan assemble plastic, Lexan and fan. Tighten the locknuts, don't over tighten to prevent the fan from flexing.
Step 11:
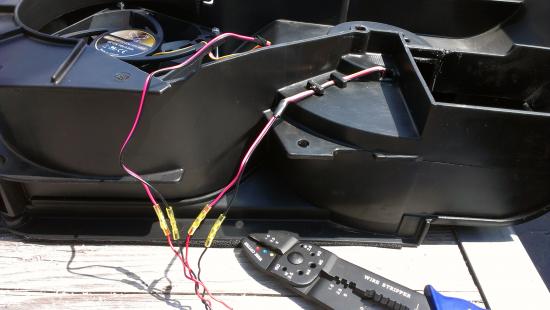
Connect the wires up. I cut the wires of the old fans about 10 cm from the connector and right next to the connector for the new fans. I used a crimp connector to connect the wires. Black to black, red to red. Easy. See picture 9
Step 12:
Test the assembly by placing it on the bike and hook up the connector. Turn on the ignition key and if all goes well the fans should start spinning! (if you have The Lairds firmware) See video 1
Step 13:
If you are happy with the result put it all back together and enjoy how silent your bike is! See video 2
Final notes:
This was not a difficult job at all. If you have some patience and are handy with the power jigsaw then it is no problem to do this.
You will get a very quiet bike and it will loose 500 grams of weight :-)
If anybody needs a stock fan as a replacement or spare just send me a PM. (2x Diplomat DC P/N: 040690 Model: DD523612B1AX)


| Attachment | Size |
|---|---|
| 38.8 KB | |
| 36.15 KB | |
| 25.71 KB | |
| 23.23 KB | |
| 34.98 KB | |
| 30.31 KB | |
| 23.65 KB | |
| 22.39 KB | |
| 26.76 KB |


Ok, video 1 was lost somewhere.
You can find it here
Once you go EV, Gas is history!
Great post, thanks!
Can something similar be done for the MC fan? I mean, install a MC fan that makes much less noise but moves enough air to provide cooling?
This information may be used entirely at your own risk.
There is always a way if there is no other way!
Interesting.
Because The laird's firmware keeps the battery cool, it needs less cooling. Those fans will be perfect,nice mod.
Mik, Sure you can, but you'll need to modify the MC Hex file to reduce the max power discharge, or with less instant cooling the MC will get very hot.
Very good.
Thanks for Share!
I noticed that the $12 Scythe fan uses sleeve bearings, if you pay about 8 dollars more you can get a longer lasting ball bearing fan. Here are two Delta fans I found that are in most ways similar to the Scythe fan;
Scythe DFS123812H-3000 http://www.scythe-usa.com/product/acc/022/dfs1238_detail.html
Bearing Type: Sleeve Bearing
Speed: 3000 rpm
Airflow: 133.60CFM
Noise: 45.90dBA
Connector: 3pin
Dimensions: 120 x 120 x 38 mm
12V DC 7.2 watts
Delta AFB1212HE-F00 http://www.delta.com.tw/product/cp/dcfans/download/pdf/AFB/AFB120x120x38mm.pdf
Bearings Ball Bearing
RPM:2900 RPM
Air Flow:109.17 CFM
Noise Level:44 dBA
Power Connector:3 Pin
Dimensions:120 x 120 x 38mm
12V DC 4.2 watts
Delta AFB1212HHE-F00 http://www.delta.com.tw/product/cp/dcfans/download/pdf/AFB/AFB120x120x38mm.pdf
Bearings Ball Bearing
Speed 3500 RPM
Air Flow 130.80 CFM
Noise 47dBA
Power Connector:3 Pin
Dimensions:120 x 120 x 38mm
12 Volt DC 6.12 Watts
Usually for making a computer silent you replace the old fan with a new fan which is bigger in diameter and can create the same airflow but at a lower RPM.
If you know the specs of that MC fan (especially airflow) than I am sure there will be a more quiet alternative. I am not sure how much room there is to go to a bigger size though. Another thing, it is quite out in the open so I am not sure how regular computer fans would cope with that.
On the positive side, because the battery fans are always on with the firmware I am using it means there will already be some airflow over the MC heatsink from the exhaust of those. So if you cut down on a small bit of airflow with a quiet MC fan it would be OK.
Once you go EV, Gas is history!
How is the airflow with the new fans?
Can you feel suction at the inlets and/or wind at the exhaust?
This information may be used entirely at your own risk.
There is always a way if there is no other way!
Yes to both (you can feel the flow quite well with your hands) but less strong than with the stock fans.
Completed two charges from nearly empty within 12 hrs and temperature is currently only 4 Celcius above ambient. Looks good!
My next step will be to make a request to The Laird for leaving the fans running after riding for 1 hour rather than the 10 minutes currently. Riding is now the biggest heat producer and leaving my new fans on won't drain much power (about 15 Watt max)
Once you go EV, Gas is history!
Thanks for information!!!!
I already use such software from The Laird. The after-riding cooling (for 1 hr) can be enabled or disabled by repetitive key turns. When the battery warning lamp remains on, the battery impellers will run for one hour after turning off. When the warning lamp is off, the impellers will turn off. A slight problem is that the bars will not count down during riding if the battery warning lamp is turned off.
This information may be used entirely at your own risk.
There is always a way if there is no other way!
My bike turned 30K today and the last 3000KM were with the fan modification
After monitoring the temperature closely it became clear that post riding and charging cooling helps to keep the temperature under control. Especially because I ride to empty 2x per day.
The Laird helped out here again (thank you so much!!!) and provided firmware with 90 minutes post riding and charging cooling.
This last week temperatures have hit 30 deg. C in Holland (which is quite unique) and the batteries stay within 5 deg. C above ambient.
Perfect result and I am glad that I made the modification.
Tomorrow I am going to test ride the Brammo Enertia :)
Once you go EV, Gas is history!