When I installed 19 gen 2 Nissan LEAF modules into my VX-1, I decided to not install BMS at that time. I bottom-balanced the cells as many have done, but I never wanted to keep it that way forever. Part of my long-term concern is that 2 of my 19 modules came from a different battery pack than the rest, so their capacity/use history doesn't match the others. While a BMS (especially one that communicates with both the charger and motor controller) would be preferable, I've decided to at least get one step closer toward better battery management.
My 19-module pack is 38S, so I purchased two 0.8A 20S "inductive active balance" boards from AliExpress (https://www.aliexpress.com/item/4000790255916.html) as identified by israndy (https://visforvoltage.org/comment/79837#comment-79837). Each board has 3 connectors with 7 wires each: [B-,1,2,3,4,5,6] [7,8,9,10,11,12,13] [14,15,16,17,18,19,20]. The AliExpress listing for these boards includes the following information: "Note (13 or more string plugs need to be inserted obliquely, first touch the B-pins and insert them obliquely upwards, otherwise it may cause the board to burn out)." I am interpreting that as the need to plug in the first connector with the B-, then the second connector [7-13], then the third connector [14-20]. Seems straightforward.
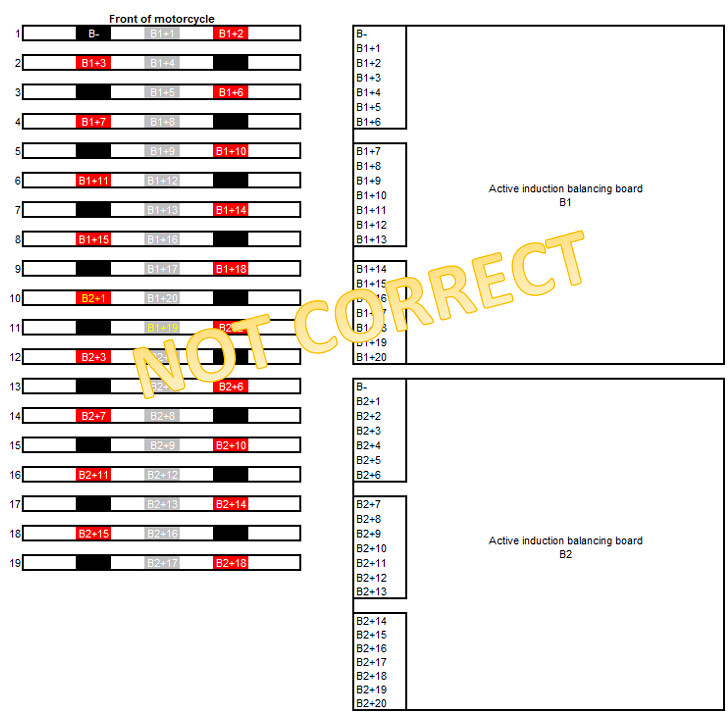
Now for the part where I'm not certain: how do I connect the two balance boards in series? I assume I want to overlap the balancers by a few cells so the cells on the ends don't bear the brunt of the balancing. Or maybe this isn't a thing, because they should all ultimately equalize over time. But should I put the first positive terminal of the second balancing board on the second-to-last cell positive of the cells covered by the first balancing board? Or should the last positive of the first board and the first positive of the second board be connected to the same cell? In my mind, the latter seems more risky. I should probably state that I can more easily wrap my head around (DC) electricity than electronics...
Part of my balancing board project will include installation of the orange plastic LEAF busbar covers with BMS wiring. I bought Sumitomo 32-pin (6098-5289) and 24-pin (6098-5285) connectors and 8230-5379 male terminal pins so I can more cleanly connect my balance boards. Full disclosure: the 24-pin connector may be the wrong part number; I will need to scrape away some plastic on either the male or female connector so the two will pair up. The pins appear to align otherwise.
This diagram is an example of how I imagine hooking everything up. If I'm way off base, I appreciate any assistance you can provide!


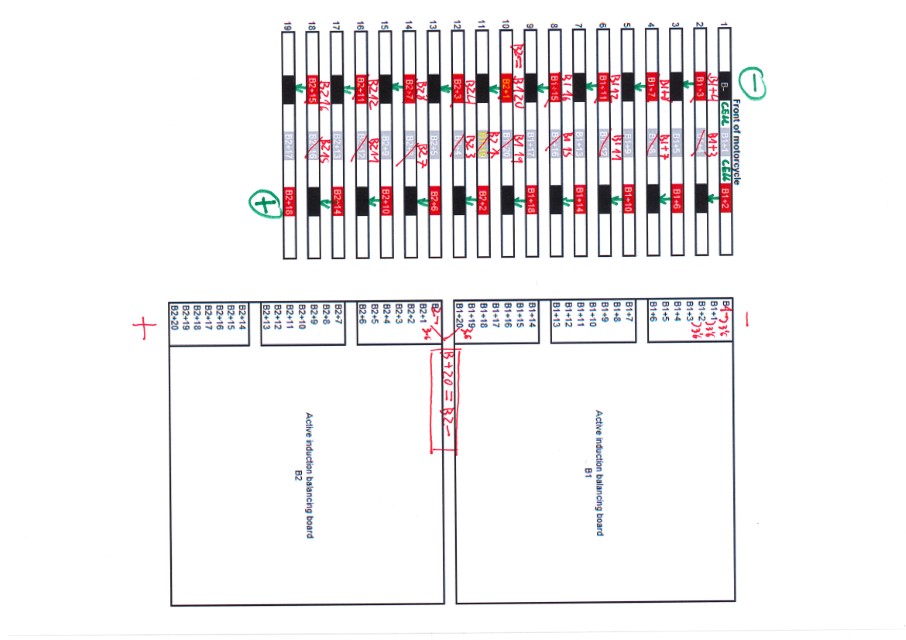
Hi, The diagram goes not look right. You must respect the flow of voltage, between each BMS pin there must be one cell jump, without reversing voltage. bear in mind that each board is autonomus, so B1+20 equals next board B2-, you must wire to both boards to work properly. On the other hand, thre's space for another leaf module, you can go up to 40S.

Thanks for trying to answer that question, I tried to read it but my dyslexia kicked in and I fell asleep, too many words. This is why I am not a scientist. I do like those balance boards, they worked great when I first installed them. Now that they have sat for much of the winter I am excited to see if they killed my batteries during all the down time. I'll post on this board when I have a warm day to take it out.
______________________
I also own a 2018 Tesla Model 3 and a 2012 Mitsubishi iMiev
Apologies for being so verbose in my original post. Trying to add information and context that will hopefully allow others to figure this out if interested.
I'm very curious to hear how your boards worked out over the winter. That's certainly my concern as well. I wasn't sure if it would make sense to disconnect them during longer periods of storage.
______________________________________________
2007 Vectrix VX-1 (19 gen2 Leaf modules, ESD charger) -- SOLD
2013 Nissan Leaf SV
I certainly made some bone-headed mistakes with my original diagram. Thanks for correcting me, Roger!
Here is the revised cleaned-up diagram incorporating the suggested edits:
______________________________________________
2007 Vectrix VX-1 (19 gen2 Leaf modules, ESD charger) -- SOLD
2013 Nissan Leaf SV
This one looks fine! By the way, welcome to whatsapp vectrix group.
Thanks again for your help in figuring this out!
______________________________________________
2007 Vectrix VX-1 (19 gen2 Leaf modules, ESD charger) -- SOLD
2013 Nissan Leaf SV
OK, so I plugged the bike in and it was only down a bit from where I left it when winter started 3 or 4 months ago. It started charging and topped up just fine. I'll get to take it out today if the torrent that has been blowing thru is finally done. Suffice to say, pretty happy with the balance boards.
______________________
I also own a 2018 Tesla Model 3 and a 2012 Mitsubishi iMiev
Glad to hear! Out of curiosity, where/how did you mount the boards? I wanted to be able to see the LEDs as they balance, so I placed mine outside the black battery compartment cover in the cavernous space under the portion of the seat that's bolted in place.
______________________________________________
2007 Vectrix VX-1 (19 gen2 Leaf modules, ESD charger) -- SOLD
2013 Nissan Leaf SV
Just Zip Tied
______________________
I also own a 2018 Tesla Model 3 and a 2012 Mitsubishi iMiev
How are these behaving several years later? Looking to do the conversion myself, and some BMS is a good idea!
Nikki.
Curious how these boards are holding up. Planning a similar conversion, and will want to put some form of BMS on here. I know here in the PNW we get a lot of moisture, so would love to know how these are coping with moisture etc.
Cheers!
I sold my Vectrix (and I believe Randy may have gotten rid of his as well), but I never really got the boards to work well for me. Whatever you do in your conversion, though, make sure you have good, solid connections when crimping or soldering terminals onto BMS wiring!
______________________________________________
2007 Vectrix VX-1 (19 gen2 Leaf modules, ESD charger) -- SOLD
2013 Nissan Leaf SV