I've just returned from my first test-ride following my LiFePO4 conversion. A few of you have asked questions about it so I thought it perhaps worth drawing my experiences together here. I should stress that nothing that follows is new - it's my own experience following in the well-trodden footsteps of others. But it should, I hope, at least offer a few pointers and perhaps reassure those considering their own conversion that it's within the grasp of a competent amateur. Please, before you take my word for anything, watch the videos on YouTube and read Antiscab's original thread all the way through.
Before you start, you need to consider two points.
Which cells? If you're going Lithium you need to first decide what battery capacity you want. I chose 40Ah for reasons of cost and simplicity. My commute is ten miles each way, so 40Ah should give me plenty of capacity (especially since I can charge at work). The installation is simpler due to the smaller cell size, and there's no need for a CycleAnalyst. I approached a dozen or so cell suppliers and am confident I got the best deal available; my cells were $1.22 per Ah, working out at $48.80 per cell (including bolts and washers) plus $2 per interconnect.
Cell width is very important. If you go with 40Ah cells there seem to be four basic options: Blue, Yellow, Black and Grey. There's a whole wealth of subjective information on various forums about who makes the best cell, whether company x is the successor to company y and so on. I won't go into it here. I ended up with CALB (Grey) cells on price alone. I nearly went for Sinopoly (Black) but the quoted width (117mm) is 1mm too wide. Perhaps they fit, perhaps they don't, but I didn't fancy taking the risk (and ultimately the grey ones were cheaper anyway).
BMS? Using Antiscab's kit was, for me, a no-brainer because all the hard work, both in terms of figuring out the installation, BMS etc, and in terms of soldering 40+ short, fiddly wires, is done for you. I'm pretty good with a socket set when it comes to anything oily, and I'm not bad at electronics, I just didn't fancy the faff. So given that the BMS Antiscab uses is already proven, and it comes with the spacers and other bits and bobs your conversion will require, I didn't feel the need to explore other options.
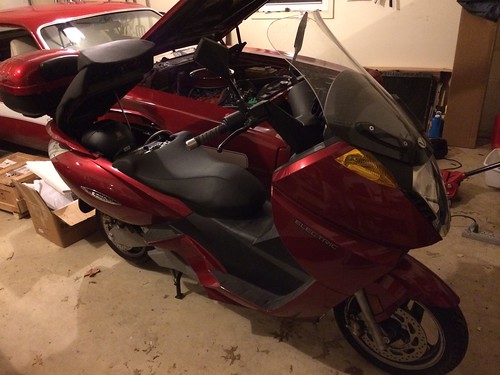
So ultimately I ended up with what I'd call a "Basic Antiscab" - a simple, 40Ah conversion using tried and tested components which will, I hope, turn my Vectrix into the bike it always should have been.
I've included some pictures in the posts that follow. There are more, and at higher resolution, here.
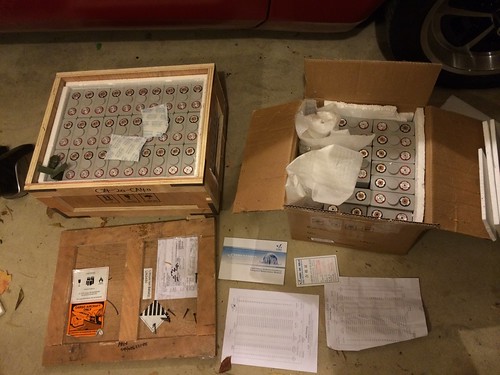
CALB 40Ah cells, as received. I like that they come with a datasheet giving the serial number, capacity and internal resistance of each cell. Mine are all listed as 42 or 43Ah.
Conversion kit - spacers, 200A fuse, Noalox paste, inrush current limiter (aka lightbulb), and BMS.


I'm not going to chronicle the conversion from start to finish; Antiscab has done that exceptionally well in his videos, without which I'm not sure I would have attempted the conversion.
Instead, in this post, I'm going to highlight some areas that tripped me up, and what I'd do differently next time.
1 - The fan cover (picture below) was pretty well stuck down. You'll need something to lever it up - a big screwdriver is good, something like a putty knife or kitchen spatula would also be good.
You need to lever the fan cover up with a screwdriver or similar
2 - In the videos, Antiscab and friend have a small amount of trouble getting the fan cover off. I read in someone else's post (sorry, I can't find the link) that it's easier if you lift the front of it first, up and over this connector (which is for the front temp sensor board). Then the fan cover lifts off pretty easily. You still have to reinstall it front first, though, otherwise you'll mess up the insulating foam.
Front temp sensor connector
3 - I don't have a hoist. So, again borrowing from a previous post, I decided to partially disassemble the batteries in situ. It's fairly simple to remove these nuts and then take out the top layer of NiMH cells - then you can lift the pack out.
Undo these to remove the top layer of NiMH cells
4 - As the video says, once you've got the old cells out, change your fuse! (unless it's been done before). It's fiddly but not difficult.
5 - You may have to smooth out some of the welds towards the rear of the battery box - and possibly at the front, too, although to a lesser extent. I know some have been less than happy with this idea; I made the judgement that the small amount of metal removed would be highly unlikely to adversely affect the bike. Even then, I had to persuade the rearmost cells into position with a block of wood and a mallet ...
6 - Clean your terminals. The guy who sold me my cells stressed the importance of this, as do a couple of other sites. It made a noticeable difference to the appearance of the terminals - if yours look dull, or if in any doubt, I'd suggest you do this, it doesn't take long. I used 220 grit sandpaper because it's what I had handy; a wire brush would probably do the job.
Here's a gratuitous shot of the bottom layer in place
Bottom layer installed!
7 - If you're putting your temperature sensors back on, get them the right way up. Mine caught fire when I connected the rearmost battery connector and (presumably) completed a circuit through the microprocessor board.
On the subject of that rear connector, the video mentions that it's found in the bottom layer of the rear NiMH pack, but I think I found it in the front pack.
Temp sensor fire!
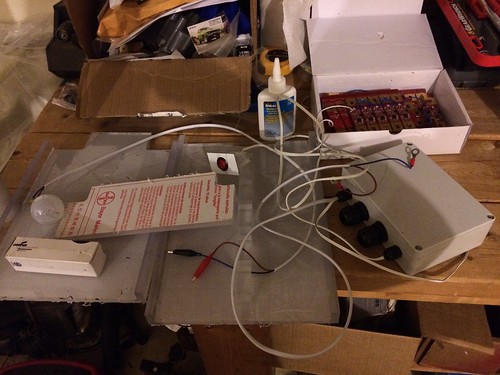
8 - I also forgot the wire which goes between the rearmost BMS modules. This is really important. The BMS modules form a circuit, so your multimeter should show continuity between any two terminals on any two modules in the BMS chain (assuming the green lights are on and the red lights are off). I had to take my top layer out and solder in that one wire, which was a pain. So before you put the spacers on top of the bottom layer, check that there's continuity all the way around the 'chain' of BMS modules. The last page of this datasheet: http://www.evpower.com.au/IMG/pdf/CM-LFP-V8-datasheet.pdf has a diagram which explains things pretty well.
Also, zooming in on this picture, I now see that the middle thermistor modules are upside down, hence the short. Ah well.
Bottom layer BMS installed. Spot the missing wire.
9 - The video isn't absolutely explicit about the fact that you need to splice in an extra length of mains cable in order to connect up the power supply to the charger inside the BMS box. So get yourself a foot or two (you won't need that much, but better to be safe than sorry) of appropriate gauge wire.
Also - and here's another thing I got wrong - when cutting the mains cable, don't clip the redundant wire until you're absolutely sure you've chosen the right one, and tested the charger operation. I overlooked the fact that the two cut ends of mains cable are essentially a mirror image of each other, so I wired the charger up wrong initially and the bike wouldn't charge.
I think - but check this yourself - that the wires you need are, when looking at the front / charger end of the (now cut) cable, you need the wires at six o'clock and nine o'clock, in addition to the earth wire. But check, check again before you cut the redundant wire, and don't put everything back together until you're sure your bike charges properly and the BMS operates as it should.
You'll note I opted for a direct splice for the earth wire. I'd love to say this was for safety, but it's actually because I got the length wrong.
BMS box and mains connector
10 - I tried to be clever and drill a series of guide holes before attacking my fan cover with the cutting wheel. Completely unnecessary, so I didn't bother on the second side.
Unnecessary pilot holes
11 - A small point, but get a short (4" or so) hex extension for your power drill, the kind you get with a lot of multi-headed screwdriver sets. That way you can reach with the drill the bolt heads that the video says you'll have to do manually.
12 - There's no such thing as too much gaffer tape.
This post is less about learning / guidance and more just a couple of observations.
1 - someone had drawn a smiley face on the back of my fan cover.
Smiley face on my fan cover
2 - First charge date. I'm assuming that's 1 July 08 rather than 7 January 08, since the bike was made in Poland. Also interesting to note the factory-assessed capacity of 34.7Ah; the datasheets with my new cells list most of them as 43Ah, some at 42, which means I'm (theoretically) already 20% ahead of factory. Not sure what the real-world difference is, given I'm currently using stock firmware, but there you go.
Also, this pic shows the correct way up to reinstall the temperature sensors. I suspect my fire was caused by my installing them upside down, causing the solder connections to make direct contact with the M8 bolt.
Untitled
3 - I noticed these four digits written on the frame above the motor controller. I thought initially that they might be the last four digits of my VIN but they're not. I wonder if they correspond on others' bikes?
This is not the last four digits of my VIN
OK, some real-world experience.
I finished the wiring part of the conversion last Tuesday evening. Plugged the bike in, to get the first charge done with the covers off in case anything was amiss. Charging phases went as you'd expect until about an hour into the EQ phase when, with voltage reading 160 and red and green lights on most (all but one or two) of the BMS modules I could see, the BMS tripped. So I figured it was doing its job.
Powering on the bike after unplugging the mains and resetting the BMS, the 'fuel gauge' was full with the range reading 47 miles. Since I still had the covers off I checked the voltage across each of the cells in the top layer, all were at either 3.42 or 3.43.
The bike then sat for six days because I was travelling. With the NiMH pack this would have meant pretty horrendous self-discharge. Powering on the Li bike (once I'd put all the covers and the seat back on of course!) I was presented with a full fuel gauge and an est range of 41 miles - I'm assuming the drop from 47 to 41 is the bike's assumption of self discharge?
I then went for a 13.8 mile ride on mixed urban / suburban roads, including a four mile stretch of the I-66 at 60mph, and bits of US50 at 50mph. Est range when I got back was 28, with ten (of 17) bars remaining on the fuel gauge. I plugged it straight in; voltage on plugging in was 140.
After 41 minutes of charging readings were 143v, CP151, 10A, 14 bars.
After 1 hr 40 minutes: 144v, 3A, 16 bars
After 2 hrs 3 minutes: 146v, 3A, full (17) bars
After 2 hrs 22 minutes: 155v, EC 153, 1.25A, full bars
Sometime in the following fifteen minutes the BMS tripped.
Unplugged the mains, reset the BMS and switched on the bike: full bars, est range 48 miles.
NB this is with the 'early' MC1014b and Charger_V2012_032808 firmware; the 'later' MC1017-68mph and BCR3001 files won't charge the bike until I replace the front temp sensors.
That's all for now ... if the weather complies I'll ride it to work tomorrow :)
... and my final but most important point:
THANK YOU big time to Matt (Antiscab) and The Laird (Sandy) in particular for their pioneering work in developing the VX-1 to where it should have been in the first place; and to others who've shared their experiences of disassembling / converting their bikes.
Cheers :)
James
Completely agree!
Hi James,
Great job on the conversion and thanks for taking the time to write these posts!
Once you go EV, Gas is history!
Jeff, aka themanfromcrypton, asked a question by email on point 9, above, which I'll answer here because, on rereading my post, it's not 100% clear.
As Antiscab points out in the videos, there are four wires in the mains cable - Earth (green / yellow) plus three grey ones. Why the other three aren't colour-coded I don't know, but there you go. Depending on the voltage of your market, two of those three are connected to the charger and one is redundant. A learning point for me: I'm concluding that this means you can't just connect a 110v bike to a 220v outlet or vice versa - anyone know for sure?
By cutting the mains cable and routing it through the blue (in my case off-white) BMS control box that comes as part of Antiscab's kit, you are enabling the BMS to switch the mains supply to the bike's charger on and off. To this end the box has three pairs of switched terminals. You cut the mains cable, connect one end (in my case the end leading to the back of the bike) directly to one side of the switched terminals, and splice in a foot or so of extra cable on the other end (in my case the front end) to connect it to the other side of the switched terminals.
If I were doing this again, I'd connect the two ends of the earth wire directly together. This means that (a) your earth is constantly connected, which I guess is a bit safer. And (b) that you can preserve all three mains wires, so if you ever decide or need to rewire your plug for 220v operation for whatever reason, you can. Most importantly - Make sure you match the ends of the wires correctly - which I didn't initially.
As always, IMHO and YMMV
James
I also went the 40Ah Li conversion route (yellow battery) and same BMS.
According to antiscab you don't need to attatch the the temperature sensors to the battery, but only electricaly to the temperature controler board.
see;
http://visforvoltage.org/forum/10583-vectrix-lithium-conversion-kit?page=5 page #6, message #169
I have a question for you, in message #3 you mention ressetting the BMS a number of times, are you refering to the EVpower BMS or the Vectrix's BMS and how do you do that ?
Hi Anderson, the reference to resetting the BMS is to flicking the switch supplied by Antiscab (the one that sits up by the seat when all's put back together) off then on again. The NiMH Vectrix doesn't have a BMS!
Cheers