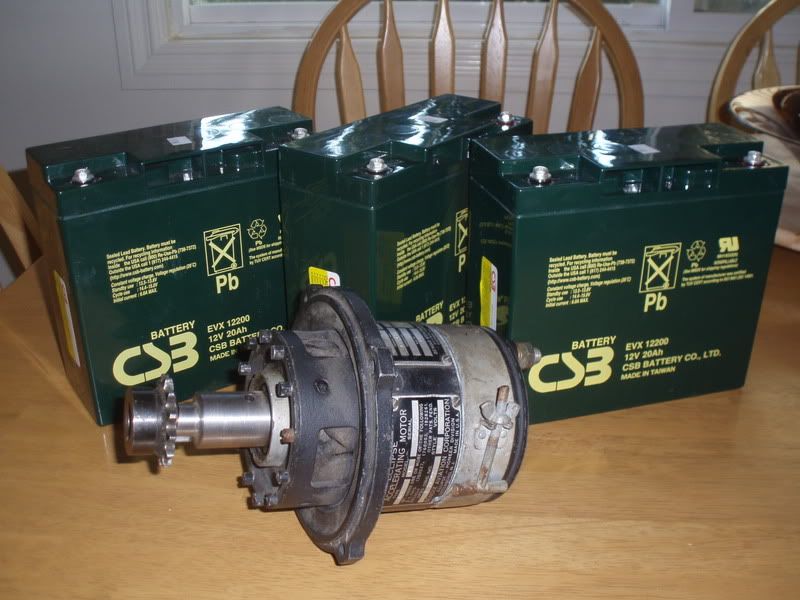
Hello. Nice to meet you all. I look forward to picking up what I can here and hope to be able to add to the forum when I can. My first EV build is a Taco minibike that currently sports a five horse briggs. I picked up a 1204 curtis controller, a magura twist throttle, three 12 volt 20 amp hour batteries, and a used WW2 era 24 volt ball bearing aircraft starter. The fabrication and machine work will come easy it's the wiring I am confused about. I am new to the game and have little experience and no local EV pals yet. Here's a first pic for fun, I hope I have the size right. I live in SoCal.
New guy here wanted to introduce myself / Taco minibike project
Wed, 08/20/2008 - 20:03
#1
New guy here wanted to introduce myself / Taco minibike project
Who's online
There are currently 0 users online.
Who's new
- eric01
- Norberto
- sarim
- Edd
- OlaOst


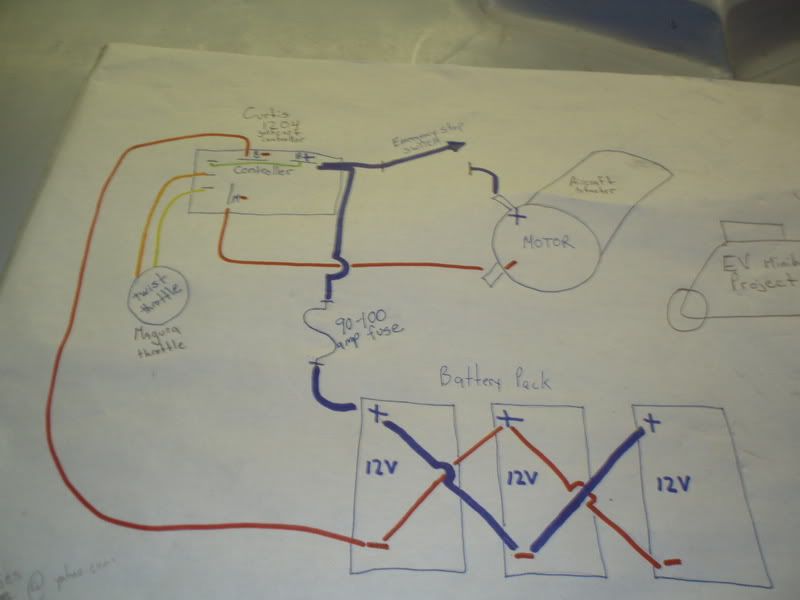
Trying to figure out how the three pictured wires hook into controller. My 1204 diagrams just show two for throttle.
Here are a couple more pics showing my wiring diagram. If it looks right or wrong I would appreciate the input. Thanks.
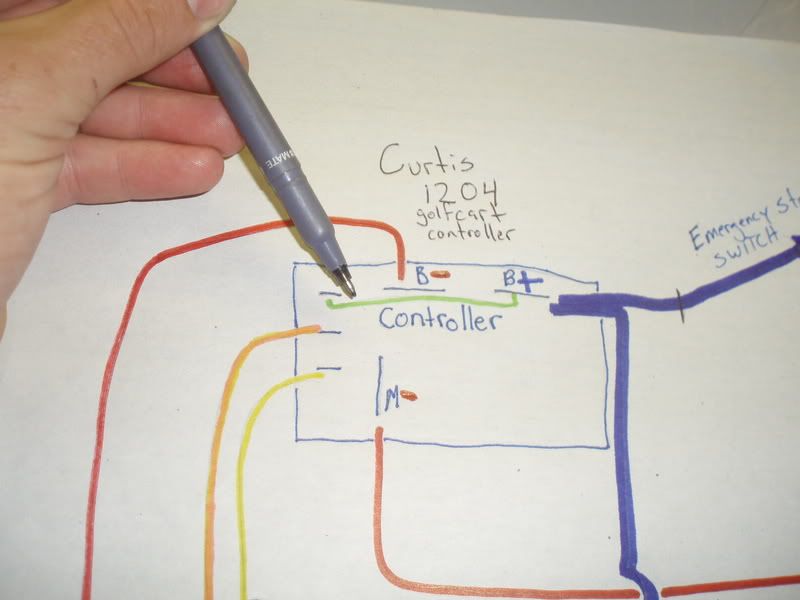
Does the green wire make sense that I am pointing to with the pen?
The Curtis controller takes a 0-5k ohm input across its throttle inputs. You should get a multimeter and use the ohm setting to figure out which pair of the wires are 0-5k ohm. One pair of wires will read 5k ohms regardless of how you twist the throttle. The other two pairs of wires will read 0-5k and 5-0k ohms.
The green wire is correct but it's good form to put a switch in the middle of it. However with the low key esthetics of that bike ;-) you could just have a wire with a blade connector on the end and disconnect it each time.
As for the battery pack you've got it pretty much wrong. The way to do it is
===== +BBB- +BBB- +BBB- =====
That is ... take that blue wire going to the + of one battery, this is the positive-most connection in the pack ... the - of that battery is then wired to the + of the next battery ... the - of that battery is wired to the + of the next battery ... and the - of that battery is the negative-most connection in the pack.
The positive-most of the pack is wired through a fuse to the + of the controller.
The negative-most of the pack is wired to the - of the controller.
Something which will help is to read the install manuals for the Alltrax controllers... http://www.alltraxinc.com/Doc_Depot.html ... Yes, you have a Curtis controller, but the Alltrax controller documentation is readily available and has roughly the same connectors.
Ah.. uh.. Curtis Instruments Series Motors... whaddaya know...
- David Herron, The Long Tail Pipe, davidherron.com, 7gen.com, What is Reiki
Wow, I am very appreciative of the quick reply. I 24 volt my son's power wheels car by putting two twelve volt batteries in series and you are absolutely right, my diagram is totally wrong there. So the green wire with a switch in the middle of it would be an "ignition" switch?
Now the throttle will only use two wires, the ones that pose varying resistance and according to my curtis diagram they will go on the prongs pictured.? If you agree I am confident to try it. I am scared of the smoke test that's all.
Here is the wiring diagram I modded/simplified to work for my setup if it helps anyone. I got it from Greg Whitney.

It employs a foward/reverse setup. I got it from the guy I bought the motor from. I am hoping for 25-30 mph.
I had to test it out tonight! It's 11 pm and I gotta be up at 4:30, but I can rest easy because it works famously!!!! This site rocks. Thanks a million. I will be sure to post the updates.
I am currently working on the motor mount. I am a hobby sandcaster so I carved a bracket out of left over packing styrofoam from my latest dvd player. I will bury the styrofoam motor mount in petrobond sand, pour the molten aluminum on the styrofoam and with a little luck the alloy will take the shape of the styrofoam. Machining can be time consuming and it gives me a chance to cast something. It also rules making something out of scraps versus buying a chunk of billet. As usual time isn't on my side so tomorrow will have to do. Knowing the wiring works still has me walking on air regardless. Here's the proposed mount.
I am presuming it'll be strong enough. I am on the fence about any more gussets.
Well the motor mount is basically done except for the holes to bolt it to the bike. Of course I still have to disassemble the bike. I should be going down the street tomorrow I presume. EV grinning all the way. The real question is how is the performance going to be?
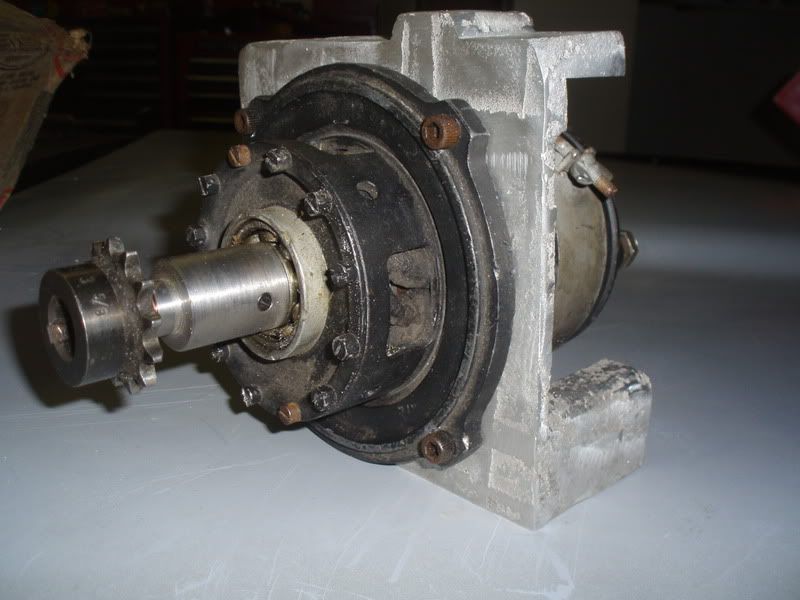
This motors performance sucked. I could try to force a fan on the windings etc., but the speed was just too slow. With my current setup: three 12 volt batteries, curtis 1204 controller, and magura throttle, WHAT might be a faster or more powerful motor selection?
Get a 700-800 watt 36v scooter motor on ebay. I've seen them for 60-80 $$
That should be perfect.
Wow, very very cool sandcasting using styrofoam. Where do you buy the materials for doing something like that? It looks like a great alternative to milling.
I love your little tacobike, by the way. Check out my own blog where I converted a moped to electric using an RC helicopter motor and parts.
Karen
Working on a Piaggio Boxer (mo-ped) EV conversion: http://gpsy.com/ev
Thanks for the compliment. I modded a pottery kiln by drilling the gas jets oversize to melt the aluminum in a cast iron pot. The petrobond sand (best) or greensand (good) can be ordered online. I picked up a drum from a local foundry. A foundry would likely give you a sizeable amount of sand. A charcoal fire and a shop vac set on blow will melt aluminum also. Just ask and I wil gladly get you up to speed if you really want to give it a shot. I will check out your bike for sure.