Now that we have a decent, sound explanation why the rear lights blow sometimes,, I wonder if similar problems might get introduced by the Hazard Lights I rigged up!
Which part would be most likely to get damaged by using the Hazard Lights, if any?
Is one of the blinking patterns really more "benign" than the other? I think it would have to be the alternating pattern, but might be wrong.
Any insights would be much appreciated!
This information may be used entirely at your own risk.
This setup is fine. It has no effect on the tail light since the current draw is so low. This applies to either blinking pattern. You can get either affect by turning on either blinker then flicking the hazard switch when the blinker is "on" for synchronized flashing or when the blinker is "off" for alternating flashing. This is because either blinker is driven "on" as soon as the switch is sampled "on", then it is simply toggled at about 2 Hz. It doesnt care what the other blinker is doing. When both are flashing the dash indicator should be constant "on" since the circuit is detecting too much current for a single directional (the same current measurement circuit is used for both blinkers).
This setup is fine. It has no effect on the tail light since the current draw is so low. This applies to either blinking pattern. You can get either affect by turning on either blinker then flicking the hazard switch when the blinker is "on" for synchronized flashing or when the blinker is "off" for alternating flashing. This is because either blinker is driven "on" as soon as the switch is sampled "on", then it is simply toggled at about 2 Hz. It doesnt care what the other blinker is doing. When both are flashing the dash indicator should be constant "on" since the circuit is detecting too much current for a single directional (the same current measurement circuit is used for both blinkers).
That is good to know, thank you!
Would there be an easy way of disabling the chirping during "hazard light crawl to the power point" rides, without disabling the horn altogether?
This information may be used entirely at your own risk.
I just thought of a better way for Vectrix technicians to do this:
By using pre-fabricated waterproof switches (with hazard symbol on it) with three cables already attached, and three insulation displacing connectors, the hazard lights could be installed in under 5 minutes!
4 screws to be removed and 2 hex screws loosened a little to take off the handlebar cover.
Drill hole in cover, feed cables through and fasten the switch.
Disect the harness cover, crimp IDC's to the three cables to connect the switch, wrap in electrical tape or heat shrink and put the cover back on.
Material cost would be less than $5.- for bulk purchases.
OK, they had their chance.....looks like I have to do it myself!
I cannot buy in bulk and charge hourly rates which reflect a value assigned to those hours by myself...
So it will be expensive, but here comes the kit:
Vectux Hazard Light Kit – Buy or DIY
Like with the ABCool, it'll be "money back in the first week" but no other warranty deal. And I'll again post full instructions on how to DIY for cheaper than buying it.
.
My first attempt at building the Vectux hazard light kit (as described in detail in the above posts) was only partially successful.
The device continues to work well and reliable, but the lack of a waterproof switch had forced me to mount the switch in a less than ideal location (under cover, protected with a “rubber boot”).
That works well for predictable hazards, but makes it hard to reach the switch in a hurry when the unexpected happens. A bit of panic does not help either…
There were several occasions in the last year when I wanted to turn the Hazard Lights on quickly, but could not let go of the handlebar due to the conditions. Like when some idiot was following me in a SUV with only 3 meter "safety" distance through a roadwork site with a 40km/h speed limit and extremely slippery mud surface with grooves in it! (A rocket launcher switch would have been my preferred option, but the Hazard Lights are easier to explain).
Or when approaching the end of a traffic jam or some other unexpected obstacle, knowing that any car following will probably be speeding and might flatten me between the obstacle and it’s bumper bar.
.
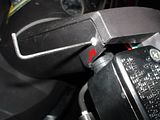
But now I found a very suitable IP67 rated switch. That means it's more waterproof than the rest of the Vectrix and does not need to be mounted in a protected location; it should happily function with full exposure to the elements!
And this switch fits neatly between the left side switch cluster and the mirror mount!
In this position the switch can be operated without letting go of the handlebar. This makes it easy to turn it on and off repeatedly during low-battery-crawls when the indicator beeper comes on. The beeper gets a bit annoying after a while, but turning the hazard light off for a moment and then back on fixes this problem.
I have also found a way to make up a kit that allows easy installation of this Hazard Switch without soldering or need for special tools (just as described in the self-quote above). But, it does involve removing some of the shrink wrap around some of the original cables and will leave a mark on the original cables. It is not intended to be removed again, although it could be removed when it's time to show your Vectrix in a museum. Outwardly the VX-1 would be in original condition. The switch could even be put into the handlebar cover temporarily if an original look was needed for some reason (without disconnecting it).
So the kit is kind of "stealth", but cannot be removed without leaving any trace, and someone might use it as an excuse to void your warranty!
Of course, someone else might use the lack of Hazard Lights as an excuse to try not to pay compensation to your widow…...you decide what’s more important!
I will soon list the first kit for sale on ebay and will post detailed instructions on how to install it or build your own kit.
This information may be used entirely at your own risk.
Same deal as with the ABCool: Money back for one week after receiving the kit, no other warranty whatsoever.
The theoretical and practical steps are largely covered in the above posts already. But, here are a few extra pictures to show more detail: (Click thumbnails to enlarge)
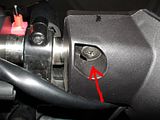
Remove these screws before lifting off the top plastic cover on the handlebars:
And loosen these screws without taking them out, one on each side, with a 2mm hex key:
Then lift off the black plastic cover carefully.
Find this connector and push the release button to pull out the part with the cables going to the left handlebar switch cluster:
To be continued.
This information may be used entirely at your own risk.
Well, this is going to seem pretty lame compared to all the work that Mik has done here, but my solution for hazard lights was simply to buy a helmet with a built-in rear LED blinker. For example, BikeBandit.com has had the GMAX GM54S Modular on sale for $99 several times over the last few months. A couple of rechargable AAA batteries will provide days of illumination, and it has three settings (steady, slow blink, and rapid blink). There's even an optional remote brake light kit.


Now that we have a decent, sound explanation why the rear lights blow sometimes,, I wonder if similar problems might get introduced by the Hazard Lights I rigged up!
Which part would be most likely to get damaged by using the Hazard Lights, if any?
Is one of the blinking patterns really more "benign" than the other? I think it would have to be the alternating pattern, but might be wrong.
Any insights would be much appreciated!
This information may be used entirely at your own risk.
There is always a way if there is no other way!
This setup is fine. It has no effect on the tail light since the current draw is so low. This applies to either blinking pattern. You can get either affect by turning on either blinker then flicking the hazard switch when the blinker is "on" for synchronized flashing or when the blinker is "off" for alternating flashing. This is because either blinker is driven "on" as soon as the switch is sampled "on", then it is simply toggled at about 2 Hz. It doesnt care what the other blinker is doing. When both are flashing the dash indicator should be constant "on" since the circuit is detecting too much current for a single directional (the same current measurement circuit is used for both blinkers).
That is good to know, thank you!
Would there be an easy way of disabling the chirping during "hazard light crawl to the power point" rides, without disabling the horn altogether?
This information may be used entirely at your own risk.
There is always a way if there is no other way!
OK, they had their chance.....looks like I have to do it myself!
I cannot buy in bulk and charge hourly rates which reflect a value assigned to those hours by myself...
So it will be expensive, but here comes the kit:
Vectux Hazard Light Kit – Buy or DIY
Like with the ABCool, it'll be "money back in the first week" but no other warranty deal. And I'll again post full instructions on how to DIY for cheaper than buying it.
.
My first attempt at building the Vectux hazard light kit (as described in detail in the above posts) was only partially successful.
The device continues to work well and reliable, but the lack of a waterproof switch had forced me to mount the switch in a less than ideal location (under cover, protected with a “rubber boot”).
That works well for predictable hazards, but makes it hard to reach the switch in a hurry when the unexpected happens. A bit of panic does not help either…
There were several occasions in the last year when I wanted to turn the Hazard Lights on quickly, but could not let go of the handlebar due to the conditions. Like when some idiot was following me in a SUV with only 3 meter "safety" distance through a roadwork site with a 40km/h speed limit and extremely slippery mud surface with grooves in it! (A rocket launcher switch would have been my preferred option, but the Hazard Lights are easier to explain).
Or when approaching the end of a traffic jam or some other unexpected obstacle, knowing that any car following will probably be speeding and might flatten me between the obstacle and it’s bumper bar.
.
But now I found a very suitable IP67 rated switch. That means it's more waterproof than the rest of the Vectrix and does not need to be mounted in a protected location; it should happily function with full exposure to the elements!
And this switch fits neatly between the left side switch cluster and the mirror mount!
In this position the switch can be operated without letting go of the handlebar. This makes it easy to turn it on and off repeatedly during low-battery-crawls when the indicator beeper comes on. The beeper gets a bit annoying after a while, but turning the hazard light off for a moment and then back on fixes this problem.
I have also found a way to make up a kit that allows easy installation of this Hazard Switch without soldering or need for special tools (just as described in the self-quote above). But, it does involve removing some of the shrink wrap around some of the original cables and will leave a mark on the original cables. It is not intended to be removed again, although it could be removed when it's time to show your Vectrix in a museum. Outwardly the VX-1 would be in original condition. The switch could even be put into the handlebar cover temporarily if an original look was needed for some reason (without disconnecting it).
So the kit is kind of "stealth", but cannot be removed without leaving any trace, and someone might use it as an excuse to void your warranty!
Of course, someone else might use the lack of Hazard Lights as an excuse to try not to pay compensation to your widow…...you decide what’s more important!
I will soon list the first kit for sale on ebay and will post detailed instructions on how to install it or build your own kit.
This information may be used entirely at your own risk.
There is always a way if there is no other way!
Done! It's now up for sale here: http://cgi.ebay.com.au/ws/eBayISAPI.dll?ViewItem&item=220485543624&ssPageName=STRK:MESELX:IT
Same deal as with the ABCool: Money back for one week after receiving the kit, no other warranty whatsoever.
The theoretical and practical steps are largely covered in the above posts already. But, here are a few extra pictures to show more detail: (Click thumbnails to enlarge)
Remove these screws before lifting off the top plastic cover on the handlebars:

And loosen these screws without taking them out, one on each side, with a 2mm hex key:
Then lift off the black plastic cover carefully.
Find this connector and push the release button to pull out the part with the cables going to the left handlebar switch cluster: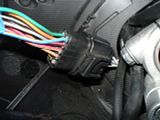
To be continued.
This information may be used entirely at your own risk.
There is always a way if there is no other way!
In 2 months my warranty will be over. I'm planning to add this brilliant feature to my Vectrix... Thanks for sharing with us your ideas.
Well, this is going to seem pretty lame compared to all the work that Mik has done here, but my solution for hazard lights was simply to buy a helmet with a built-in rear LED blinker. For example, BikeBandit.com has had the GMAX GM54S Modular on sale for $99 several times over the last few months. A couple of rechargable AAA batteries will provide days of illumination, and it has three settings (steady, slow blink, and rapid blink). There's even an optional remote brake light kit.
And it definitely doesn't void your warranty.
Pages