Hi guys,
Thought you might like to see some pictures of a kart I've built for my 5 yr old. I've been working on it off and on since October 2008! I bought a Jambuster 24v 250W scooter off ebay as the donor vehicle, cost £10! From that I got the motor, speed controller, throttle, rear wheels, band brake, cables, power indicator and key switch. The front wheels are heavy duty sack truck wheels, again off ebay, £6/pair. I welded the frame up from 1" box section, and made everything else from bits of flat metal bar etc scrounged from anywhere I could!
As the brief was cheap as poss. (just as a challenge to myself, otherwise iy's too easy just to go out and keep buying bits) I made the steering wheel from laminating four sheets of ply together then routering out the wheel! The electric box at the back contains the batteries (again off ebay, 2x 12v 7.4ah), speed controller, all the connections, fuses and relays. I've added a horn and the indicators off the scooter just for fun!
For safety I bought a 4 channel RF transmitter and receiver device off ebay (recommended by one of your members, £15 from Hong Kong) I've connected the wires that go to the micro-switch on the brake lever to the relay in the RF receiver, effectively I can now stop the motor on the kart remotely from up to 300m, a great safety feature if my nipper gets over-confident! Also. the hormn wire too so if she annoys me with the horn I can stop that too!! The seat is an old toddler car seat modified to fit the kart, but provides a full harness and a bucket seat! I've fitted an adjustable stop to the throttle pedal so I can limit how far down the pedal can be pressed, effectively contolling the amount of power she has access to. As she gets more competent I can give her a bit more power!
The dimensions mean it's got a really wide track, 900mm long overall by 750mm wide overall, this should make it stable in corners but also, the narrow tyres at the back mean it should skid before it flips over.
Anyway, have a look, any comments, suggestions, questions etc would be interesting. My daugter loves it anyway!
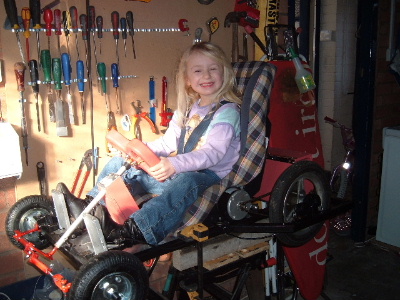 Millie on the test bench trying it for size!
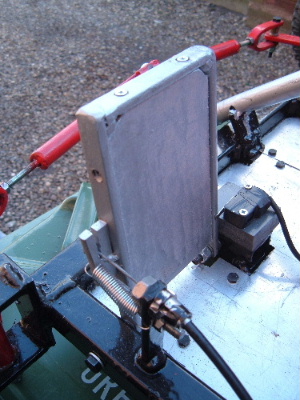 Brake pedal with motor cutout switch
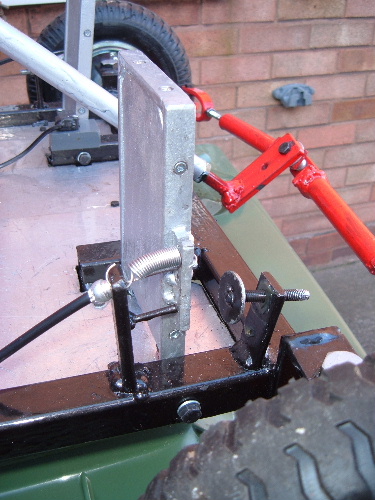 Throttle pedal showing travel limiter
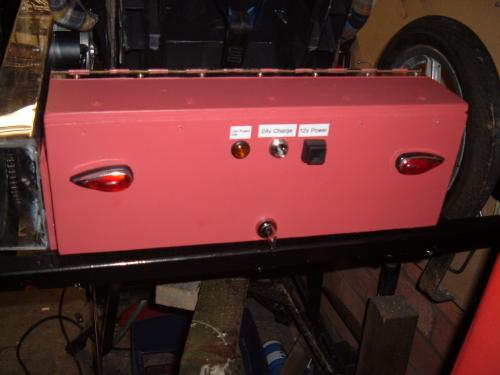 Rear battery and control box (lockable!)
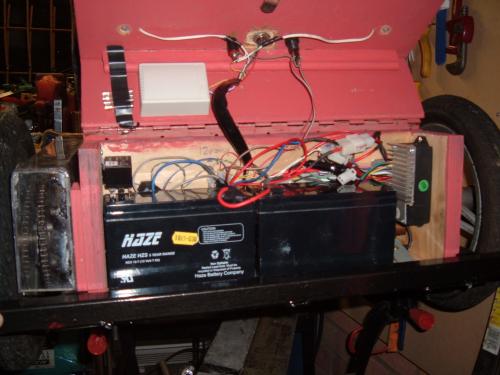 Showing inside control box
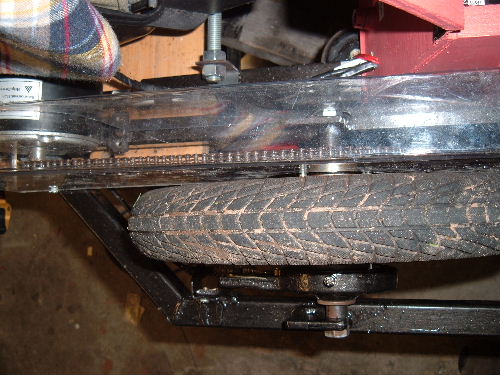 Perspex chain guard
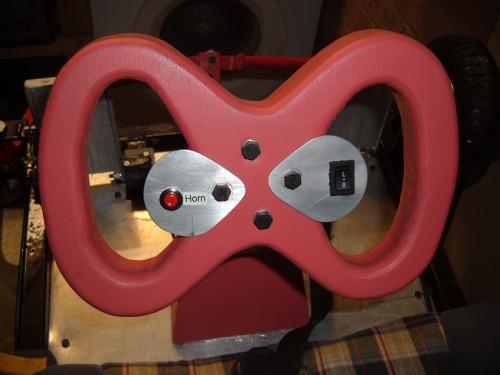 Steering wheel
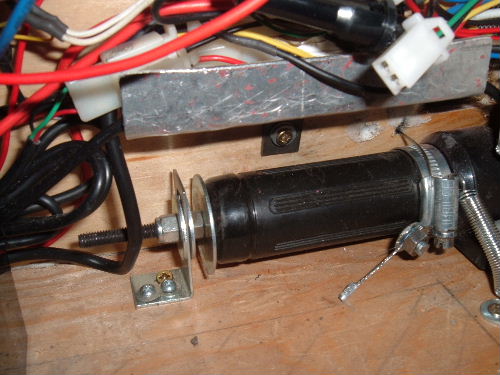 Scooter twist throttle converted to cable pull
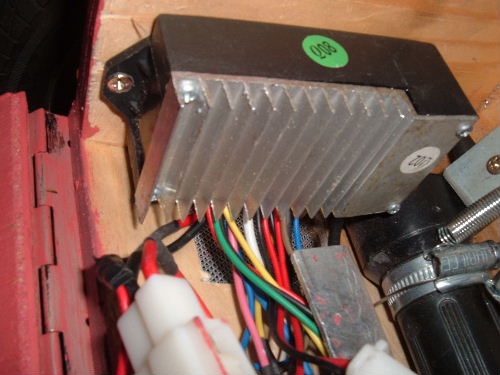 Speed controller


This looks great - no wonder she's got such a big grin on her face! I like the wheel - it came out great. The twist grip modification gave me pause for thought. Not so much that it will slip but that you could over stress it if the pedal travel ever becomes greater than the twist grip. You might want to investigate a different setup there? Just a thought.
Again, it looks great. Now of course the real important questions for any EV:
How Far? How Fast? How Much?
(Oh, and don't let my kid see this - he's been after his own EV for a long time now!)
John H. Founder of Current Motor Company - opinions on this site belong to me; not to my employer
Remember: " 'lectric for local. diesel for distance" - JTH, Amp Bros || "No Gas.
It looks great - can u make me one? lol!
How did you join the metal bars, have u got a welder?
Ive never done any welding but would like to give it a go - not really sure where to start tho - any tips?
Hi John, Thanks for your comments! Re your comments on the twist grip arrangement. The way I've done it is to pass a 22mm tube through the centre of the twist grip, after cutting the closed end cap off the throttle handle (the end furthest from the handlebars on the scooter) I've then grub screwed through the throttle grip into the tube then I've drilled a 22mm hole part way through the side of the housing box to support the one end and the other end is supported by a 6mm bolt through the end cap of the tube and through a 90 degree bracket. So the throttle lever itself is supported both end to prevent stress on the original mount. Now to prevent the cable pulling too far, if you look at the 3rd photo I've built in a pedal stop, this is adjustable via a thread so that at first I can wind it out and limit the pedal travel to effectively limit the top speed of the kart while she learns. Secondly, as I wind it back I will stop it where the throttle is at full travel so that the pedal can't be depressed any further so preventing over stressing the twist grip. Hope I've explained that OK.
Re your REAL questions!
As regards how much. Well the brief was as cheap as possible without compromising on safety. So if you can make it instead of buying it and it's cheaper to do so, make it! So I reckon the whole lot cost me about £50!(about 70$ at todays rates!) The bulk of the parts came from a Jambuster scooter bought off ebay for £10, ie. Motor, throttle, cables, brake assembly, indicators, horn, speed controller, rear wheels and sprocket. New batteries cost £20. Steel tubing and flats etc were scrounged from a mate who owns a steel fabrication business. Front wheels cost £7 off ebay. Fixings were around a £5. I'm sure I've probably spent a £10 on sundry bits and welding consumables! Electrical bits were all knocking around the garage, eg. switches, aluminium plate for deck, plywood for box, seat was an out-grown toddler car seat etc etc
How fast and how far are yet to be answered. We've had a test drive in the back yard so far. It seems pretty quick and powerful, but the yard is way too small to test it properly. So, I've arranged to use a disused taxi way at a nearby airfield next weekend so we can do some proper trials. But she will be speed limited at the moment until my confidence in her driving builds!
Before I get a safety lecture off anyone : She has a Full face crash helmet, MotoX leather gloves and leather race suit all bought off ebay for a few pounds. Vital for any parent thinking of building one of these. As is a chain guard.This is shown on photo 6, it was immediately apparent in the seat fitting that she could stick her little fingers in the chain and probably rip them off if they got caught in the chain and sprocket. Secondly, The best thing I bought has been the remote RF controller, the receiver is visible in Photo 5, white box in lid. This means that for a range of approx 500M I can press the button on the key fob I can kill the motor via the controller. So if she loses control or gets over confident I can retain some control. And finally, the throttle travel is limited, so I'll only allow her more power when I'm sure she is capable of handling it. The kart is also 750mm wide and 900mm long and low to the ground, so the stability is pretty good.
I'll report back on how far and how fast after trials. Thanks again for comments
Kev
(PS. I won't show your kid if you don't !!!!)
Hi Colin,
Thanks for comments. Yes, I used a semi-industrial Mig welder that I have from my car-rebuilding days! The tube was 25mm square x 2mm thick wall, so plenty to go at with the welder in terms of power. You could use a stick welder, which are relatively inexpensive but a bit harder to learn with in my opinion. I guess you could bolt it all together with gusset plates on the corners, but really if you cut it all to size and fabricated all the bits up it may be easier to find a local welding shop or car repair place and pay them to weld it for you. If you want to do it yourself (more fun) you need to get a welder then practice lots on scrap steel. It helps to get some instruction off someone who can weld as it's a lot easier than trying to follow instructions from books etc. Above all, test your welds afterwards by trying to break them!
Hope that helps. Kev