Well I purchased my XB-500 back in January and thanks to this site and some other similar forums I have been able to modify it to get much better performance and I figured it might help some others to hear about the modifications I have done that have worked out. Here you go:
Controller:
Of course one of the first things I did after I got the bike was to do the shunt mod to my XB-500 controller. It really made a big difference in acceleration and I also noticed a big difference on hills, instead of slowing down on hills it would actually accelerate up them.
After a few months something went wrong with my controller (I still do not know what, no mosfets or caps appeared to be blown) and I was sent a warranty replacement which turned out to be an XB-600 controller which I wasn't going to complain about since it is a better controller with 12 mosfets instead of only 6. I shunt modded it and then hooked it up for a test drive and I immediatly noticed it accelerated much smoother and seemed to cause less engine noise too so I was happy with it.
I have noticed the extra current the XB-600 controller provides has significantly effected my driving range on my low capacity 12AH batteries. I used to drive to work and back (10 miles round trip) without a problem but with the new controller the batteries run too low for my liking before the 10 miles are up. I am now charging the bike at work before driving home which isn't a problem although I am concerned that the extra charge cycle per day is going to really hurt the life of my batteries.
Batteries:
I also added another 12 volt 12AH battery under the seat to go from 48v to 60v which was one of the easiest upgrades and certainly made a significant performance difference by adding about 5 mph to my top speed. I really liked how richardb did his 60v mod using a computer extension cable so I got one (with 14 gauge wire) which made it uneccessary to run wires into the 48v battery pack and instead I did all of the connecting outside of the battery pack. This setup seems much cleaner to me and it also makes it REALLY easy for me to switch back to 48v mode in case I have to show the bike doesn't go over 20 mph (I just have to reach under the bike and unplug the wires going to the extra battery and then plug the wire going to the bike electrical system directly into the 48v battery pack like a stock XB-500). Wiring it up this way also makes it possible to take the 48v pack out without any wire hassles. Here is a link to the very useful instructions richardb has on his website:
http://www.bergerweb.net/xb500/addbattery.shtml
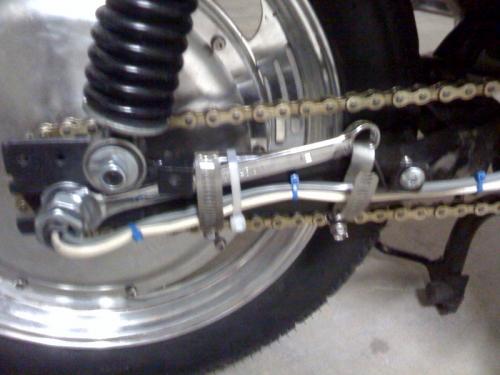
Torque Arm:
I had a couple of axle spin-outs which resulted in me needing to re-wire the motor which is NOT fun and takes a lot of time so I decided to make my own torque arm instead of rely on the cheap, thin steel the axle lock washers are made of (my 2nd and last spin-out I even had used thread locker on the nuts). I ordered a torque arm from ComCycle USA but I ordered the wrong size which was too small and I had no luck trying to grind it out and accidently removed too much steel. I knew there had to be a better way...
After thinking about it for a while I decided to try a wrench out, I measured the distance between the flats on the motor axle and found I would need a 12mm wrench. I went to Ace Hardware and bought a 12mm wrench along with a couple of pipe straps, put a lot of threadlocker on the nuts, and it ended up working perfectly and I have not had any spin-out problems since. Here is a pic of it installed:
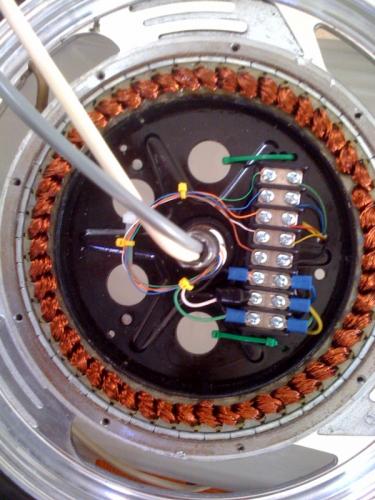
Re-wired motor:
As I mentioned above, after the spin-outs I had to re-wire the motor. I had inquired xtreme about the motor since I was leery about opening it up myself and they said they would be happy to replace it BUT that would require me to send the motor back to them at my expense and then wait for them to verify it was damaged and then ship me a replacement. I did NOT have weeks/months to wait around so I opened the motor up myself.
It took quite some time to get it open the first time, I used a variety of different sized screw drivers and eventually after probably 3 hours of on and off messing with it I got it open. Now that I know how to get it open without damaging it it only takes about 5 minutes or so for me to get it open.
I decided right from the start that I was not just going to solder the new wires on, I wanted to setup something that would make it very simple to change the wires out in the future that would not require a soldering iron. I originally used 5 pin XLR connectors for the hall sensors and spade connectors for the motor wires but then one day when I was wandering around Home Depot I came across an 8 circuit terminal strip (8 circuit was perfect for the 5 hall sensor and 3 motor wires) that looked like it was the perfect size to fit in the motor and would also have no problems with the voltages/currents involved. Here is a link to a similar 8 circuit terminal strip as the one I got in case you want to check it out:
http://www.goodmart.com/products/84575.htm
I installed the 8 circuit terminal strip and connected up the wires and secured everything inside with ty wraps and after a few months I haven't had a problem yet (before I put the motor sides back on I covered the terminal strip with electrical tape):
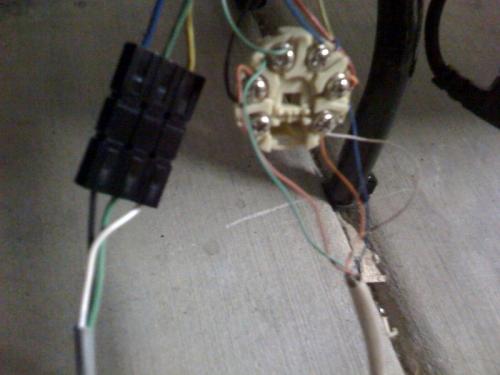
Outside of the motor I also wanted to setup a quick disconnect/reconnect system to make it nice and easy to pop the back wheel off and I ended up using 30A Anderson powerpole connectors for the 3 motor wires and for the hall sensors I just used part of an in wall phone jack (hillbillyish I know haha) which I keep sealed in a plastic bag. I originally used 5 pin XLR connectors for the hall sensor wires but after needing to rewire once again I decided the phone jack worked better since no soldering was involved. Here is a pic:
Tires:
After getting 3 flat tires down here on the Arizona roads and having to push my scooter a few miles each time (at least it was in the spring when it was only high 80's low 90's which is nice low temps in Arizona) I decided I had to get new tires and I ended up getting a pair of Cheng Shin C131 scooter tires that ZeroGas recommended (only $15 each!), here is the link:
http://www.bikebandit.com/product/3400
These tires made the ride MUCH MUCH smoother and I don't worry anymore about getting a flat tire, these tires are beasts! These tires are 3 inches wide instead of the stock tires 2.5 inch width and I draw a little more amps for longer periods of time than with the originals but it doesn't seem to have significantly affected the scooters range and even if it did it would be worth it in my opinion. In addition to the smoother ride and better puncture protection I also really like how much more these tires dampen big bumps, they act like shock absorbers MUCH better than the stock tires. The first time I cruised around testing the new tires out it felt like I was riding on air!
There was one downside to this upgrade though and that was I had to move the tire back farther than where it was previously mounted and that was because the tire actually had a slightly larger diameter and the front of the tire would hit the bike frame preventing the tire from spinning. I only had to move the tire back about an inch or so but it was enough of a change that the chain was no longer long enough to fit. So I have to order a bigger chain to install in order to keep the bike legal.
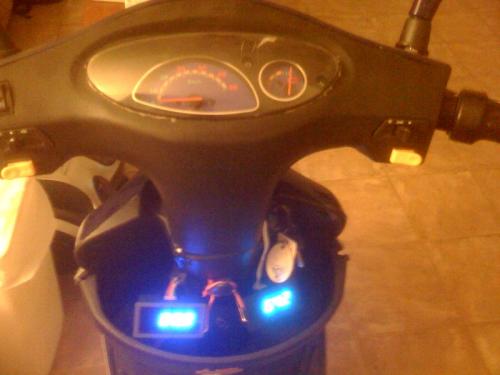
LED Amp Meter and LED Voltage Meter:
I ordered a LED amp meter and a LED voltage meter off ebay for really cheap and installed them and they are working out really nicely. After installing them I found the amp meter displayed garbage though and then after hooking it to a separate 12v battery and noticing it worked just fine I realized it just needed an isolated power supply. I ended up finding a small (maybe 1cm x 1cm x 2cm) 12v to 2x12v isolated output power supply that I shoved in a bread board and then ran a wire from each isolated 12v output to the inputs on the amp and volt meters and it all works fine. I still haven't figured out how I want to permanently mount the meters though so they are both just secured on the hook below the handlebars with a piece of wire connected to each meter. These suckers are bright too, I have absolutely no problem reading them in the bright Arizona sun:
Upcoming Mods:
I have wanted to move the controller under the seat for quite some time to eliminate the voltage drop created by the extra ~6-8 feet of wire needed to run to the controller mounted "under the hood" and then back to the motor and I am going to be doing that soon but first I need to wait to order and receive a 30A 72v controller from ecrazyman (along with one of his new 72v chargers). Having the controller mounted there will also just make it easier to work on. I also plan to upgrade all the motor/controller wiring to 14 gauge since I think the stock motor wires are only 16 gauge (I could be wrong, I haven't looked really close yet).
I also will be adding another 12v 12AH battery when I get the new controller to bump the voltage up to 72v and hopefully get another ~5 mph boost in speed which shouldn't be a problem judging by the experiences of others who have gone to 72v on the XB-500/600.
One last thing I will mention since I found it interesting is that the XB-500 and XB-600 use the same exact motor. I inquired xtreme about it and they told me they use the same motor on both bikes, so anyone who may have been thinking about buying an XB-600 motor to put on the XB-500 and hoped to get better performance (the thought crossed my mind since I thought maybe it was rated for higher wattage) definitely should not do so.
Once I get the new 72v system setup I will post again.


You seem to have done a lot of work, and achieved some fine results. Thanks very much for the compliment on my website http://www.bergerweb.net/xb500
I have added to the website, instructions for moving the controller to an under-seat position, and modifying the controller to handle 72 volts. You might take a second look before you start your re-wiring.
I also found a simple way to keep your original 48V-12V DC-DC converter when you switch to 72 volts. Just re-wire your ignition switch so that it gets its power from the 48 volt tap of your battery pack. Then 48 volts will be furnished to the DC-DC converter and the ammeter, and 72V will only go to the controller. If you need more info, write me at:
Richard [at] bergerweb.net
Dickey_b
Waste Not, Want Not
Danga,
You mentioned using the Cheng Shin C131 scooter tires. I also ordered this tire for my rear wheel, and when I received it, I noticed immediately the difference in size, but decided to use it. I'm glad you posted your findings about having to move the wheel back to do this. I'm also wondering about two other things.
A. Did you have to change the mounting on the rear wheel skirt and the front plastic fender. Mine look awfully close to the existing 2.5 inch tire.
B. Where did you get a tube for the bigger tire. I'm afraid to stretch my 2.5 inch tube by that amount, lest it cause flats for an entirely different reason. Bike Bandit sells tubes, but none with a bent stem like my original.
Help me if you can here.
Dick
Dickey_b
Waste Not, Want Not
Well I am replying out of order here, I didn't see your initial message at first but anyway thanks for mentioning the updated information you have available at your website, I definitely will be checking it out. Good tip on using the stock 48v DC-DC converter solution for a 72v system too. I originally was thinking of using diodes like you thought about at first but just thought that was a big waste and like you mentioned if the voltage changes then the diodes will probably need to be modified too. I don't drive at night much (which would require the headlights which seem to draw around .3 amps constantly on my bike) and during the day the amp and voltage gauges are really the only things constantly pulling 12v so I don't think in my situation I will run into problems with the 48v pack capacity getting taxed significantly more than the other battery packs which would be my only concern with this setup.
Have you gotten to ride many more miles at 72v since your last update, I am curious how that is going? I hopefully will have my new 72v 30A controller from ecrazyman soon which I ordered recently and at that point I will be relocating the controller under the seat like you did and will make the DC-DC converter supplied with 48v mod you came up with. I also am waiting for a replacement 48v battery pack from extreme since my current pack got too hot and blew up (nothing spectacular, the sides of the battery cells are just bulging out). I am excited to get the 72v system setup and I definitely will have an updated post on here to let anyone who cares to know information on how it turned out.
Dick,
Odd, it seems my first post never went through for some reason, so now I look like an idiot since I made the "replying out of order" comment haha, oh well.
Anyway, I had no clearance problems with the C131 tire and the rear skirt. I never put the front fender on though so I can't say for sure if it would hit the C131 but I would guess that modifications would need to be made. I didn't like the look of the fender myself anyway so not having it on there is no problem to me so I guess worst case for you if you wanted to use the new tires but do like the fender is you would have to remove the front fender if mods couldnt be made.
Regarding the tire tubes, I just used the old 2.5 inch tubes. I asked a few people I know who are knowledgable in the area about it and they said as long as the tube was within .5 inches of tube width that it should work just fine. The tube will be spread out over more surface area of course with the 3.0 tire so there is a slight increase of the chances of the tubes getting punctured but I have heard of some people going for years using a tube that is "too small" and never having a problem. I also seem to recall ZeroGas mentioning that he just bought some 12 inch tubes from Wal-Mart that worked just fine even though they only come with straight stems and they are probably cheaper than buying from Extreme too.
Danga
Just today, I updated my wiring diagram for my XB-500 to reflect the way my bike is wired. I have added a small fuse to the ignition circuit which comes from the 48V tap.
If you want, take a look. The schematic is at this web address:
http://www.bergerweb.net/xb500/XB500-Wiring.gif
In case anyone is interested:
With my 72V mod on my xb-500 controller, I have run my voltage up to 84 volts and driven to work (10 miles) and back. I was running at top speed most of the way. I topped out at 38 mph down one hill, but my top speed on level ground was around 33mph. I have since gone back to 72 volts, because on that bike, it's too scary to go that fast. I like being able to get up to 30mph once in a while when i'm in traffic, but the road has to be pretty smooth. When you hit any kind of rough surface above 25mph, you're asking for trouble. If I weighed 40 punnds less, I might not feel so endangered, but when you hit a pothole, the force of the blow is proportional to the weight, and to the square of the speed. So the same bump in the road will give you double the shock at 30mph that you would get at 21mph.
Dickey_b
Waste Not, Want Not