JDH: CB750 Conversion - The Motor is Mounted

Well, it's sort of mounted! I'm not going to bolt the motor mount to the motor platform until I have the front sprocket on the motor shaft - that way I can do a better job of lining things up (well that's the plan anyway).
Making the motor mount went fairly smoothly (apart from when I smashed my left pinkie with the 10lb engineer hammer - it's pretty much better now though). I purchased a 12" square piece of 0.25" thick aluminum from the metal supply place. I cut this into two 6"x12" strips. The first strip makes the motor platform and is bolted to the frame - I drilled through the frame for the mounting bolts. So far this is the first, and maybe only, frame modification. On the one hand I was leery about putting holes in the frame - on the other hand though (a) I'm adding a structural member & (b) the El-Ninja seems to have enough bolt holes to qualify as swiss cheese...
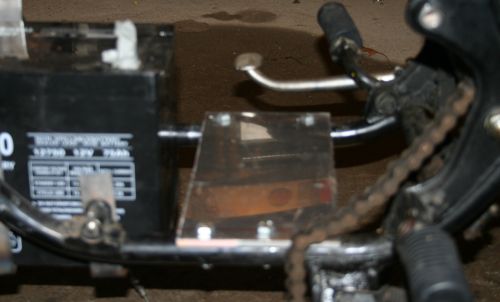
Here's a picture of the platform bolted in place (actually the bolts are just resting in the holes - nothing is tightened yet (hence the lack of washers on everything!)). The bolts closest to the camera are not at either end of the plate (like the ones at the back) because of the presence of the side stand welded to the bottom of frame rail:
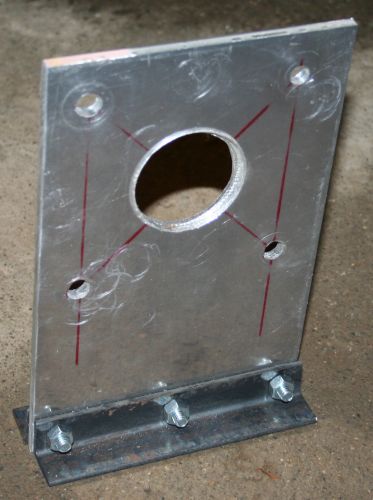
With the other 6"x12" strip I made the motor mount. I drilled four holes to match the bolt pattern on the motor. Of course I didn't get it spot on - I had to file out three holes a bit, but not too much. I then used a 2 3/8" hole cutter to cut out the hole for the shaft (and there's a ridged ring around it hence the large size hole). I trashed the hole cutter - it was a cheap one anyway. The other one I bought didn't fit on my shank. So, using the 2/3rds cut hole as a guide I used a smaller drill to drill a ring of holes and then a file to finish the job. It was a PITA but it turned out OK.
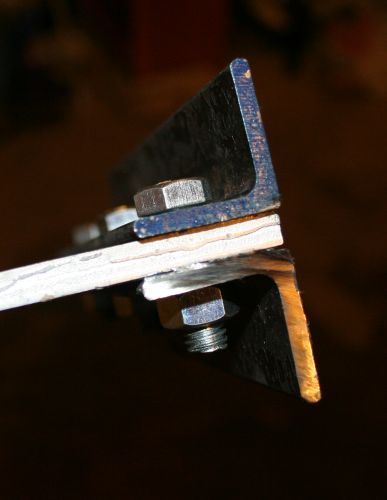
To attach the motor mount to the motor platform I'm using two pieces of the 1" angle steel that I have. Hopefully the dissimilar metals won't bite me. I'll keep an eye out for corrosion and I can replace if necessary. Here's a couple of pics of the finished mount:
 |
 |
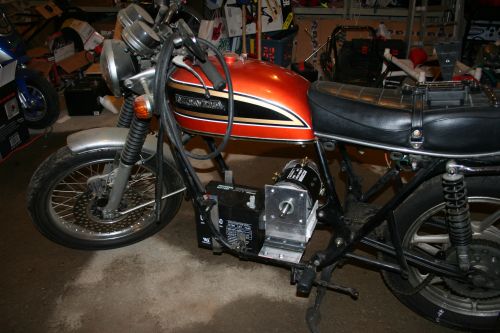
The final pic (below) shows the motor mount resting in place on top of the motor platform. I will fashion some form of simple support for the other end of the motor and then use some thin aluminum strap to wrap around the motor and keep the non-shaft end secure.
I'm pretty happy with how things came out. Of course if it all ends up as a twisted mess when I fire up the motor then it's back to the drawing board!
Now that the motor is in place I will mount all the "engine bay" batteries "for real". BTW, I managed to shave two inches off the width of the front bottom three. A Spring ride is certainly looking feasible at the moment...
- jdh2550_1's blog
- Log in or register to post comments

Who's online
There are currently 0 users online.
Who's new
- eric01
- Norberto
- sarim
- Edd
- OlaOst
Support V is for Voltage

Comments
Re: JDH: CB750 Conversion - The Motor is Mounted
Hey, That looks great! It seems you have drilled through the bottom frame tubes? Or maybe used existing ones? Anyway, be careful drilling as it can cause a weak spot in the frame. These bikes are built pretty tough overall. On mine, I did a similar mount but used u-bolts pointing up as they will "clamp" the tube. Of couse then the plate gets two holes...
Jeff
Re: JDH: CB750 Conversion - The Motor is Mounted
Thanks Jeff.
I'm not too worried about these holes - if you look at the El-Ninja design (which is field proven) he has far more frame modifications (drilled holes) than I do.
However, in hindsight I wish I'd thought of the U-bolt approach (in fact I think I got it from you before I did this - but I'd forgotten about it). If I'd gone with U-bolt I could more easily consider changing the mounting position of the plate. Now that it's all mounted I'm beginning to get concerned that the length of the chain will be too long.
Does anyone know of any design parameters for how long a chain can be?
If the chain is too long then I will have two options:
1) Remount the motor further back towards the back wheel.
2) Add some form of chain tensioner.
John H. Founder of Current Motor Company - opinions on this site belong to me; not to my employer
Remember: " 'lectric for local. diesel for distance" - JTH, Amp Bros || "No Gas.
Re: JDH: CB750 Conversion - The Motor is Mounted
...Regarding length of chain: Whatever length you end up with, be noticing as you build how the new sprocket positions will affect the chain path. For example, my center stand wanted to rub on the chain and also I had to grind off some frame protrusions. My Etek has play for both side-to-side and forward and back now. Making slots was a hassle but the adjustability was worth it. Here is another issue: The rear sprocket, if made larger, can get very close to the trailing arm. You may have to shim the wheel mounts. Finally, keep in mind how trhe chain will travel when the swing arm goes up and down. Early on in testing my bike, the chain came up without my noticing and ate through the bottom of a lead-acid battery. By the time I realiized it, I had a bad battery and acid-etched parts! One reason why I switched to LI_ION.
I see you are using an Advanced-shaped motor. I tried using my original sprocket (so 12 tooth front with 43 tooth rear). Although it worked, the ratio eats amps and makes the motor hot. Franky, most EV driving is city/town and stop and go so a ratio like 6:1 is good. It will limit the high speed but then you could have had a gas motorcycle for that, LOL...
Complicating the chain path with idlers and such makes more noise, wear and things to go wrong as well as a wider "stretch" footprint. There would be slight mechanical losses as well. The Bidwell trailing arm/currie mount is the best but will not work for all. Itrr would be nice to have all the room up front for batts and shorter chain.
Jeff
Re: JDH: CB750 Conversion - The Motor is Mounted TIP ENCLOSED
...Here is a tip when working with aluminum, even 1/4" thick sheets and angle: You can drill large holes with a wood "spade" bit! They are cheap and if it gets dull, you can replace it. The value in the modded motorcycles and car conversions is that you can make a large hole with "slop" and, using a washer, you will have some adjustability--like a slot.
Speaking of slots: If you drill two spade bit holes next to each other (think like overlapping), then it is easy to remove the waste when making a slot. Regardless, spade bits are available cheap for wide diameter holes that other bits for metal would cost much and maybe not fit the chuck?
Finally, always drill a pilot hole and keep the bit perpendicular to the work. Backing it with scrap wood is a good plan, too.
Jeff
Re: JDH: CB750 Conversion - The Motor is Mounted
Hey John. Your progress is looking good!
I just added a chain tensioner to my conversion. I can change from a 24 tooth sprocket to a 36 tooth sprocket, and not have to worry about adding and subtracting links to adjust the chain.
I found 2 options. Tractor Supply has an idler sprocket with a sealed bearing for $16. They also carry a replacement polyurethane roller for one of the ATV's they sell for about $10.
I chose the sprocket type. Just remember, if you decide to used a tensioner, make sure it is installed on the "slack" side of the chain. When the motor applies force to the rear sprocket, the top side of the chain will be very tight, and the bottom side will be some what loose (slack). You dont want the idler to try and counter act the force in the "tight" side of the chain. It can be done, but the mounting scheme has to be VERY strong, or you will tear if off the frame.
Just a thought....
Mike K.
Racermike
5 years ago I met Jesus and he total ruined my life. I have never been happier.
Re: JDH: CB750 Conversion - The Motor is Mounted
Thanks guys.
My plan is to keep the rear sprocket the same size and use a smaller front sprocket (original was 18:48, my proposal is 10:48 or 11:48 - 1:4.8 rather than 1:6 - we'll see if that draws enough amps to turn things a nice shade of orange...)
Mike - thanks for the TSC tip (in this post and the last one) - there's one within about 10 miles of my house. I can see an "engineering on the fly" field trip coming on... :-). What sprocket (number of teeth) are you using on the front?
Jeff - I'll try a spade bit - although most of my holes now are for bolts and I have a regular titanium bit that is big enough. For the big hole in the center I used a hole cutter labeled for "wood and metal". I'd already abused it cutting some 3/4" MDF so it was probably dull to start with. It couldn't make it through the 1/4" aluminum.
John H. Founder of Current Motor Company - opinions on this site belong to me; not to my employer
Remember: " 'lectric for local. diesel for distance" - JTH, Amp Bros || "No Gas.
Re: JDH: CB750 Conversion - The Motor is Mounted
If you don't mind the crappy look you can make the big hole with cheap power tools like this: Draw circle (or use hole saw to scribe) then drill little holes all around the circle as close to each other as you can. Now make one bigger hole and go in with a sabre/jig saw with a metal cutting blade or if you have a Sawzall like me use that to "connect-the-dots" It will not be pretty but gets the job done and fast.
Your ratio will probably be on the edge but if the motor can take the heat and amps it will work. Range will be compromised a tad. I just bought a 71 tooth aluminum sprocket for "Deep Cycle". Sprocket Specialist has large sprockets that fit your stock bike hub. Look at main page under "Sprockets" and a selector appears. My sprrcket was only $109. It will replace my 72 tooth steel surplus, cobbled sprocket that weighs like 15 lbs because it is welded to my old stock sprocket!! Anyway, the new one will just bolt on and weigh a whopping 3 lbs!
Jeff
Re: JDH: CB750 Conversion - The Motor is Mounted
Hey John.
Glad I could contribute something that may be useful.
The smallest # of teeth I could get for a #40 chain on a 7/8" shaft motor was a 12-tooth.
Keep up the great work, and keep us posted!
Mike K.
Racermike
5 years ago I met Jesus and he total ruined my life. I have never been happier.
Re: JDH: CB750 Conversion - The Motor is Mounted
Lookin' good!
For everyone.... when drilling or cutting aluminum, use bees wax as a lubricant. It'll blow you away how it's much faster, quieter, and doesn't dull the tools.(as much)
I think you'll find if the factory drilled a hole in a frame tube, they drill the hole large, put in a piece of pipe and weld it on both sides of the frame tube. The bolt goes through the little pipe. That way the frame tube won't crush and you get full strength.