
The Raliegh Mountain Bike that I built was more of a test project. I wanted an electric vehicle that could get me to work 6 miles from my home.
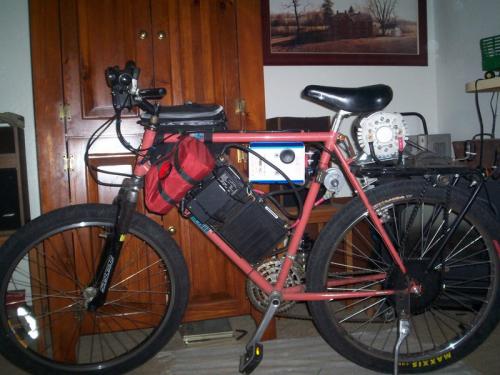
This Raliegh bike met the requirements of the law in Texas and met my requirements as transportation to and from work. I needed my electric bike to do more. I wanted more comfort. The Raliegh was not suspended and gave me a good workout. The seat, I tried several, was never comfortable. Handling was good up to 20 mph, got a little squirrelly above that speed. Range was'nt to good. About 10 miles no pedaling. Limited cargo capacity.
I started looking into alternatives. In Texas I do not have to have pedals to meet the bicycle law. I could have built my own frame, but, experience has taught me that it easier to build something that some one else has thought out first..
The "Cheetah" looked easy to build and I liked its flexibility
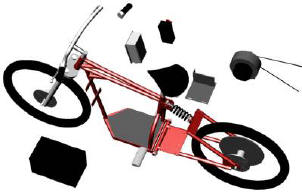
Tools needed to build this bike are amazingly simple.. A welder. A hacksaw. An electric drill. Bench grinder. Good selection of drill bits. Be real nice to have a metal cutting chop saw, drill press, 4" grinder, jigsaw with metal blade, hole saws. But not necessary. I modified the metal from round tube,, EXPENSIVE,, to mild 1" square tube in 14 and 12 gauge wall thickness. The seat and head tube I cut off of an old murray elcheapo junko mountain bike. I cut up the front forks and re-used them right behind the batteries. For the rear pivot i used black steel plumbing pipe, you need 2 pipes that fit inside of each other. I also cut off the brake studs? from the murray bike which I welded onto the rear bracket for the rear brake.
Results from day one at the shop
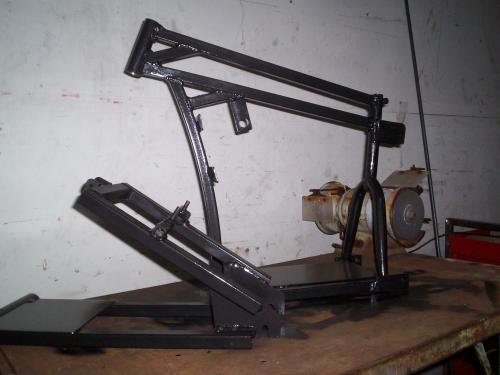


Some more pictures of day one
[b]AGM BATTERIES[/b]
Day 2
Started the day out, sorry no pictures, making the bushings for the rear pivot. See that pipe. I needed to put a bushing in there. The shaft for the pivot I made out of 1/2" round stock and tapped the ends to accept bolts. I had 3/4" nylon plate left over from some old project my Dad had worked on in the past. I asked Dad what kind of plastic that 3/4" thick plate was, I told him I needed delrin for wear, He said that was for a sled and He had purchased it for wear resistance. I knew it was tough plastic, I had used that plastic previously to replace a bronze wear bar on our metal punch shear press and it out performs the bronze bar.
I used a jig saw and cut some what circular pieces of plastic. Drilled a 1/2" hole in the plastic. Inserted a 1/2" bolt about 3" long into the hole in the plastic disks I had cut. Then I put the bolt with the disk into the chuck of my drill press. I put a long bolt into the bed of the drill press to use as a tool rest, used a woodturning chisel to turn down the disk to the diameter of the pipe. I made four bushings from the plastic, two for each side and, per the Bidwell manual, cut a pipe to go inside the pipe on the rear assembly, this pipe is a spacer that acts as a seat for the bushings to rest against.
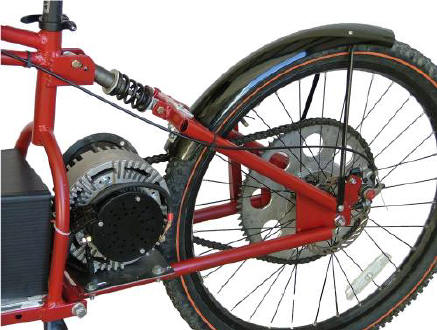
Then I started on mounting the motor and jackshaft.
Bidwell does'nt use a jackshaft, I do. I had some clearance problems between the motor cooling fins and the jackshaft sprocket, eventually I bought a longer belt and put the jackshaft underneath the swing arm giving me gobs of room.
[b]AGM BATTERIES[/b]
Very Nice! 8)
This is the first close look I've had of your Cheetah, I'm impressed!
BTW, you forgot to mention one tool that goes along with the welder that some of us just don't have ...
... that's knowhow.
I could cut and grind all day, but I'd never be able to get a frame together (welding), not in a million years.
You'd hear me in the back of the shop going ... arc, bzzzzzzzzzz (sound of rod stuck to metal), #$@#$%^%
... arc, bzzzzzzzzzz, #$@#$%^% ... grind, grind arc,
bzzzzzzzzzz, #$@#$%^% ... :D
Seriously though, thanks for documenting this build.
I've been anxious to see it up close.
It's built stout from stem to stern, I bet it rides like a Cadillac ... smooth and easy.
I'd have to say it's much closer to a motorcycle than a bicycle, at least in terms of durability.
I bet it's fun to ride!
Keep up the great work Chuck!
Dave
MB-1-E
Electric - Bridgestone MB-1 Mountain Bike
Icon Photo of lighning striking Eiffel Tower Jun 3, 1902, taken by MG Loppe'
Dave B
MB-1-E
<a href="http://visforvoltage.org/book-page/996-mountain-bike-conversion-24v-3-4h... - Bridgestone MB-1 Mountain Bike</a>
The rest of day 2 was spent assembling the 2 halves and mounting fork, wheels headset and handlebars.
The above are the original forks I purchased for this bike. The bike shop in Richardson sold them to me very reasonalbly, they had had them hanging on the wall for quite a while, more than a year, I bought several other items that day and they thru them in at a good price. They turned out to be exceptionally strong, they did not have oil dampening, only problem with them is that the springs in them just aren't large enough for the weight. Also, they are not disc brake compatable. When I figure out how to take them apart I will put larger springs in them and possibly re-use them on this bike.
[b]AGM BATTERIES[/b]
Day 3 and 4
Started the wiring, brake lines and electrical system.
In the upper left hand corner, you can see a recent weld, soon you will see what thats for, but for now, that was added recently, went over to my Dad's house where I have a stick welder and put that support on. Needs to be painted. Dave says he can't weld,, need fresh steel and fresh welding rods and some one to just show the basics. Striking that arc can be difficult, this weld took me about 6 tries before the rod would'nt stick. The second mistake most make is not waiting for a little puddle to develop. After the puddle starts, then you start welding. These welds were difficult, I burned thru the paint, then used a wire brush in a small hand grinder to clean off the paint and slag, then, I put the real weld on there after shielding the batteries and tire from splatter.
In the above picture you can see four batteries. Thats the solniel 2409 charger on top of the left pack. I used 2 strips of Scotch foam double sided tape to fasten it there. Found a rectangular tupperware dish that just covers that charger, I use that tupperware dish as a rain cover, the battery cables hold it in place. I made 3 battery clamps. the two on the outsides of the packs are made from 1/4" rod. Picture the capital letter T. The bottom of the T I threaded and have a nylock nut underneath the battery tray that clamps those T's down. The middle battery clamp is also a T, except the top of the T is made from 1" x 1/2" 12 gauge C channel. This has proven to be very reliable for holding the batteries in place. I have never modified this design.
[b]AGM BATTERIES[/b]
The bike is never finished,
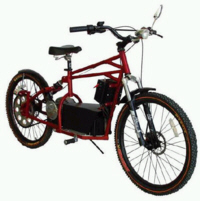
You can see I have a pretty comfortable seat in the above pic. This picture is posted on the healthebike forum, Bob was riding that tadpole in the backround at renner and alma in richardson. Bob was interested in my bike, I was interested in his. He said his brother in Loisiana had just gotten an electric bike and had started a bicycle e bike forum. His brother Roger has been in China quite a few months, following is another pic Bob took.
The seat needed to be put further back so I fabricated the following seat post.
[b]AGM BATTERIES[/b]
Alright Chuck!
I really like that rear suspension.
Floats like a butterfly ...
... stings like a bee.
I see that you're all ready with your tire pump, should one of those gnarly Texas thorns decide to take a ride.
I'm beginning to learn about that never finished thing. :)
Dave
MB-1-E
Electric - Bridgestone MB-1 Mountain Bike
Icon Photo of lighning striking Eiffel Tower Jun 3, 1902, taken by MG Loppe'
Dave B
MB-1-E
<a href="http://visforvoltage.org/book-page/996-mountain-bike-conversion-24v-3-4h... - Bridgestone MB-1 Mountain Bike</a>
The bike is never finished.
I have been in Texas 25 years. It has'nt quit raining since I started this bike. I need fenders. I need real lights. I needed a better seat, I got that.
Old seat
New seat, now you know why I had to ride over to my Dad's to weld those supports on.
I needed better brakes also. The v-brakes worked fine if they were dry. A little hairy when they got wet. In order to put a disc brake on I had to replace my front fork, not real happy with the rock shox dart 3, it has better springs and oil dampening, but flexes a lot forward and backwards, it is'nt near as tough as the triple tree gordo I had. Also had to upgrade the front wheel to accept a disk. Front disc brakes cost me $400 for the fork, brakes, hub and rim. These are hayes mx2 6" rotor. They would stop on a dime except they over tax the rock shox. But, I can stop in the rain. It was worth every penny.
The rear shock I got from Wheels in Motion in Richarson TX as a take off from a parts bike. It had an 800lb spring, found a spring in the 450lb range from mcmaster-carr for about $15 vs $100 from a bike shop. I need to lower the spring where it attaches to the seat tube. This will give me a little lower spring rate, it is still a little too stiff, but a lot better than the 800 lb spring!
[b]AGM BATTERIES[/b]
Lights,
Just read what little this forum has for lights. Reikeman on his post under accessories said he had been in quite a few bike accidents. I was hit by a car from the rear 30 years ago. In the hospital for 7 days and nights. Right shoulder and neck are always a little stiff. Ended my baseball career, was never able to throw a baseball again. I was very lucky not to have been hurt seriously. 16 year old male, had just gotten his drivers license and was 2 blocks from his house on his first drive by himself. He hit me going 45 mph,, what he said,, not what others said. His parents had given him the keys to a 69 cougar with a 390 engine.
Flashing lights help a lot to prevent cars from pulling out in front of you, I have a cateye that retails for $40 and is'nt worth $10, but it flashes good. At a company called Sports Authority in Plano TX I bought a front light called a Blackburn for $20. It is wayyy better than the cateye. Both use 4 AA batteries and both have 4 led lights. The blackburn is twice as bright for half the cost.
I spaced these two flashing lights as wide as possible so that it gives drivers the best shot at seeing me. On the Raliegh, I had a very near collision last winter. I was about to take a right turn into a parking lot. I saw a car on a side street about to cross into the parking lot, but she had to cross 6 lanes of traffic to get to where I was turning. I did'nt have a rear view mirror, before I slow down I always look behind me to make sure I won't get run over, turned my head back forward, slammed on my brakes, the lady did not see me until the very last second, thank god she did, I would not have been able to stop in time and would have broad sided her at 25 mph. We both stopped about a foot from each other. She had been talking on a cell phone and I had forgot to turn on the blackburn, I did'nt have the cateye yet. She apoligized profusely, in fact too much, I am sure she is a much better driver now, I put a rearview mirror on and NEVER forget to turn on my flashing lights.
chuck
[b]AGM BATTERIES[/b]
Chuck,
Thanks for the updates to your post.
I have a flashing tail light and a headlight soon to arrive in the mail. I also have an LED headlamp which I want to place on my helmet in case I ever need to work on the bike at night.
I hadn't really thought about a flashing headlight but will get one now, very good advice!
I think I'll eventually rig up a brake light, I don't think it would be difficult.
My feeling is that it's good to have several battery sources for your lights. I want them independent of my main battery pack. I have a NiCd pack from a drill that no longer works and plan to use that to power one or two of these lights.
Have a Safe Holiday weekend!
Dave
MB-1-E
Electric - Bridgestone MB-1 Mountain Bike
Icon Photo of lighning striking Eiffel Tower Jun 3, 1902, taken by MG Loppe'
Dave B
MB-1-E
<a href="http://visforvoltage.org/book-page/996-mountain-bike-conversion-24v-3-4h... - Bridgestone MB-1 Mountain Bike</a>
Dave,
Welding is the easy part. Fabricating the parts that are to be welded is the hard part.
Gas welding is easier to learn. It is easier to see what you are welding because the lenses do not have to be uv resistant, there is no flash, you heat the metal and flux the rod, get the metal red hot and start putting the filler in. When gas welding if the rod sticks you do not have the steel hot enough. Gas welding is more enjoyable, it is more of a get back to nature way of welding. It's a lot slower than electric welding. One problem when gas welding is holding parts together, both of your hands are used in the welding process. One way to hold parts is to build a table top sand box and lay the pieces to be welded in the sand, get it?
Mig welding is extremely easy if you remember the one basic trick, you have to get that puddle started, under the lense the puddle is still orange but is turning yellow, you can actually see black spots of impurities in the puddle a lot of times. On thin steel the puddle is formed in about the time it takes your dogs to chew threw a rawhide bone. On 1/4" steel maybe about 2 seconds max. With mig, once you figure out the setting on the welder, amps, you don't have to be close, just in the general correct amp range, most home use mig welders have just 4 or 5 settings. 1 is for sheet metal, 4 is for 1/4 inch steel. One size wire does it all.
Stick welding is a little harder to learn and you need many different rods. I never have been able to remember the numbers, but white rods weld upside down, spatter horribly, light tan rods generally for poorer grades of steel, old steel etc. Can't remember if its the 6013 or 7014, maybe its the 7012, makesgood looking welds. For home use this would be about the only rod you would need, good strength, good looks, this is important so you don't have to grind, just need it in 2 or 3 thicknesses.
The rod should'nt be much thicker than the material you are welding. Thin steel requires a lower heat setting, remember capacitance, use a big rod it is hard to strike and arc, that rod sticks because of its capacitance. If the rod is sticking, use a smaller size rod. Or increase the heat. The most basic welding handbooks tell you everything you need to know for home and small shop welding. A lincoln welder can be had for $250 new and will weld just about anything.
chuck
[b]AGM BATTERIES[/b]
Owning a welder would open up a whole new world.
I won't be buying anything (other than ebike parts perhaps) for the next year or two but might consider a home Mig welder sometime.
Stick welders and I just don't get along well.
The ability to fab most anything has always appealed to me though.
If I need anything gas welded, I take it to my brother, he's a coppersmith and uses an oxyacetylene and air-acetylene torch with ease. He brazed up my motor mount and chain adjustments. The actual brazing only took a few seconds but the prep he did is what took the time.
Dave
MB-1-E
Electric - Bridgestone MB-1 Mountain Bike
Icon Photo of lighning striking Eiffel Tower Jun 3, 1902, taken by MG Loppe'
Dave B
MB-1-E
<a href="http://visforvoltage.org/book-page/996-mountain-bike-conversion-24v-3-4h... - Bridgestone MB-1 Mountain Bike</a>