I traded for some EV components and was looking for a project to put them in. An Advanced A00 4009 motor, Alltrax AXE 4844M controller, main contactor, reversing contactor, Curtis meter, lugs, wire, fuse, etc. I didn't want to do a motorcycle so eventually I settled on an ATV to use mainly as a utility vehicle and perhaps to groom half a mile or so of cross country ski trails in our back yard. I put an ad in craigslist and wound up with a '87 Polaris Trail Boss with a blown 250cc 2-smoke motor. A few hours later I had the ICE gutted and the remains power washed. The original transmission was a CVT driving a simple forward / neutral / reverse gear box which has a chain drive to the rear, solid, axle. It would be nice if it had a limited slip rear end but I already got more than I paid for. Rear brakes is a disc mounted to the F/N/R transmission. It's not on the axle, though that would not be a difficult conversion. It has front drum brakes that seem to work quite well and will probably work better once I go over them.
I'm thinking that I will remove the original F/N/R transmission and replace it with a jack-shaft, a disk brake on the axle and a contactor forward / reverse via swapping the field windings on the motor. The transmission is pretty big so removing it will give me more room for the motor. Or would I be better off using the mechanical F/N/R box instead of the contactor one, if possible?
My second question is batteries. I will be running 48 volts total and I'm thinking something in the 30 AH range. What are good brands for use in EV's that are subjected to bumps and jarring? Has LiFePO4 technology really proved itself when it comes to expected life with a proper BMS? Where do I find a well designed BMS, preferably in kit form? My gut reaction is to go with SLA and four independent chargers. Charging via solar panels is also a possibility down the road.
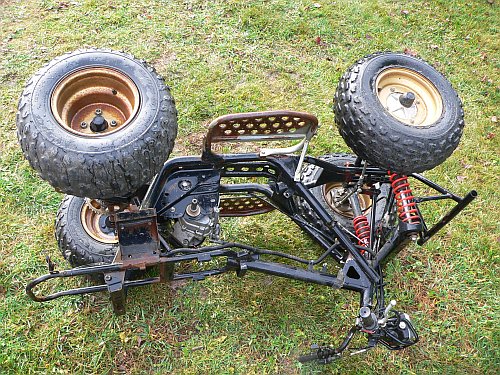
I tipped it on its side and...
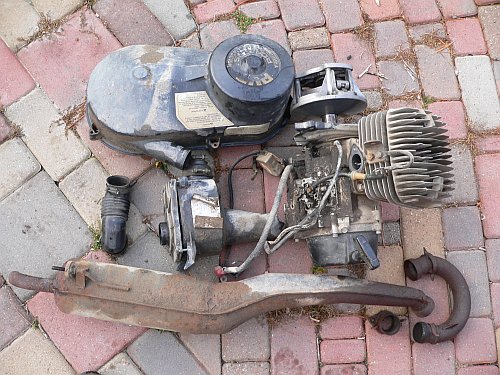
...all this junk fell out ;o)


I decided that the forward/neutral/reverse gearbox goes. It's heavy, it takes up too much space and I suspect it eats more than a few watts.
The rear tires are 21" in diameter so for 30 MPH top speed they would spin at 480rpm. With 7.5 to 1 reduction, the motor would be spinning at 3600rpm. The existing sprocket set 13/42 gives me a 3.23 reduction but the chain is well worn and it took the sprockets with it. More scrap metal to recycle. I will also need to look at torque, weight of the machine with me on it and what it will take to pull a tracking sled or small trailer up a grade. A two-speed jack-shaft is a distinct possibility.
Does anyone know if there are on-line calculators for figuring this sort of thing out?
If your only tool is a hammer
everything looks like a nail.
Hi Fourcycle,
If you go with SLA I'd suggest Greensaver Silicone batteries. They started out with a "bad rep" but personally I like them. Check out the SP27-12 or one size larger. I think four separate chargers is the easiest setup.
Consider LiFePO4 with a BMS - less weight and cheaper in the long run (due to increased cycle life). Check out the Goodrum/Fechter BMS available at tppacks.com. As far as "are they reliable" there are folks that have had good results when using a BMS and there are others that have had terrible results when not using a BMS. It is newer tech and so there's less anecdotal evidence out there.
If you want to do the calculations yourself then check out "Build Your Own Electric Vehicle" (can't remember the author) - that has a good chapter that takes you through all the calculations. Although I don't think it accounts for increased power needed for off-road and snow. There are online calculators - can't remember the URL's right now though.
Good luck and keep us posted. It's amazing what falls out when you tip it over, isn't it? ;-)
John H. Founder of Current Motor Company - opinions on this site belong to me; not to my employer
Remember: " 'lectric for local. diesel for distance" - JTH, Amp Bros || "No Gas.
Thanks, John. I had read about the Greensaver batteries and I've not read anything bad about them yet. You say you like them so I wonder if you've checked them out? LiFePO4 is probably not a good choice for this project since I don't see it getting a lot of use and I would probably not get enough cycles out of them during their lifetime to justify the cost. Right now I'm thinking a series string of two or three 20AH Greensavers in parallel to get to 48 volts. I'm hoping that by putting the smaller batteries in parallel that the total internal resistance is less than that for a single larger capacity battery. If not, it will give me more mounting flexibility. That kind of data seems to be kaput on their web site at the moment...
I came across an excellent web site for small vehicle power calculations! Check out Simple Vehicle Power Calculator. At least it was new to me... There's a version with imperial (US) units too. Good stuff!!
I think I'm pretty much done pulling the ATV apart. There are several things that need attention, after ~22 years of use, before I start installing EV parts but it looks like it will not be a difficult conversion. The person I got it from said the lower end on the engine was seized and the head had been pulled and I could see where the piston had been pounded on in an attempt to free it. After the engine fell out, I decided to see what exactly the problem was... just out of curiosity you know... It's a stinking 2-stroke and it's better off not running, in my opinion. I pulled the cylinder and found that a good sized piece of the piston skirt had broken off and gotten munched by the crank and rod in the typically tight quarters of 2-smoke crankcase. That was it, nothing more. Clean out the debris, put in the new piston and it would have been running again.
Ah well, it's mine now.
If your only tool is a hammer
everything looks like a nail.
Winter setting in has put a damper on actual wrenching in my unheated pole building till warmer weather arrives. However, ordering new parts to replace worn parts and thinking through various designs continues.
If your only tool is a hammer
everything looks like a nail.
It sounds a really interesting project. Have you seen the EVATV produced in Scotland. It might be worthwhile for you to look at that layout. Also both China and South Korea are producing EVATV's.
Jacobsen used to have a very good small electric vehicle similar to an ATV. This ran on the same batteries and controllers as the big golf course ride-on-mowers.
Best of luck
marcopolo
Hi Fourcycle,
I just started a similar project. My 2000 Trail Boss looks very much like yours but I picked up a 36 volt all but mechanically dead golf car. The Trail Boss tranny was the straw that broke this guys back. I've got the engine and tranny loose but not out - tomorrow's task.
It’s kind of looking like the left side of the tranny is part of the rear left swing arm bushing / bracket. Anyone have experience with these chassises? Drawings?
The plan at this time is to mount the motor on the swing arm atop the rear axle. At 66 my jumping days are pretty much over so I’m not too concerned about the static load on the axle.
Three 12 volt golf car batteries in the engine-trans compartment and I should pretty close. If life and machines were only this simple.
I could use some help on the drawings and advice on the swing arm.
LowGear
Hi Marcopolo. Yes, I did search for EATV's while I was considering doing one myself and found it to be a fairly deprived branch of EV's. I took notes on some of the information I gleaned in the process.
Hi LowGear. Wow, another Trail Boss ATV conversion in the works. Cool! My tranny is a separate entity and not part of anything else. There were two swing arm pivot bolts that went into it from either side but a second nut on both bolts allowed one to center the the tranny sprocket to the drive shaft sprocket. I understand that in later versions of the Trail Boss the tranny added a low gear so they may have changed the overall design of the rear end as well. Is there enough room for the motor while keeping the tranny? Having a low gear might come in handy. I have also seen designs that put the motor on the swing arm though I will put my motor where the tranny was.
BTW, I had to take out a lot of nuts and bolts and other fastening hardware before the parts fell out when I tipped it on its side...
I don't have any drawings myself, just the parts drawings available on the web from parts suppliers.
If your only tool is a hammer
everything looks like a nail.
Hi Fourcycle,
The engine would have fallen out if I had rolled the chassis over but not that stinking transmission. It flops around but really seems hung up on the left swing arm bushing. This left bushing is quite different and seems to have part of the transmission centered inside it. Tomorrow I’ll pull the bushing off and see what happens.
The motor I have, which is paid for, is wider than the transmission so it won’t fit in there as to center it on the swing arm rotation hence the above the axle configuration. It’s a three speed motor so besides the original Trail Boss transmission being toast I’m going to try this motor direct drive.
I went to the Inter-State battery shop today. They have these great 12 volt deep cycle golf car batteries that measure in at 7.25 X 11.25 X 13.5 – W X H X L – but they’re just too big. I have the 36 volt golf car charger so I’m pretty hooked up for a set of batteries that are compatible with it. Does anyone know of a slightly smaller deep cycle that would work in this application? I live on a five acre farm so there won’t be any really long runs but the farm does rise some 250 feet over a 700 foot run.
LowGear, it seems we have similar sized parcels as well, though I don't have any 250' climbs ;o) Have you gotten your transmission out yet?
As springs comes, I have been working a little more on this project. I removed bits of ancillary metal that provided support for the massive exhaust system, engine, held the starting battery and so forth, with a die grinder. Initially I'm going to shoot for a top speed of ~20 MPH since it's going to be used mostly for utility purposes. I'm stuck as to what to use for my primary drive which will provide a 3.5 to 1 reduction from the motor (7/8") to the jackshaft (3/4"). I'd like to go with something other than chain because of the noise and the charts for chain drives peter out well before the motor's top end of 5,000 rpm. I'm looking at up around 40 ft-lbs at 5K rpm. Toothed belt would be cool and quiet but it's too expensive. I'd also like to be able to swap out sprockets for different ratios as I experiment with this. Chain might still be the best way to go... After all, they are used in motorcycles to drive the camshaft and those usually spin well above 5K. Perhaps chain guides would be a good idea at those r's...
Any thoughts?
If your only tool is a hammer
everything looks like a nail.
The Polaris project rolls on along. I gave up on being nice about getting the tranny out so I fired up the reciprocating saw. 5 minutes later and the broken tranny was in my storage box labeled EATV. My skeleton and spare parts look identical to the above pictures.
I’ve decided on the Trojan 30XHS batteries. Input welcomed of course. The color isn’t right but they seem to have a great reputation. I’m having mounting plates cut out of 1/8” steel next week and the battery group 31 strapped trays are on the way in the mail. This is going to be a tight fit which will challenge regular maintenance.
I’m thinking that instead of building a platform for the motor that I’ll just have a plate cut out of 1/4 inch steel and bolt it to the axle hub assembly. My local welding shop has one of those computer controlled plasma machines. WOW!
LowGear
I too have been making some progress on my Polaris EATV project. However, I have been spending the lions share of my free time helping my in-laws restore their 1987 27' sailboat to what is better than new condition. I find it amazing how much time and money can go into a boat that's only 27' long and 9' wide! I'm also having a lot of fun with the project :o)
My Polaris unit had more problems than I saw initially. So what else is new, right? When I got to working on the front end I found that the two front axle center lines were not even close to to being on the same axis. Further investigation found that it had taken a pretty good hit to the left front wheel and broken the lower A arm pivot mounts. A PO had then gone in with a stick welder and globed a 1/2" thick puddle of weld after beating things roughly back into place. Roughly is the operative word here... I little error at the pivot point translate to a big error at the end of the A arm... I spent a good hour with the die grinder to remove the mess and will fabricate a new rear control arm mount out of 3/16" angle iron. The original mount was only 1/10" inch thick and under hanging the chassis I can see how it could easily get damaged. Poor design on Polaris's part. I will see what else I can do to beef things up. The oil seals on both front struts are shot too. When I flipped it over to grind out the weld, oil dribbled out from the seals so I'll have no dampening. It's a low speed ride though so I think it will be okay like that. I also made a new bushing for one of the strut towers. One was broken and half of it was missing.
I am also reconsidering using the transmission. It provides either a 2.5 or 3 to 1 reduction depending if it's in forward or reverse. With an electric motor reverse can be forward if I want. I have three reasons for using it: 1 No forward / reverse contactor. 2 It provides a disc for the rear brake. 3 It shifts the motor to jack-shaft drive center line UP about six inches, getting primary drive stuff out of the dirt and moisture potentially down below.
I have removed the bald front tires, cleaned and painted the wheels and installed new front tires. I put new bearings and seals into the rear end and have new sprockets and chain. For some reason the rear wheel hubs were J-B welded to the splined axle. I had a bugger of a time getting one off so that I could rebuild the rear end. Lots of heat, along with a three arm puller eventually did the trick. Now I wonder why the hubs were glued to the axle...
If your only tool is a hammer
everything looks like a nail.
Hi Fourcycle,
There are always surprises in the used equipment department. Mine is not in this rough of shape but a few grommets and the like will be needed.
What kind of batteries are you using to have the luxury of leaving the tranny in? I've been watching you-tube stuff and most of the electric units there mount the motor somewhere on the rear swing arm axle assembly. This is true for the retros as well as the new stuff that has been coming out the last couple of years.
LowGear
Greetings LowGear,
I have not decided on a battery type yet, though I'm keeping a half-open eye out for something interesting that might come along.
I'd prefer to keep my big motor off the swing arm to minimize the unsprung mass and I have yet to figure out how to package it. First I need to get the nuts and bolts stuff straightened out so that I can reassemble things to the point were I can size things up again. Don't be surprised if I change my mind, again ;o)
If your only tool is a hammer
everything looks like a nail.
Time again to brush some cobwebs off this thread and post some pictures.
My repair to the tie-point for the back ends of the swing arms. Trice as thick as OEM, made of scrap angle iron and the A arms are now solid and where they should be.
I decided to use the gearbox. I made an adapter for the splined input shaft so that I could fit 1" keyed sprocket. Some scrap 1" pipe took minimal machining to make the adapter from.
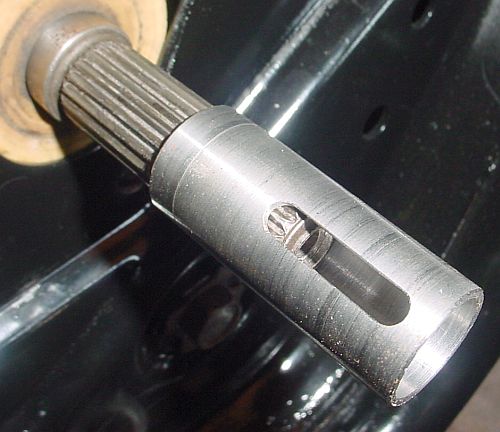
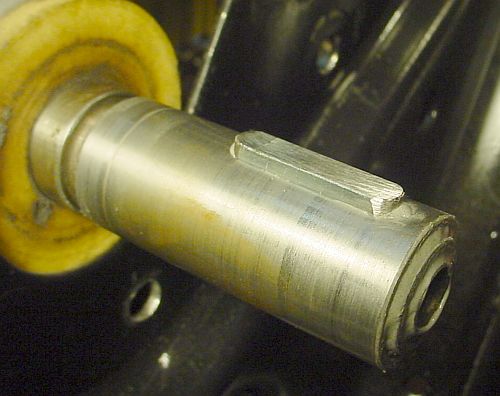
After grinding a key-way into the hardened shaft, I used J-B Weld epoxy to hold it all together. There should be plenty of surface area to take the torque.
After making a cardboard template, I cut out some 1/4" aluminum plate to go between the tranny and motor.
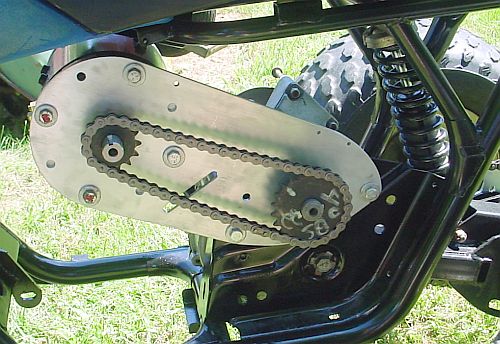
I cut the slot for a chain tensioner, which I made before fitting the chain, only to find that things worked out for a perfect fit, no tensioner needed! ...yet. It's good to have in place though. Currently the total gear reduction from motor to wheels is 14 to 1. Not to worry, I will be fitting a chain guard.
A length of 1" x 1" angle fitted between the other (floppy) end of the motor and the frame made everything nice and solid.
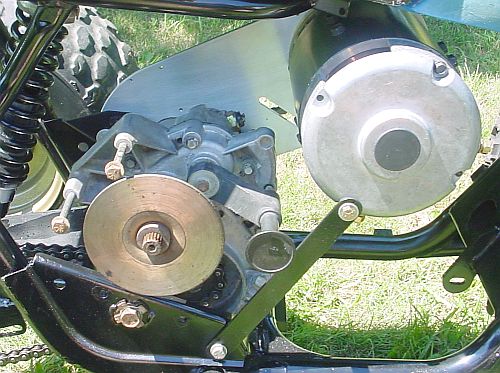
The two long bolts are for the disc brake caliper. The knob to the left selects forward, neutral or reverse.
Now to find some batteries to fit and mount the electronics. The bottom of the gas tank has been removed and will provide cover for the electronics. I also need to make a pot-box to actuate the pot from the OEM throttle lever on the ATV. Not a big deal, it just take time. It's part of doing things on the cheap plus you learn from it, right?
Here it is so far.
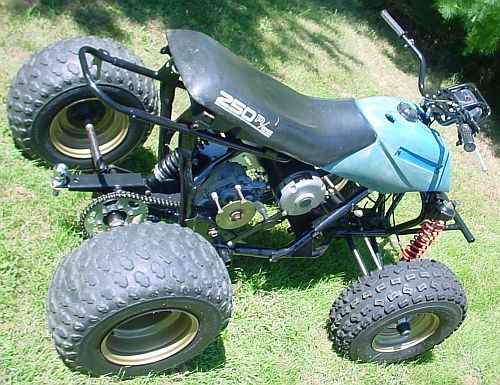
The plastic body is not fitted, but I kind of like the naked look. A bit of paint helps it look better too.
If your only tool is a hammer
everything looks like a nail.
Hey Fourcycle,
I think you're doing some very nice work.
I was nervous about hanging the 60 pound motor off the rear center hub as well but as I look at the many other "electric ATV" on Youtube I see most of them are doing the same thing. Not using the tranny (mine was dust anyway) gives enough space for one of the three 12 volt deep cycle batteries as well. Actually I'm thinking just marine batteries to start and experiment with before popping the $200 each the nice stuff sells for.
I've been toying with cutting the bottom out of the fuel tank as well seeing how the seat uses its back edge for the front seat support. You've pushed me over the edge.
Thanks for the motivation.
LowGear
I hear you. Part of the reason for starting this post was as a motivation prod. It's gota have a happy ending ;o) I think you'll be fine mounting the motor on the swingarm. The closer to the pivot-point the better when it comes to mechanical shock.
The battery thing has been eating at me for a while. I was going to try the Greensaver but I can no longer find a US site that carries them. There yesterday, gone today... Not a good sign. I found some on eBay but I'd rather not go that route. Optima D51 Yellow Tops seems to be a good choice for high current draw applications. The cheaper batteries, like the UB12350, seem to top out around 180 amps which is only good for about 9 HP. My motor can do 12 HP peak and the Altrax controller peaks at 400A so cheap battery internal resistance would be the limiting factor. D51's are not quite $200 a pop but close. I'll call around and see if I can get a deal on four of them. LiFePO4 would be interesting to play with but I have a difficult time trusting the quality on cells I can get, they need a BMS and they are just too expensive considering all that. For Optima I can be pretty sure that the company will still be around in five years.
I use a 1/8" straight-shaft carbide burr in a Dremel tool to cut out shapes in soft plastic. Worked great on gutting out the bottom of the tank!
If your only tool is a hammer
everything looks like a nail.
The pivot point would be nice but there is less travel room as you get closer to the main cage. A short chain also has a certain draw to me as well. I just flipped the sprocket guard and everything looks pretty good for clearance.
My motor plate reads 3 HP and 300 RPM at 36 volts. Another site on the web maintained that 4 HP and 400 RPM would be the result of 48 volts. I'm very battery space tight so it's going to 36 volts. I wonder why the great difference in HP ratings for the two motors (yours and mine)? I hate to sound like an ignoramus but they look to be about the same size. I'm also using the Cushman resistance style speed control. It came with the dead golf car and an electronic one was looking close to $300 if not more. I want to feel this pony run me up and down the driveway a few time before I spend very many dollars on it.
LowGear
Are you sure it's 3HP @ 300 RPM? A motor like that would be good for direct drive. Mine (6.7" dia) is rated 2300 RPM, 4.15HP at 36 volts continuous and 6HP continuous at 48volts. It will do 12 HP for brief periods, though I expect to to be at or below the rated power most of the time. With the intended use as a utility vehicle, towing, pushing and wheelies at times, the extra power is nice to have on tap ;o) This thing reminds me of the Traxxes Stampede R/C truck my daughter and I put together back in the days when you could buy them as kits. 10x the size, 10x the cost. Except the Stampede has a differential...
If your only tool is a hammer
everything looks like a nail.
The throttle was one thing I had not addressed yet. I like the OEM Polaris thumb throttle that came on the machine, well built, made mostly of metal and it was just right.
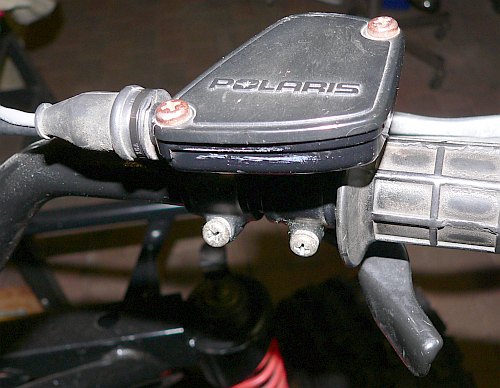
I considered a pot box but I've never really liked pots because the wiper usually becomes intermittent, sooner or later. Even the expensive ones. I use to work for a company that made life support equipment and when pots glitch it's not a happy day. I didn't want that for my throttle either. Plus the pot box would have to be connected to the cable which would also need a spring to pull it back when you take your thumb off the lever, not to mention the stuff takes up a lot of space, is expensive and yada-yada-yada... I try to go for KISS when I design and build stuff so I modified the guts of the throttle. When the cover comes off, it now looks like this inside:
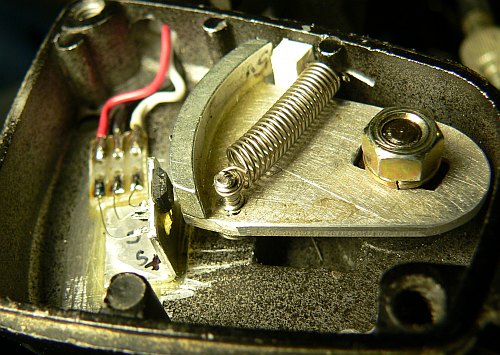
I bought a cheap Chinese Hall effect throttle and used the guts to modify my OEM unit. All they have inside is a magnet and the Hall device and after a bit of head scratching I came up with the above. It works fine, giving me a nice linear voltage as I advance the lever, going from 0.82 to 5 volts. If needed, I can add a simple OP-AMP circuit to give me 0 to 5 volts.
If your only tool is a hammer
everything looks like a nail.
First roll this evening on my EATV project :o) Bare frame with the seat set loose on top and stubs for footpegs. Everything work well and I rode it through our trails, hills and dales for a good 10 minutes before it got too dark. It had plenty of power and was geared well for my intended use. I'm happy!
I'll post more details in the following days.
If your only tool is a hammer
everything looks like a nail.
I wound up using four Odyssey 22Ah AGM batteries for this project. I looked at LiFePO4 long and hard but the $1200 price tag was just too much. The Odyssey AGM's were no bargain either but I worried that a lesser battery would not be up to dishing out the ~200 amps I was looking for. So far I'm happy enough with the choice. It has gobs of power and works well for the utility vehicle I was looking to build. I did all of the work myself, including the video, shot with a broken $15 eBay camcorder that I repaired... My EATV is not 100% complete but there are only a couple minor details left to do. I now feel confident that converting a car to LiFePO4 electric is easily within my capabilities.
http://www.youtube.com/watch?v=mL25Uq2zXKg
If your only tool is a hammer
everything looks like a nail.
Congratulations on the movie and the ride. I haven't come very far as I'm always drawn to "chores" and away from "tools".
I tried to look up your Odyssey 22Ah AGM batteries but couldn't find them. I'm still centered on the Marine deep cycle that Costco sells for about $80 a piece. Your physically smaller batteries are very fetching but I think AGMs of any sort cost about twice as much and I have the three battery shelves almost in and they're close to level. I'd be interested in alternatives. The nice thing about lead-acid units is that I'm thinking I can use the original Cushman charger which is built for 36 volts and has a simple timer on it. I hope my 3 - twelve volt batteries will be compatible with the original 6 - six volt battery charge load.
I wish I could do the quality of work I see on your unit but we go with what we've got or we get left behind. That's the rationalization for just hooking the Polaris throttle cable up to the original Cushman speed control / reversing box. I'm hoping I'll have some of the control I saw as you backed into your parking spot.
LowGear
Thanks LowGear. Just don't let the "quality" of my work deter you from your project! I love seeing people going with what they got!! That takes even more creativity.
I think you will be fine with the Costco batteries. The Odyssey AGM's like high current charges so my 15A charger is a good fit. My gut feeling is that your 36v charger will will work fine but you might want to check the the charging specs for your batteries or batteries similar to yours. With your motor on the swingarm and no transmission you should have plenty of room for batteries / controller hardware and will probably have much more range than I do at less than half the cost in batteries.
If your only tool is a hammer
everything looks like a nail.
I doing some wiring and would like to move a wire in the left hand switch handle device. How the heck do you get those cable ends out without screwing the connector completely?
Casey
Yeah, those can be difficult to figure out. Generally there is a little tab of pin material or two, way down where the pin comes through the plastic connector shell, looking from the non-wire end of the connector on the outside of the pin. I often use a small flat-bladed jeweler's screwdriver to push / bend the tab/s in while gently tugging on the wire and eventually it will come out without damage. When reinserting the pin be sure to bend the tab/s back out slightly so they will lock the pin in place when it's pushed back into the plastic connector shell.
My Polaris EATV continues to work well and I've had zero problems with it. I have cut down ~40ft tall pine trees and dragged them whole to my burn pile, it pulls my electric 20 ton log splitter or my 16ft trailered sailboat as though they aren't there or a little garden tractor trailer loaded to the hilt with firewood. I don't use it much but when I do it it's ready and starts instantly, unlike many of my other gas powered contraptions...
If your only tool is a hammer
everything looks like a nail.
Aloha Fourcycle,
Thanks for getting back to the thread so quickly.
The jewelers screwdriver and pointy thing has been my approach. I built cables for a few weeks and we used a slitted tube that came with the connectors. It just slid over each wire from behind and collapsed the locks for removal. They just pushed in and automatically locked during assembly. I'm approaching the utility knife attack point of mind. There is a locking wedge that goes in from the back and when I first looked at it I thought it was a slam dunk. Why do so many of those Slam Dunks byte you right where some of your darkest thoughts occur.
I'll put my 325 glasses on and see if I can prevail without pulling a knife on this desperado.
LowGear