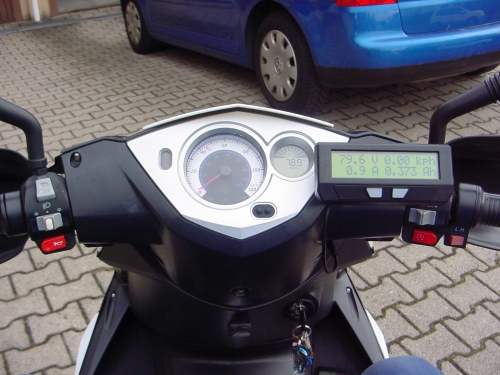
It's pitch black night and not very warm outside, so the flash had to light up the scene
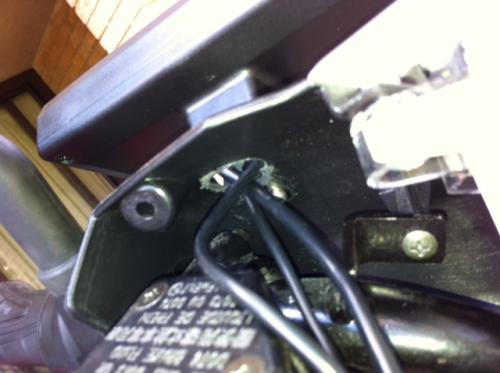
That photo is perfect. Shows me exactly where the Large screen model can fit.
Here is about what the place will look like in the near future
Nice, there isn't anywhere else to fit it I guess.
And this is the cutout where I intend to let the cables disappear below "ground"
I think I will surface mount the cycle analyst so it's flush with the plastic and sucure it from below like on my scooter, then you will have no cable visable at all. I will also install a switch to turn the backlight on and off because I keep the CA connected 24/7 so it can measure the charger and discharging while riding and re-charging.
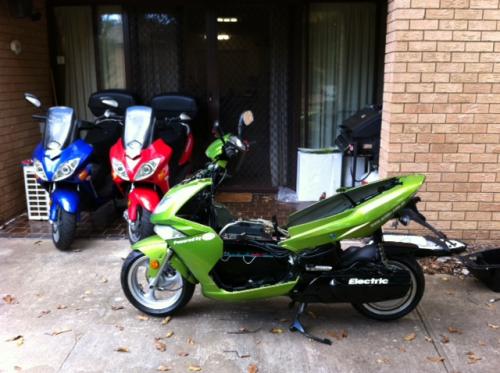
Are you intending to start an Erider dealership in Canberra?
Not a dealership, but Erider, Melbourne is happy for me to be the contact point in Canberra to show off the bikes and for servicing/repairs.
How will you handle the speedometer issue, will you use the magnet or connect to the halls?
No experiments here. I will use 2 magnets (NdFeB...) and half the tire circumfernce for quicker response and better resolution, and probably those will have to be on the left motor lid on the rear wheel, as I have so far found no other suitable spot on the front wheel and fork of my Thunder without having to construct a holding bracket of some sort for the reed switch of the CA. But I will have to ensure that whatever resin I use for fixing the magnets will have to be thermally stable at least up to 100°C, and on the other hand I will first have to test if the magnetic field of those VERY powerful magnets (small as they may be...) interferes with the Hall sensors in the motor. I am not really looking forward to all this work, I would rather ride the thing instead of tinkering with it... But the CA is a MUST as long as the information it supplies is not built into the scooter instrument cluster from the start.
My rides:
2017 Zero S ZF6.5 11kW, erider Thunder 5kW
A good epoxy glue will hold the magnets, I used one called "Chemical Metal" for the magnets on the hub motors on my "hybrid" car.
By the way, it´s a good idea with the 2 magnets, will also affect the wheel balance less.
I think I will surface mount the cycle analyst so it's flush with the plastic and sucure it from below like on my scooter, then you will have no cable visable at all. I will also install a switch to turn the backlight on and off because I keep the CA connected 24/7 so it can measure the charger and discharging while riding and re-charging.
I fear the only flush place you could manage to install the large screen CA would be further down in one of the inner farings or the center console. The place I will put my CA is really the only one without covering other vital information or switches...
I will only use my CA with "ignition" on, as I will quickly learn the ratio of Ah used to kWh pumped back in with the charger. And I am not really looking forward to learning this ratio, as it will make me want to cry due to high charging losses :-(
A good epoxy glue will hold the magnets, I used one called "Chemical Metal" for the magnets on the hub motors on my "hybrid" car.
Also known as "Liquid Metal" :-) Yes, a good epoxy resin should easily outlast the 80°C maximum temp. of the NdFeB magnets before they start to permanently degenerate.
My rides:
2017 Zero S ZF6.5 11kW, erider Thunder 5kW
I tried getting a speed of the "spare" hall sensors but it won't work. You MUST connect to a hall sensor cable that is also connected to the controller.
Thats because 5V has to be applied to the hall sensors to get them to work
The cycle analyst has an internal 5V supply, which you could use to power them
If the main hall sensors fail, just swap them, the cycle analyst only needs one set to work, where as the MC needs all 3
Matt
Daily Ride:
2007 Vectrix, modified with 42 x Thundersky 60Ah in July 2010. Done 194'000km
So, my back is hurting as this Saturday found me in the garage till 11p.m. Thankfully my two sons (7 and 11) helped me with half stripping my Thunder in order to get my Cycle Analyst into place. A first test was if the NdFeB magnets stuck to the LH motor lid (just with super glue for starters, the liquid metal will follow next Tuesday) would interfere with the motor hall sensors, but this was thankfully not the case. The shunt wire of the CA was just long enough to reach towards the back end of my battery bay, so no need to lengthen that. But of course the Reed switch needed a fair strech of additional cable, which I soldered in and individually and around that communally clothed in shrink tubing. One of the hardest parts was putting on new 8mm wire terminals on all four wires that meet at the negative battery pole: Battery -, Controller -, Charger - and probalby the DC/DC -. The postive lead of the CA I connected to the plus going into the DC/DC converter, as that was the easiest place to get juice that is switched on and off by the ignition key.
The huge shunt I could fit to the shet metal lid sitting attop the end of my battery bay, but I had to put in a slightly longer wire to the controller because the original was slightly too short to reach back there. The main wiring is 10mm², which isn't a whole lot, but it could be worse :-)
All is functioning, only the CA needs a slight change in the speed sensor programming, as I put in two poles (as I use two magnets) AND put in just half the tire circumfrence, which is why the CA only showed approximately half the speed it should. But that will be easy to fix :-)
I found it better to use the peek hole for both normal CA cables plus for tucking in one of the Analogger connections, and using the cutout only for storing the second Analogger cable. I had to position the CA slightly further down that fairing, as it would otherwise hide access to one of the screws that holds the handle bar fairings together. Now it is possbile to get at that screw by tilting the CA completely down.
Pics to follow beginning of next week. Happy Easter!
My rides:
2017 Zero S ZF6.5 11kW, erider Thunder 5kW
For opportunity charging you might consider connecting the CA power after a circuit breaker and before the ignition sw. That way you can flip the breaker and have the CA on while charging, but the ignition is off to prevent theft while shopping, eating, etc. This will reduce your AHs reading while charging. Then your "AH used" will be correct even though you might have recharged a couple of times. Even at home I find this useful too as after a morning ride, I can do less than a full charge and then take off again and still have an fairly accurate AH used reading.
Motorcycles: 2011 ZEV Trail 7100, 84V, 60AH, 60+mph, Cycle Analyst, TNC throttle, modified charger. 2013 Kymco GT300i
Bicycles: 2017 Sondors Thin
Cars: 2016 Leaf SV, 30KWH pack. 2007 CR-V
Solar array: 5KW. Cost per lifetime KWH produced $0.073
Bi
Thanks IBScootn for the ideas! However, those few times I DO oportunity charge I do the math myself, knowing that with around 10A charging current during the constant current phase I will have an additional 10Ah in my battery after an hour. If the charge should actually termiante at 100% (which would include the Constant Voltage phase at the end) I would half to subract slightly to remain on the safe side of my actual charge.
I can monitor what my charger does with the ignition on while charging, but this is something I will only do on my own parking lot in front of the house to learn what is actually happening down there while charging :-)
My rides:
2017 Zero S ZF6.5 11kW, erider Thunder 5kW
Integration of Large Screen HC Cycle Analyst in Erider Thunder
I'm done: My Fury Thunder is finally able to speak to me in real dirty electrical talk :-)
As the inner workings of my Fury are slightly different from the other Thunders I will concentrate mainly on the speed sensor and display mounting. As for the 200A 0.5 mOhm shunt it will suffice to report that it found a fitting perch on a stainless steel lid that covers the rear end of my battery tray. My Fury was originally fitted with an active C-BMS that wasn't up to the temperatures present in a mid-summer battery bay. This system was mounted under that steel lid. Here a pic of the shunt mounting (shunt blades are vertical to enhance cooling air flow) and all the cable mess around it. From the right comes battery minus, on the left charger, controller and "ignition"/DC-DC-converter minus branch off, from left to right:
Be advised that ring terminals with inner Ø 8 mm will be necessary for all wiring attached to the main shunt terminals!
The main CA cable required no extension apart from the positive lead that I attached to DC/DC-Converter plus in order to take advantage of the ignition key for switching the CA on and off. For those instances where I want to monitor charging I will have to leave ignition on, something my Fury will allow even while charging :-)
Now comes my rather unusual solution of implementing the speed pickup, which is a reed contact. The only spot that I found on my Fury Thunder without having to construct some holder in order to get the pickup near enough to a magnet on the wheel was the left rear shock:
Meaning that I am working directly with the motor speed, including all spinning on snow and the likes, or when perched on the main stand. I put some rubber padding between shock and sensor housing for a more secure fixing in combination with the cable ties, which also hold the cable. Bottom left is the interface between my extension and the sensor wire. It is soldered, individually insulated with shrink tubing and communally around the outside too. Additional insulation tape under the cable tie and at the upper end of the external shrink tubing serve as added safeguards against excessive relative movement in this connection and to ensure water tightness. And as there will always be some relative movement between shock and rear fork I added another layer of tape where the wire runs across edges.
Left of the speed sensor is one of the two NdFeB magnets, only fixed with super glue in this pic, but in the mean time additionally surrounded with epoxy. Exactly opposite is a second magnet which I fixed with opposing polarity to the other, in order to ensure no permanent magnetizing of the hopefully very soft-magnetic reed contact. With two magnets the reaction time of the CA to speed changes should be cut in half, and the wheel balance might suffer slightly less. Before I decided on this magnet location I conducted a test to see if these rather powerful magnets would interfere with the hall sensors in the motor, but thankfully this is not the case.
Here you can see the complete swing arm now including the speed sensor cable which from there runs forward on the left side of the bike's frame. The main CA cable runs along the right side. Also faintly visible is the second sensor magnet at the bottom, just below the chipped paint on the motor lid:
Now we move forward where the normally visible part of the system resides. Here a front view with the forward handle bar fairing removed, looking at the throttle side:
This is the only place where the CA can be mounted in the rider's direct line of sight without blocking the visibility of instruments (I have the electronic cockpit) or light switch. It is bolted to the rear handle bar fairing just below the peek hole that was originally there to allow visual checking of brake fluid level. In this scooter it is useless for this cause, as can be clearly seen, so I now use the hole for running the CA cables into the fairing.
They are fixed to the steering tube with cable ties just above the upper steering head bearing to ensure they do not touch the fixed fairing edge. Below that they run freely down the left and right side of the front fairings to always ensure ample leeway for full steering deflection.
The CA is mounted down low enough so that the corner screw for fixing the front handle bar fairing is just barely accessible over the CA housing when it is tilted back completely. That is slightly lower than originally intended, but still just OK visibility-wise.
Here another look from the front that shows my gaffer tape "spoiler" to keep rain from entering the CA through the six cable holes and the 1/4 inch thread in the housing foot, yet still ensuring enough air can get in and out from behind so any moisture that might collect inside can also exit out the bottom:
Grin technologies rather suggest such a spoiler in contrast to outright sealing as otherwise trapped moisture would fog up the display window from the inside when it's colder. We'll see if it works alright...
And here is the rider's view of the finished installation:
It works :-)
And logging with the Analogger also works, though it must be ensured there is no phase interference in the CA data output stream. The CA allows a sampling rate of either 1Hz for long range logging or 5Hz for dynamic stuff. Particularly for the latter the CA's averaging time needs to be reduced below the standard value of 5 (corresponds to 0.4 sec) as otherwise between 3 and 4 successive voltage and current data sets will be identical. I used a value of 3 corresponding to 0.1 sec averaging time with usable results, naturally more noise (or detail, who knows...) but also enough dynamics. My Kelly KEB72801X pumps 120A battery current almost from standstill into it's system, rising to 140A at around 50km/h, were the reigns are let loose up to about 62km/h with current spikes of even over 170A at fully charged battery, more like 160A on average, and from then on back EMF begins it's current suffocation up to a top speed of only 82 or so km/h, at 27°C Battery temp. Of course I have the slightly smaller Cheng Shin "slicks" on the rear again, which may be one of the causes for the slightly reduced top speed of formerly 85...86 km/h.
But is becoming very clear once again: it is now easy to gain a multitude of data, but will take me a few weeks probably to properly analyse it :-)
My rides:
2017 Zero S ZF6.5 11kW, erider Thunder 5kW
I can see the little hole you run the wires through, the two thunders I have currently have plastic caps popped in there. I can't quite see how you have mounted the CA? I have saved your photo to my iPhone and zoomed in. Have you just put a bolt and washer through the plastic into the rear screw hole on the CA? If so, is that enough to stop it wobbling with high speeds?
Over all it looks like a very nice install. Thanks for sharing. In comparison the PDT ERider scooters with sevcon controllers tend to only dump 30A from standstill and then after 10km/h it then winds up to 110A until top speed. Very rarely you will see it above 110A. Unless the battery voltage gets low, it will pump in more amps to make up 8000w.
You're very welcome :-) For fixing the CA I simply unscrewed the handle bar adapter but left the fork in place so I can still tilt the CA downwards to get at the RH front handle bar fairing. I drilled a 5mm hole into the rear handle bar fairing, took the screw that formerly held handle bar adapter and fork together, put the screw through a BIG washer and the hole in the fairing, cut off a little piece of one of the rubber strips from the handle bar adapter, poked a hole in it and stuck it over the protruding thread, and then screwed on the CA fork. It is a very solid assembly when that screw is tightened correctly.
I am not sure that the high start up currents of my souped-up Kelly do my motor much good, I have a first hunch I may have already slightly demagantized my motor magnets as top speed seems somewhat diminished from last year. I haven't even come close to real 86km/h yet, despite my heating up the battery to 27°C before I went on my first Analogger ride. My Thunder even struggled to get above 80...
However, I am having heaps of fun with the rapid response from standstill :-)
My rides:
2017 Zero S ZF6.5 11kW, erider Thunder 5kW
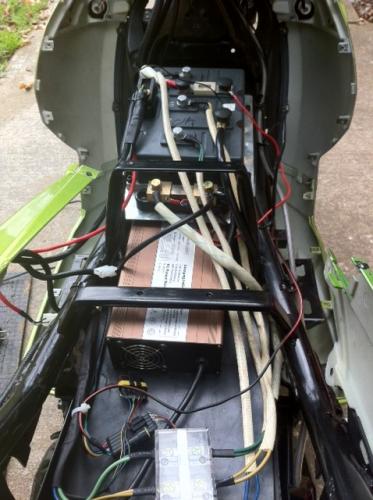
I had received two Erider thunder bikes for delivery here in Canberra and they both wanted a Cycle analyst, After working out how to strip the bike down, it all ran very smooth. I installed the charger internal to the bike and mounted the Shunt next to the sevcon speed controller. The CA (thanks to your photos) were cleanly installed near that hole (which had a cap glued on top of it). However... I bough two large screen HC CA units and one worked picking up the speed from the hall sensor, while the other maxxed out at 75km/h and the speed dropped to 30km/h. So I had to pull it apart and replaced C6 with a 22nF capacitor and it then worked perfectly up to 101km/h (max free wheel speed). I have mounted the cycle analyst so that it is ALWAYS on so when you ride it counts power used and when you regen it counts power returned. I have also connected the charger to the shunt as well so when you charge, you can see the power returning into the batteries. In my opinion, that is VERY important. After re-assembling the WHOLE bike, I realised the headlights and 12v DCDC converter was connected to the battery and would not be measure by the cycle analyst... So I stripped the bike down again and took the negative wire from the battery MINUS and put it on the shunt so now it can even count the 55w from blinkers etc etc.
After nearly 6000km on my scooter, I have noticed nearly 3.6Ah returned from regen braking, and around 145w (over 1 hour is around 2Ah that you would not normally see) being used in lighting. Plus when I am running low, I have charged for a bit while I have a coffee break, come back and find I gained an extra 3Ah. That 3Ah then gave me an extra 4.5km down the road. I personally would not wire the CA any other way.
Here are some photo's.
Green Erider Thunder stripped down
This is where I mounted the shunt resistor for the Cycle analyst
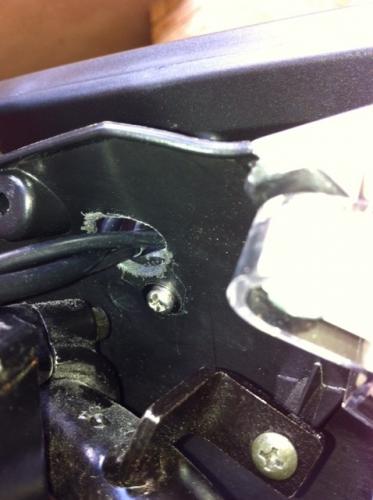
These two pics show how the CA is mounted from behind. The original screw was used with a large washer (thanks to MEroller for idea)
This is the final product, a nice solidly mounted Cycle Analyst.
Looks good, Phil! You mounted the display a tad higher up than I did, which should slightly improve readability while riding and possibly make the whole light switch visible under it, but can you still get at the top right screw of the front handlebar fairing?
That Sevcon controller is a real monster compared to my Kelly! And what exactly is that on top of the batteries? A big rubber mat? That would be pretty good to improve the rain compabilty of the Thunder.
One thing you forgot, though: As the charger once again resides INSIDE it would be important to get the external charger display from Mountain Chen. It can be plugged into the charger and takes the place of the round lid in the center console, visible at the bottom of your pic (formerly was the hole for the filler neck of the fuel tank):
And looks like this:
My rides:
2017 Zero S ZF6.5 11kW, erider Thunder 5kW
Today I also moved my CA housing further up like Phil with his conversions - heaps better and the light switch is in full view too now. I found that turning the CA where it is bolted to the fairing also allows access to the top right screw of the front handlebar fairing even with this higher position.
My rides:
2017 Zero S ZF6.5 11kW, erider Thunder 5kW
I have some bad news to report: after I had a close call with a prematurely empty battery and multiple BMS shutdowns of battery power despite 72V under load I thought it would be a good idea to monitor a complete charge from plugging in to the end to see if the balancers were misbahiving or what. For this I need to switch the "ignition" on in order to power cycle analyst and analogger. This had worked without trouble before, but only switching on the ignition AFTER having plugged in the charger.
This time I wanted to log from plugging in, but there was only a bang from under the center console, and the bike was without power and all those nice LED's of the charger display remained off, as did the charger fan.
I immediately unplugged the charger and switched ingintion off and on again, and the bike had power again and full functionality, but the charger remains dead :-(
This time I timed how long it took me to strip Thunder down to the built-in battery charger, using a powered screwdriver: 1h 8 minutes (whithout preparation time).
- The charger still receives power from the grid and charges up it's input capacitors, clearly measurable by the high DC voltage present in the plug pins after unplugging, and quickly subsiding as the capacitors discharge, just like always. Naturally also the input fuse is perfectly in order.
- I can measure the full battery voltage at the BMS input (charger output plugs into there), so I assume it is also not damaged
- The inside of my GBS/Elite Power Solutions EMC 72-10 charger looks pristine all around, there is not a single sign of soot or molten or popped elecric or electronic components inside
Any clues what could have happened to it?
My rides:
2017 Zero S ZF6.5 11kW, erider Thunder 5kW
Aoch - sound like something borke in your charger - it is not always visible. If you do not get any DC out from the secondary side it is probably broke,or some control signal has been lost, but the "bang" suggest a blown capacitor or something.
It doesnt seem like a good idea to switch on ignition after connecting the charger - a current spike could cause a rush of cahrge into or out from the charger. :/
ME - I have other problems. I have had the jitter when braking hard for a while, and even occasionally a wobble even when just going straight.
After checking the brakes, lubrication the floaters and cleaning everything, and then filling the forks about half full with fork oil, that is too much by the way they are a bit too hard now. But I had no specifiactions for how much to use...
But now the jitter is even worse !!
Yesterday the scooter started BOUNCING when braking hard - it started as a joitter when braking moderately hard from about 40-50 kph and within a second or two the vibrations were so bad that the front wheel almost felt like it was going to leave the ground !
Clearly there is some other problem than the amount of fork oil :(
Today I loosened all nuts from the bearing, inspected them (looked ok, but very little grease (!)
I have now tighened the nuts again, after greasing up the bearings, once again just by feeling since I do not know the torque :(
The steering may be a bit to tight right now, but I will test the scooter first, before loosening it bit by bit, just to see if it helps.
If this doesnt do it, I dont know what to do next - then maybe the forks themselves are faulty, OR the whole construction/design is too sensitive, and I may need new forks, more lead (stteper angle of attack) or something...
I really wonder what the problem is, I haven´t noticed any such tendencies yet, maybe they changed something on later models?
If more oil made it worse, maybe less is the solution?
The fork on mine isn´t perfect, at high speeds (80-90+km/h) it feels a little bit "bouncy" as well.
Yes, it is the judder thing, and yes, the front wheel actually CAN leave the ground in the process, which is how I aquired the first scratches on my fairings :-(
With tighter steering head bearings it should be pretty good, at least heaps better than that braking cangaroo... And yes, flood the bearings in grease, the Chinese sources of our scoots are only just learning about the blessings of proper bearing lubrication???!
70Nm is what E-Sprit prescribe for countering the steering head nuts, though I think I would not go quite that far if I had torquing means for this purpose. Just don't tighten these bearings too hard, lest you flatten the bearing balls prematurly!
Maybe the front tyre brand and make also makes a difference?
A new charger is under way, I just hope it does not take a whole week again to cover a distance of 200km...
My rides:
2017 Zero S ZF6.5 11kW, erider Thunder 5kW
Those "Elite Power Solution/ex. Ningbo Thunder-Sky" chargers are no good, I have one 72V 15A that broke almost immediately, it started to smell burnt when I was trying to charge my car and didn´t charge any more. Unfortunately it had been laying around unused for more than a year since I had another one, so no warranty left...
I really wonder what the problem is, I haven´t noticed any such tendencies yet, maybe they changed something on later models?
If more oil made it worse, maybe less is the solution?
The fork on mine isn´t perfect, at high speeds (80-90+km/h) it feels a little bit "bouncy" as well.
Yes I will probably back off a bit on the oil - however that is not the root cause, it only amplifies the problem.
Hopefully it will be better now when the steering bearing nut is tightened, otherwise I do not know what to do :/
Johnny J, what make of charger do you have more confidence in? That can do 24 cells, has an output to drive an external LED battery and will not react violently to the BMS temporarily disconnecting the battery from the charger in order for a balancer to burn off surplus charge? As of yet I have not heard of troubles with this kind charger:
My rides:
2017 Zero S ZF6.5 11kW, erider Thunder 5kW
Johnny J, what make of charger do you have more confidence in? That can do 24 cells, has an output to drive an external LED battery and will not react violently to the BMS temporarily disconnecting the battery from the charger in order for a balancer to burn off surplus charge? As of yet I have not heard of troubles with this kind charger:
Well, I bought a TCcharger to my car instead, problem is it is a bit large for a scooter and I really do not know any other good make right now.
Regarding the front fork, I just got a message from Mountain and it seems they have found a better one for the Thunder that will not vibrate or bounce at high speeds or braking, I will propably order one and get it sent together with the BMS, only the freight cost is the problem, will see where it lands..
Seems folks over on ES are having luck with them; but they are adding some potting compound/silicone to anchor down caps/heavy items. Folks seem impressed with the accuracy of the customized cut-off voltage level.
Meroller - you seem to know some stuff about the ZEV scooters, do I have the same forks as you and Klas? I have only gone 6700KM and so far all is great, but all this talk about fork problems has got me concerned as to how long before I have fork problems. My manual states I should check the fork fluid annually, but no instructions on how to do that or what to fill it with if needed. The lack of maintenance specs on these forks is frustrating.
Good luck Klas,
Motorcycles: 2011 ZEV Trail 7100, 84V, 60AH, 60+mph, Cycle Analyst, TNC throttle, modified charger. 2013 Kymco GT300i
Bicycles: 2017 Sondors Thin
Cars: 2016 Leaf SV, 30KWH pack. 2007 CR-V
Solar array: 5KW. Cost per lifetime KWH produced $0.073
Bi
IBScootn, thanks for the link. What makes me uneasy is that they also call their charger EMC. Mine is called an EMC7210...
As for your ZEV6100 forks, from the two pics I can see on the FEV homepage they look to be the same as in our bikes. But that may only be the outer appearance...
My rides:
2017 Zero S ZF6.5 11kW, erider Thunder 5kW
Check out the posts on ES. Also, if your interested in fixing the old charger, there are some folks in the battery technology forum that can help. Post that you would like help troubleshooting the charger and post detailed photos of its circuit board. They like to look over the design and provide assistance where possible.
Motorcycles: 2011 ZEV Trail 7100, 84V, 60AH, 60+mph, Cycle Analyst, TNC throttle, modified charger. 2013 Kymco GT300i
Bicycles: 2017 Sondors Thin
Cars: 2016 Leaf SV, 30KWH pack. 2007 CR-V
Solar array: 5KW. Cost per lifetime KWH produced $0.073
Bi
Ah, now I understand what you mean by ES :-)
Anyway, the new charger arrived today (warranty still), including the sheet metal cradle which allows it to be fixed between the frame underneath the controller. And it charges with 10A again, not just 9 as my old charger did in the end, and now the bike is back together and I (for the time being) a happy man :-)
But I DO want to find out what blew up in my old charger. When something goes audibly POP!, then the damage MUST be visible somewhere in there. If I can find nothing I may actually try the ES folks. But it really would be nice to get it working again, so I have a spare in case the new goes POP! too in a year's time...
My rides:
2017 Zero S ZF6.5 11kW, erider Thunder 5kW
Tracing a faulty part is pretty easy. Start at the mains primary, then to the secondary, then through bridge rectifier into some filtering caps then into FETS. Here is a list of things that normally go pop when they fail. And then what to look for:
1. Electrolytic capacitors
2. FET transistor blows a microscopic hole
3. Lamination in a transformer
4. Bridged track on circuit board
5. Ceramic fuse
What to look for:
1. A spool of unwound paper from a cap.
2. Bad smell from FET. Hole may be as small as a pin prick
3. Smell from transformer. May have burn mark near winding or no visable damage
4. Burn mark on bottom of circuit board
5. White ceramic fuse with burn mark or cracked fuse
Ok, now I have taken some oil out of the forks, and adjusted the bearing lock nut so that it is tight but not as tight so i affects the steering.
The bouncing seems gone, and it is a much smother ride.
However I can still fell a small jitter or light vibration when braking hard with the fornt brake -pretty much as much as when it all started, but now the front shoks are ok, and the ydo no longer bounce through when for instance hitting a pot hole etc.
Upgraded forks may be a very good idea, depedning on the cost I may try that, but at least for now I can use the scooter without fear of a potential fatal bounce in case of an emergency braking...


That photo is perfect. Shows me exactly where the Large screen model can fit.
Nice, there isn't anywhere else to fit it I guess.
I think I will surface mount the cycle analyst so it's flush with the plastic and sucure it from below like on my scooter, then you will have no cable visable at all. I will also install a switch to turn the backlight on and off because I keep the CA connected 24/7 so it can measure the charger and discharging while riding and re-charging.
Not a dealership, but Erider, Melbourne is happy for me to be the contact point in Canberra to show off the bikes and for servicing/repairs.
------------------------------
eRider 8000w Scooter - PDT Version
72v 50AH CHL battery
350A Sevcon controller
24km: Delivered - 24 September 2011
2490km: Installed dual 35w HID lights Bi-Xenon Projectors - 27 November 2011
8313km: Installed BMS -
No experiments here. I will use 2 magnets (NdFeB...) and half the tire circumfernce for quicker response and better resolution, and probably those will have to be on the left motor lid on the rear wheel, as I have so far found no other suitable spot on the front wheel and fork of my Thunder without having to construct a holding bracket of some sort for the reed switch of the CA. But I will have to ensure that whatever resin I use for fixing the magnets will have to be thermally stable at least up to 100°C, and on the other hand I will first have to test if the magnetic field of those VERY powerful magnets (small as they may be...) interferes with the Hall sensors in the motor. I am not really looking forward to all this work, I would rather ride the thing instead of tinkering with it... But the CA is a MUST as long as the information it supplies is not built into the scooter instrument cluster from the start.
My rides:
2017 Zero S ZF6.5 11kW, erider Thunder 5kW
A good epoxy glue will hold the magnets, I used one called "Chemical Metal" for the magnets on the hub motors on my "hybrid" car.
By the way, it´s a good idea with the 2 magnets, will also affect the wheel balance less.
I fear the only flush place you could manage to install the large screen CA would be further down in one of the inner farings or the center console. The place I will put my CA is really the only one without covering other vital information or switches...
I will only use my CA with "ignition" on, as I will quickly learn the ratio of Ah used to kWh pumped back in with the charger. And I am not really looking forward to learning this ratio, as it will make me want to cry due to high charging losses :-(
Also known as "Liquid Metal" :-) Yes, a good epoxy resin should easily outlast the 80°C maximum temp. of the NdFeB magnets before they start to permanently degenerate.
My rides:
2017 Zero S ZF6.5 11kW, erider Thunder 5kW
Thats because 5V has to be applied to the hall sensors to get them to work
The cycle analyst has an internal 5V supply, which you could use to power them
If the main hall sensors fail, just swap them, the cycle analyst only needs one set to work, where as the MC needs all 3
Matt
Daily Ride:
2007 Vectrix, modified with 42 x Thundersky 60Ah in July 2010. Done 194'000km
So, my back is hurting as this Saturday found me in the garage till 11p.m. Thankfully my two sons (7 and 11) helped me with half stripping my Thunder in order to get my Cycle Analyst into place. A first test was if the NdFeB magnets stuck to the LH motor lid (just with super glue for starters, the liquid metal will follow next Tuesday) would interfere with the motor hall sensors, but this was thankfully not the case. The shunt wire of the CA was just long enough to reach towards the back end of my battery bay, so no need to lengthen that. But of course the Reed switch needed a fair strech of additional cable, which I soldered in and individually and around that communally clothed in shrink tubing. One of the hardest parts was putting on new 8mm wire terminals on all four wires that meet at the negative battery pole: Battery -, Controller -, Charger - and probalby the DC/DC -. The postive lead of the CA I connected to the plus going into the DC/DC converter, as that was the easiest place to get juice that is switched on and off by the ignition key.
The huge shunt I could fit to the shet metal lid sitting attop the end of my battery bay, but I had to put in a slightly longer wire to the controller because the original was slightly too short to reach back there. The main wiring is 10mm², which isn't a whole lot, but it could be worse :-)
All is functioning, only the CA needs a slight change in the speed sensor programming, as I put in two poles (as I use two magnets) AND put in just half the tire circumfrence, which is why the CA only showed approximately half the speed it should. But that will be easy to fix :-)
I found it better to use the peek hole for both normal CA cables plus for tucking in one of the Analogger connections, and using the cutout only for storing the second Analogger cable. I had to position the CA slightly further down that fairing, as it would otherwise hide access to one of the screws that holds the handle bar fairings together. Now it is possbile to get at that screw by tilting the CA completely down.
Pics to follow beginning of next week. Happy Easter!
My rides:
2017 Zero S ZF6.5 11kW, erider Thunder 5kW
For opportunity charging you might consider connecting the CA power after a circuit breaker and before the ignition sw. That way you can flip the breaker and have the CA on while charging, but the ignition is off to prevent theft while shopping, eating, etc. This will reduce your AHs reading while charging. Then your "AH used" will be correct even though you might have recharged a couple of times. Even at home I find this useful too as after a morning ride, I can do less than a full charge and then take off again and still have an fairly accurate AH used reading.
Motorcycles: 2011 ZEV Trail 7100, 84V, 60AH, 60+mph, Cycle Analyst, TNC throttle, modified charger. 2013 Kymco GT300i
Bicycles: 2017 Sondors Thin
Cars: 2016 Leaf SV, 30KWH pack. 2007 CR-V
Solar array: 5KW. Cost per lifetime KWH produced $0.073
Bi
Thanks IBScootn for the ideas! However, those few times I DO oportunity charge I do the math myself, knowing that with around 10A charging current during the constant current phase I will have an additional 10Ah in my battery after an hour. If the charge should actually termiante at 100% (which would include the Constant Voltage phase at the end) I would half to subract slightly to remain on the safe side of my actual charge.
I can monitor what my charger does with the ignition on while charging, but this is something I will only do on my own parking lot in front of the house to learn what is actually happening down there while charging :-)
My rides:
2017 Zero S ZF6.5 11kW, erider Thunder 5kW
I'm done: My Fury Thunder is finally able to speak to me in real dirty electrical talk :-)

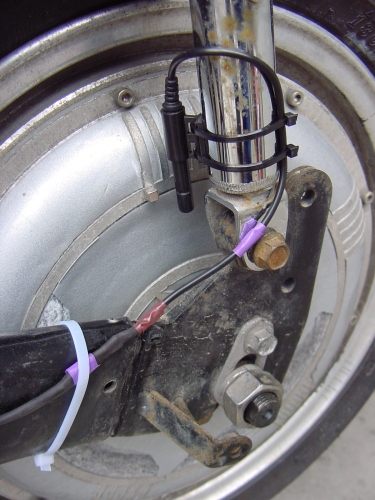
As the inner workings of my Fury are slightly different from the other Thunders I will concentrate mainly on the speed sensor and display mounting. As for the 200A 0.5 mOhm shunt it will suffice to report that it found a fitting perch on a stainless steel lid that covers the rear end of my battery tray. My Fury was originally fitted with an active C-BMS that wasn't up to the temperatures present in a mid-summer battery bay. This system was mounted under that steel lid. Here a pic of the shunt mounting (shunt blades are vertical to enhance cooling air flow) and all the cable mess around it. From the right comes battery minus, on the left charger, controller and "ignition"/DC-DC-converter minus branch off, from left to right:
Be advised that ring terminals with inner Ø 8 mm will be necessary for all wiring attached to the main shunt terminals!
The main CA cable required no extension apart from the positive lead that I attached to DC/DC-Converter plus in order to take advantage of the ignition key for switching the CA on and off. For those instances where I want to monitor charging I will have to leave ignition on, something my Fury will allow even while charging :-)
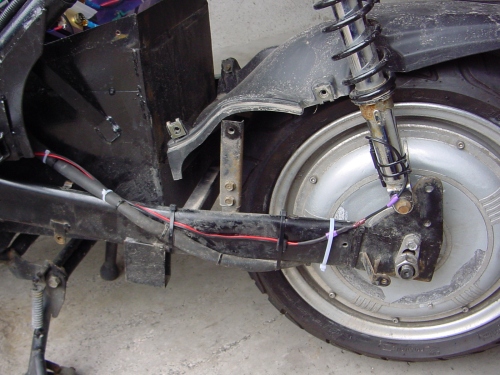
Now comes my rather unusual solution of implementing the speed pickup, which is a reed contact. The only spot that I found on my Fury Thunder without having to construct some holder in order to get the pickup near enough to a magnet on the wheel was the left rear shock:
Meaning that I am working directly with the motor speed, including all spinning on snow and the likes, or when perched on the main stand. I put some rubber padding between shock and sensor housing for a more secure fixing in combination with the cable ties, which also hold the cable. Bottom left is the interface between my extension and the sensor wire. It is soldered, individually insulated with shrink tubing and communally around the outside too. Additional insulation tape under the cable tie and at the upper end of the external shrink tubing serve as added safeguards against excessive relative movement in this connection and to ensure water tightness. And as there will always be some relative movement between shock and rear fork I added another layer of tape where the wire runs across edges.
Left of the speed sensor is one of the two NdFeB magnets, only fixed with super glue in this pic, but in the mean time additionally surrounded with epoxy. Exactly opposite is a second magnet which I fixed with opposing polarity to the other, in order to ensure no permanent magnetizing of the hopefully very soft-magnetic reed contact. With two magnets the reaction time of the CA to speed changes should be cut in half, and the wheel balance might suffer slightly less. Before I decided on this magnet location I conducted a test to see if these rather powerful magnets would interfere with the hall sensors in the motor, but thankfully this is not the case.
Here you can see the complete swing arm now including the speed sensor cable which from there runs forward on the left side of the bike's frame. The main CA cable runs along the right side. Also faintly visible is the second sensor magnet at the bottom, just below the chipped paint on the motor lid:
Now we move forward where the normally visible part of the system resides. Here a front view with the forward handle bar fairing removed, looking at the throttle side:
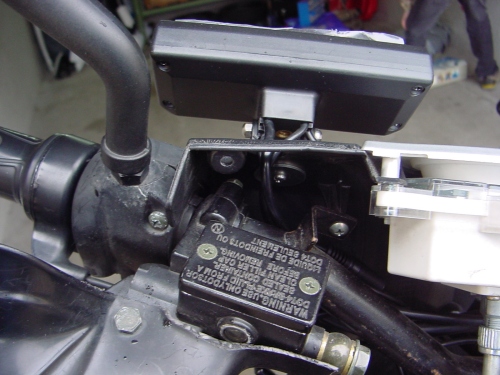
This is the only place where the CA can be mounted in the rider's direct line of sight without blocking the visibility of instruments (I have the electronic cockpit) or light switch. It is bolted to the rear handle bar fairing just below the peek hole that was originally there to allow visual checking of brake fluid level. In this scooter it is useless for this cause, as can be clearly seen, so I now use the hole for running the CA cables into the fairing.
They are fixed to the steering tube with cable ties just above the upper steering head bearing to ensure they do not touch the fixed fairing edge. Below that they run freely down the left and right side of the front fairings to always ensure ample leeway for full steering deflection.
The CA is mounted down low enough so that the corner screw for fixing the front handle bar fairing is just barely accessible over the CA housing when it is tilted back completely. That is slightly lower than originally intended, but still just OK visibility-wise.
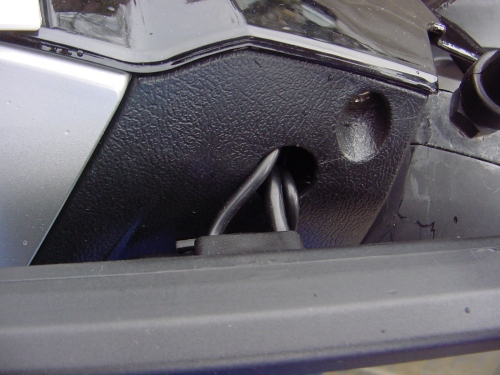
Here another look from the front that shows my gaffer tape "spoiler" to keep rain from entering the CA through the six cable holes and the 1/4 inch thread in the housing foot, yet still ensuring enough air can get in and out from behind so any moisture that might collect inside can also exit out the bottom:

Grin technologies rather suggest such a spoiler in contrast to outright sealing as otherwise trapped moisture would fog up the display window from the inside when it's colder. We'll see if it works alright...
And here is the rider's view of the finished installation:
It works :-)
And logging with the Analogger also works, though it must be ensured there is no phase interference in the CA data output stream. The CA allows a sampling rate of either 1Hz for long range logging or 5Hz for dynamic stuff. Particularly for the latter the CA's averaging time needs to be reduced below the standard value of 5 (corresponds to 0.4 sec) as otherwise between 3 and 4 successive voltage and current data sets will be identical. I used a value of 3 corresponding to 0.1 sec averaging time with usable results, naturally more noise (or detail, who knows...) but also enough dynamics. My Kelly KEB72801X pumps 120A battery current almost from standstill into it's system, rising to 140A at around 50km/h, were the reigns are let loose up to about 62km/h with current spikes of even over 170A at fully charged battery, more like 160A on average, and from then on back EMF begins it's current suffocation up to a top speed of only 82 or so km/h, at 27°C Battery temp. Of course I have the slightly smaller Cheng Shin "slicks" on the rear again, which may be one of the causes for the slightly reduced top speed of formerly 85...86 km/h.
But is becoming very clear once again: it is now easy to gain a multitude of data, but will take me a few weeks probably to properly analyse it :-)
My rides:
2017 Zero S ZF6.5 11kW, erider Thunder 5kW
Thanks for sharing, will come in handy when I start!
Excellent write up MEroller!!!!!!!
Thank you!
I can see the little hole you run the wires through, the two thunders I have currently have plastic caps popped in there. I can't quite see how you have mounted the CA? I have saved your photo to my iPhone and zoomed in. Have you just put a bolt and washer through the plastic into the rear screw hole on the CA? If so, is that enough to stop it wobbling with high speeds?
Over all it looks like a very nice install. Thanks for sharing. In comparison the PDT ERider scooters with sevcon controllers tend to only dump 30A from standstill and then after 10km/h it then winds up to 110A until top speed. Very rarely you will see it above 110A. Unless the battery voltage gets low, it will pump in more amps to make up 8000w.
------------------------------
eRider 8000w Scooter - PDT Version
72v 50AH CHL battery
350A Sevcon controller
24km: Delivered - 24 September 2011
2490km: Installed dual 35w HID lights Bi-Xenon Projectors - 27 November 2011
8313km: Installed BMS -
You're very welcome :-) For fixing the CA I simply unscrewed the handle bar adapter but left the fork in place so I can still tilt the CA downwards to get at the RH front handle bar fairing. I drilled a 5mm hole into the rear handle bar fairing, took the screw that formerly held handle bar adapter and fork together, put the screw through a BIG washer and the hole in the fairing, cut off a little piece of one of the rubber strips from the handle bar adapter, poked a hole in it and stuck it over the protruding thread, and then screwed on the CA fork. It is a very solid assembly when that screw is tightened correctly.
I am not sure that the high start up currents of my souped-up Kelly do my motor much good, I have a first hunch I may have already slightly demagantized my motor magnets as top speed seems somewhat diminished from last year. I haven't even come close to real 86km/h yet, despite my heating up the battery to 27°C before I went on my first Analogger ride. My Thunder even struggled to get above 80...
However, I am having heaps of fun with the rapid response from standstill :-)
My rides:
2017 Zero S ZF6.5 11kW, erider Thunder 5kW
Hi MERoller,
I had received two Erider thunder bikes for delivery here in Canberra and they both wanted a Cycle analyst, After working out how to strip the bike down, it all ran very smooth. I installed the charger internal to the bike and mounted the Shunt next to the sevcon speed controller. The CA (thanks to your photos) were cleanly installed near that hole (which had a cap glued on top of it). However... I bough two large screen HC CA units and one worked picking up the speed from the hall sensor, while the other maxxed out at 75km/h and the speed dropped to 30km/h. So I had to pull it apart and replaced C6 with a 22nF capacitor and it then worked perfectly up to 101km/h (max free wheel speed). I have mounted the cycle analyst so that it is ALWAYS on so when you ride it counts power used and when you regen it counts power returned. I have also connected the charger to the shunt as well so when you charge, you can see the power returning into the batteries. In my opinion, that is VERY important. After re-assembling the WHOLE bike, I realised the headlights and 12v DCDC converter was connected to the battery and would not be measure by the cycle analyst... So I stripped the bike down again and took the negative wire from the battery MINUS and put it on the shunt so now it can even count the 55w from blinkers etc etc.
After nearly 6000km on my scooter, I have noticed nearly 3.6Ah returned from regen braking, and around 145w (over 1 hour is around 2Ah that you would not normally see) being used in lighting. Plus when I am running low, I have charged for a bit while I have a coffee break, come back and find I gained an extra 3Ah. That 3Ah then gave me an extra 4.5km down the road. I personally would not wire the CA any other way.
Here are some photo's.
Green Erider Thunder stripped down
This is where I mounted the shunt resistor for the Cycle analyst
These two pics show how the CA is mounted from behind. The original screw was used with a large washer (thanks to MEroller for idea)
This is the final product, a nice solidly mounted Cycle Analyst.

------------------------------
eRider 8000w Scooter - PDT Version
72v 50AH CHL battery
350A Sevcon controller
24km: Delivered - 24 September 2011
2490km: Installed dual 35w HID lights Bi-Xenon Projectors - 27 November 2011
8313km: Installed BMS -
Looks good, Phil! You mounted the display a tad higher up than I did, which should slightly improve readability while riding and possibly make the whole light switch visible under it, but can you still get at the top right screw of the front handlebar fairing?


That Sevcon controller is a real monster compared to my Kelly! And what exactly is that on top of the batteries? A big rubber mat? That would be pretty good to improve the rain compabilty of the Thunder.
One thing you forgot, though: As the charger once again resides INSIDE it would be important to get the external charger display from Mountain Chen. It can be plugged into the charger and takes the place of the round lid in the center console, visible at the bottom of your pic (formerly was the hole for the filler neck of the fuel tank):
And looks like this:
My rides:
2017 Zero S ZF6.5 11kW, erider Thunder 5kW
Today I also moved my CA housing further up like Phil with his conversions - heaps better and the light switch is in full view too now. I found that turning the CA where it is bolted to the fairing also allows access to the top right screw of the front handlebar fairing even with this higher position.
My rides:
2017 Zero S ZF6.5 11kW, erider Thunder 5kW
I have some bad news to report: after I had a close call with a prematurely empty battery and multiple BMS shutdowns of battery power despite 72V under load I thought it would be a good idea to monitor a complete charge from plugging in to the end to see if the balancers were misbahiving or what. For this I need to switch the "ignition" on in order to power cycle analyst and analogger. This had worked without trouble before, but only switching on the ignition AFTER having plugged in the charger.
This time I wanted to log from plugging in, but there was only a bang from under the center console, and the bike was without power and all those nice LED's of the charger display remained off, as did the charger fan.
I immediately unplugged the charger and switched ingintion off and on again, and the bike had power again and full functionality, but the charger remains dead :-(
This time I timed how long it took me to strip Thunder down to the built-in battery charger, using a powered screwdriver: 1h 8 minutes (whithout preparation time).
- The charger still receives power from the grid and charges up it's input capacitors, clearly measurable by the high DC voltage present in the plug pins after unplugging, and quickly subsiding as the capacitors discharge, just like always. Naturally also the input fuse is perfectly in order.
- I can measure the full battery voltage at the BMS input (charger output plugs into there), so I assume it is also not damaged
- The inside of my GBS/Elite Power Solutions EMC 72-10 charger looks pristine all around, there is not a single sign of soot or molten or popped elecric or electronic components inside
Any clues what could have happened to it?
My rides:
2017 Zero S ZF6.5 11kW, erider Thunder 5kW
Aoch - sound like something borke in your charger - it is not always visible. If you do not get any DC out from the secondary side it is probably broke,or some control signal has been lost, but the "bang" suggest a blown capacitor or something.
It doesnt seem like a good idea to switch on ignition after connecting the charger - a current spike could cause a rush of cahrge into or out from the charger. :/
ME - I have other problems. I have had the jitter when braking hard for a while, and even occasionally a wobble even when just going straight.
After checking the brakes, lubrication the floaters and cleaning everything, and then filling the forks about half full with fork oil, that is too much by the way they are a bit too hard now. But I had no specifiactions for how much to use...
But now the jitter is even worse !!
Yesterday the scooter started BOUNCING when braking hard - it started as a joitter when braking moderately hard from about 40-50 kph and within a second or two the vibrations were so bad that the front wheel almost felt like it was going to leave the ground !
Clearly there is some other problem than the amount of fork oil :(
Today I loosened all nuts from the bearing, inspected them (looked ok, but very little grease (!)
I have now tighened the nuts again, after greasing up the bearings, once again just by feeling since I do not know the torque :(
The steering may be a bit to tight right now, but I will test the scooter first, before loosening it bit by bit, just to see if it helps.
If this doesnt do it, I dont know what to do next - then maybe the forks themselves are faulty, OR the whole construction/design is too sensitive, and I may need new forks, more lead (stteper angle of attack) or something...
/K
I really wonder what the problem is, I haven´t noticed any such tendencies yet, maybe they changed something on later models?
If more oil made it worse, maybe less is the solution?
The fork on mine isn´t perfect, at high speeds (80-90+km/h) it feels a little bit "bouncy" as well.
Yes, it is the judder thing, and yes, the front wheel actually CAN leave the ground in the process, which is how I aquired the first scratches on my fairings :-(
With tighter steering head bearings it should be pretty good, at least heaps better than that braking cangaroo... And yes, flood the bearings in grease, the Chinese sources of our scoots are only just learning about the blessings of proper bearing lubrication???!
70Nm is what E-Sprit prescribe for countering the steering head nuts, though I think I would not go quite that far if I had torquing means for this purpose. Just don't tighten these bearings too hard, lest you flatten the bearing balls prematurly!
Maybe the front tyre brand and make also makes a difference?
A new charger is under way, I just hope it does not take a whole week again to cover a distance of 200km...
My rides:
2017 Zero S ZF6.5 11kW, erider Thunder 5kW
Those "Elite Power Solution/ex. Ningbo Thunder-Sky" chargers are no good, I have one 72V 15A that broke almost immediately, it started to smell burnt when I was trying to charge my car and didn´t charge any more. Unfortunately it had been laying around unused for more than a year since I had another one, so no warranty left...
Yes I will probably back off a bit on the oil - however that is not the root cause, it only amplifies the problem.
Hopefully it will be better now when the steering bearing nut is tightened, otherwise I do not know what to do :/
/K
Johnny J, what make of charger do you have more confidence in? That can do 24 cells, has an output to drive an external LED battery and will not react violently to the BMS temporarily disconnecting the battery from the charger in order for a balancer to burn off surplus charge? As of yet I have not heard of troubles with this kind charger:

My rides:
2017 Zero S ZF6.5 11kW, erider Thunder 5kW
Well, I bought a TCcharger to my car instead, problem is it is a bit large for a scooter and I really do not know any other good make right now.
Regarding the front fork, I just got a message from Mountain and it seems they have found a better one for the Thunder that will not vibrate or bounce at high speeds or braking, I will propably order one and get it sent together with the BMS, only the freight cost is the problem, will see where it lands..
Klas - yikes I hope you get the folks fixed soon. Please keep us posted on the progress.
Meroller/Johnny - check out this charger manufacturer: http://www.bmsbattery.com/6-charger
Seems folks over on ES are having luck with them; but they are adding some potting compound/silicone to anchor down caps/heavy items. Folks seem impressed with the accuracy of the customized cut-off voltage level.
Meroller - you seem to know some stuff about the ZEV scooters, do I have the same forks as you and Klas? I have only gone 6700KM and so far all is great, but all this talk about fork problems has got me concerned as to how long before I have fork problems. My manual states I should check the fork fluid annually, but no instructions on how to do that or what to fill it with if needed. The lack of maintenance specs on these forks is frustrating.
Good luck Klas,
Motorcycles: 2011 ZEV Trail 7100, 84V, 60AH, 60+mph, Cycle Analyst, TNC throttle, modified charger. 2013 Kymco GT300i
Bicycles: 2017 Sondors Thin
Cars: 2016 Leaf SV, 30KWH pack. 2007 CR-V
Solar array: 5KW. Cost per lifetime KWH produced $0.073
Bi
IBScootn, thanks for the link. What makes me uneasy is that they also call their charger EMC. Mine is called an EMC7210...
As for your ZEV6100 forks, from the two pics I can see on the FEV homepage they look to be the same as in our bikes. But that may only be the outer appearance...
My rides:
2017 Zero S ZF6.5 11kW, erider Thunder 5kW
MEroller,
Check out the posts on ES. Also, if your interested in fixing the old charger, there are some folks in the battery technology forum that can help. Post that you would like help troubleshooting the charger and post detailed photos of its circuit board. They like to look over the design and provide assistance where possible.
Motorcycles: 2011 ZEV Trail 7100, 84V, 60AH, 60+mph, Cycle Analyst, TNC throttle, modified charger. 2013 Kymco GT300i
Bicycles: 2017 Sondors Thin
Cars: 2016 Leaf SV, 30KWH pack. 2007 CR-V
Solar array: 5KW. Cost per lifetime KWH produced $0.073
Bi
ES = www.endless-sphere.com
Motorcycles: 2011 ZEV Trail 7100, 84V, 60AH, 60+mph, Cycle Analyst, TNC throttle, modified charger. 2013 Kymco GT300i
Bicycles: 2017 Sondors Thin
Cars: 2016 Leaf SV, 30KWH pack. 2007 CR-V
Solar array: 5KW. Cost per lifetime KWH produced $0.073
Bi
Ah, now I understand what you mean by ES :-)
Anyway, the new charger arrived today (warranty still), including the sheet metal cradle which allows it to be fixed between the frame underneath the controller. And it charges with 10A again, not just 9 as my old charger did in the end, and now the bike is back together and I (for the time being) a happy man :-)
But I DO want to find out what blew up in my old charger. When something goes audibly POP!, then the damage MUST be visible somewhere in there. If I can find nothing I may actually try the ES folks. But it really would be nice to get it working again, so I have a spare in case the new goes POP! too in a year's time...
My rides:
2017 Zero S ZF6.5 11kW, erider Thunder 5kW
Tracing a faulty part is pretty easy. Start at the mains primary, then to the secondary, then through bridge rectifier into some filtering caps then into FETS. Here is a list of things that normally go pop when they fail. And then what to look for:
1. Electrolytic capacitors
2. FET transistor blows a microscopic hole
3. Lamination in a transformer
4. Bridged track on circuit board
5. Ceramic fuse
What to look for:
1. A spool of unwound paper from a cap.
2. Bad smell from FET. Hole may be as small as a pin prick
3. Smell from transformer. May have burn mark near winding or no visable damage
4. Burn mark on bottom of circuit board
5. White ceramic fuse with burn mark or cracked fuse
------------------------------
eRider 8000w Scooter - PDT Version
72v 50AH CHL battery
350A Sevcon controller
24km: Delivered - 24 September 2011
2490km: Installed dual 35w HID lights Bi-Xenon Projectors - 27 November 2011
8313km: Installed BMS -
Ok, now I have taken some oil out of the forks, and adjusted the bearing lock nut so that it is tight but not as tight so i affects the steering.
The bouncing seems gone, and it is a much smother ride.
However I can still fell a small jitter or light vibration when braking hard with the fornt brake -pretty much as much as when it all started, but now the front shoks are ok, and the ydo no longer bounce through when for instance hitting a pot hole etc.
Upgraded forks may be a very good idea, depedning on the cost I may try that, but at least for now I can use the scooter without fear of a potential fatal bounce in case of an emergency braking...
/K
Pages