Re: Extensive XB-600 modifications: no body panels, seat ...
I was looking at the 48V 1KW Regenerative Braking motor controller than Golden Motor offers.
But they won't answer any questions about whether or not it could handle 60 volts. The stock controller for this scooter has motor braking, but it doesn't utilize the current to recharge the batteries.
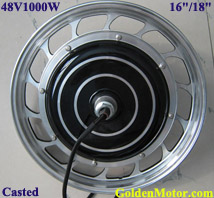
Golden Motor also offers a 48V 1KW hub motor in a 16" cast aluminum rim that could be a direct replacement for my current one.
A 1KW motor and 1KW motor would result in having a 24 MPH top speed on level ground at only 48V instead of 60V. At higher voltages it would probably end up at a non-legal speed.
But, I think I want to continue on the path of having high voltage and low amperage. I think that will net me a much higher total range, and I'll have the performance figures I'll be happier with (29mph on level ground, 25MPH uphill, 35-40 miles range).
I appears to be a drop in replacement for the 600 watt controllers we use on the XB-600, and it is rated at 1000 watts, so you wouldn't need to change the shunt.
Of course it is rated at 48 volts, and might not work at 60 volts, but then it is a lot cheaper ($58) than the regenerative controller you were looking at above.
I am not surprised that they wouldn't answer your questions about whether their regenerative controller would work at 60 volts, since they are selling it to work at 48 volts, and would want to charge more money if they warranted it to work at 60 volts.
Thanks for the pointer to GolderMotors.com, I especially likes the LifePo battery packs they sell on their do it yourself product page;
Re: Extensive XB-600 modifications: no body panels, seat ...
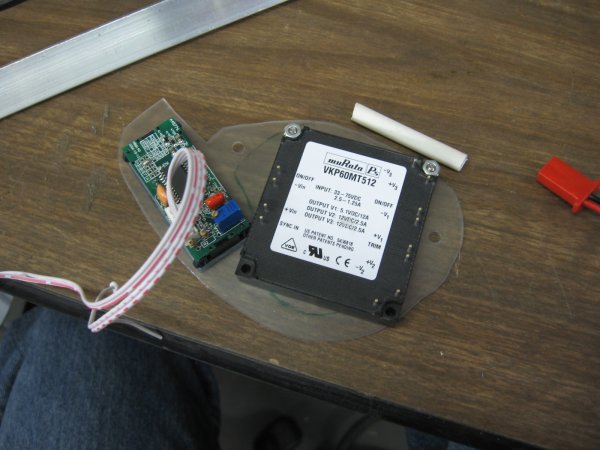
I've already ordered a replacement controller as well as a three output DC-DC converter that will replace the two I'm currently using.
The XB-600 controller is actually rated for 800W. But that rating gets altered a good deal when you add the shunt to it.
I decided to just stick with the stock controller, because I know it can easily be upgraded to work at 72V and 1KW by replacing the MOSFETs and capacitors.
Also, that particular 48V 1KW controller does lack the motor-braking feature. Something I don't recommend doing without because the mechanical brakes on the XB-600 are very weak.
I'll think about experimenting with other controllers at a later date, when I have a working scooter again. The one I posted a picture of is the one that would require the least amount of rewiring.
Re: Extensive XB-600 modifications: no body panels, seat ...
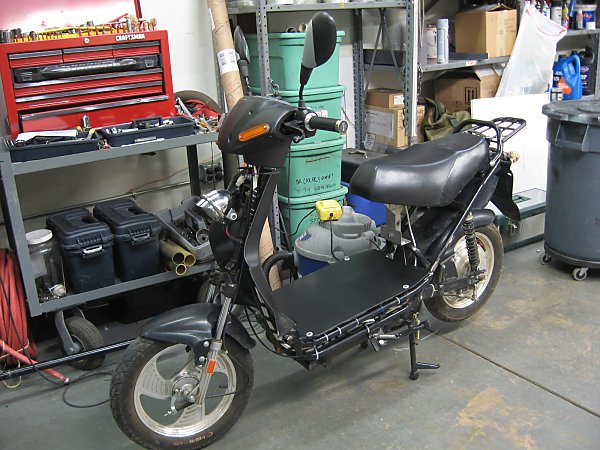
Made a replacement platform/battery cover.
I'm going to be consolidating the batteries, wiring, and controller into the floor of the frame.
Which will leave the area under the seat really empty. At a later date I might make a cargo box for under the seat.
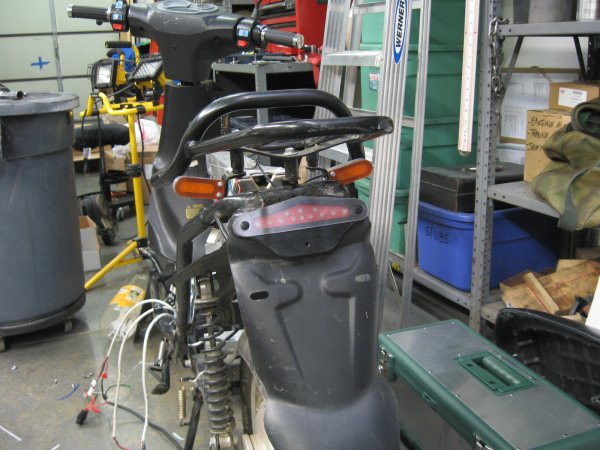
And I cut a mounting hole in the seat frame for the charger receptacle.
Re: Extensive XB-600 modifications: no body panels, seat ...
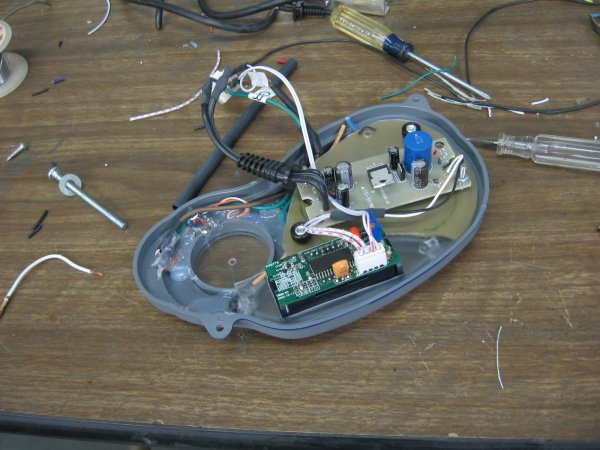
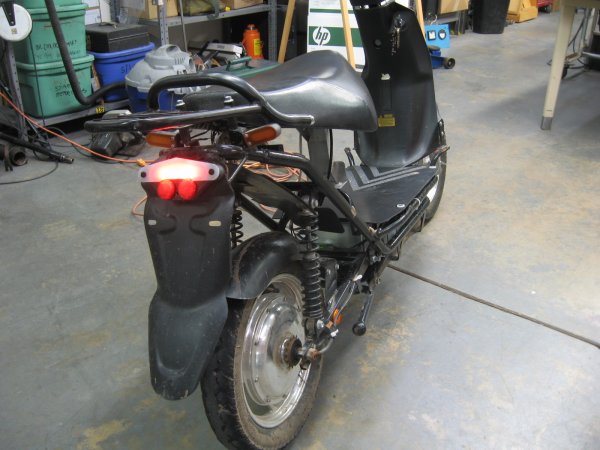
Made a replacement brake light. Total consumption is 1 watt braking, 1/3 watt running. Outputs 130 lumens maximum. I had to sand down the lenses of these LEDs because when perfectly clear they were just too painful to look at directly.
And I got the 20 LED running light array wired and tested.
Total consumption is 2 watts. Outputs 120 lumens.
Re: Extensive XB-600 modifications: no body panels, seat ...
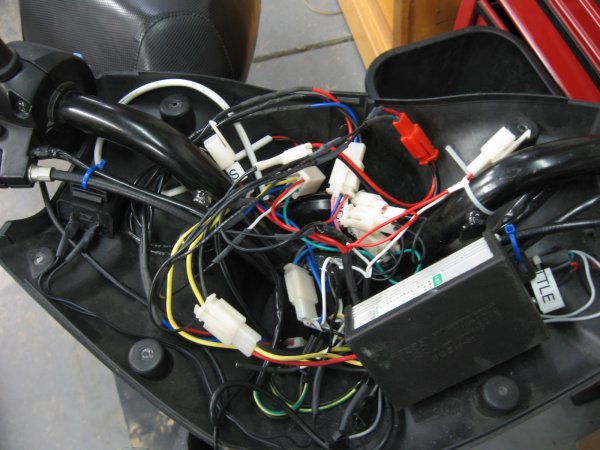
The replacement controller came in the mail, but I was still having problems turning it on. The battery set would read 66 volts when charged, but would read 15 volts under load. And the charger would flicker when I tried to plug it into the set.
Turns out the set of batteries have a few corroded terminals, which I fixed easily with a wire brush. After that was figured out I got the old controller mounted and all of the wiring cleaned up.
And then I gave the floor pan a coat of vinyl dye and cleaned off one years-worth of dirt.
The replacement DC-DC converter came in the mail too. But I'll have to wait to install it until after the LED headlight is done.
Re: Extensive XB-600 modifications: no body panels, seat ...
Replacement turned out to be dead.
So I took apart the 12V-to-5V converter and mounted it there instead. I then repinned the 6-pin connectors to forward the correct lines.
I also added some anti-slip tape to the floor pan, some reflectors to the rear fork and brake light, and change the polycarbonate brake light lens to a polethylene one to help diffuse the light better.
I'm currently contemplating whether or not I want to bother going to 72 Volts. It would involve a great deal of rewiring and soldering. I'm no longer really concerned with my range and if I want a slightly higher top speed the easiest way to obtain it would be to replace the motor.
But I'll set that idea aside for a while. At the moment I just want to get the headlight and front body panel done.
Re: Extensive XB-600 modifications: no body panels, seat ...
My High Power LED arrived a week late (thanks to it being shipped from Canada).
Today was a day of strange problems.
The Negative pad on the LED dumps heat right onto the back of the LED. So lower wattage soldering irons can't overcome the heatsink effect. If you want to solder onto the trace you have to use at least a 100-watt soldering iron. This is not mentioned in the datasheet and lead to much frustration.
And this isn't so much a problem, as it is very funny. The LED is actually TOO bright. :eek:
It's painful to look at indirectly and even more unbearable to look at directly. I'm going to have to add a diffusor or at least a blinder of some kind to avoid blinding people.
Instructable will be made once I get it back in one piece and working safely enough to put it on the scooter.
Edit: And the headlight is done!
I soldered a capacitor in to bridge the positive and negative of the LED running light array so that I get a fade effect when the headlight is switched to the high beam. Here's an animation of the effect.
The switch from high beam to running light is instantaneous.
Tomorrow I'll have more pictures of the scooter with the headlight installed, as well as an output comparison between the new headlight and the old one.
Re: Extensive XB-600 modifications: no body panels, seat ...
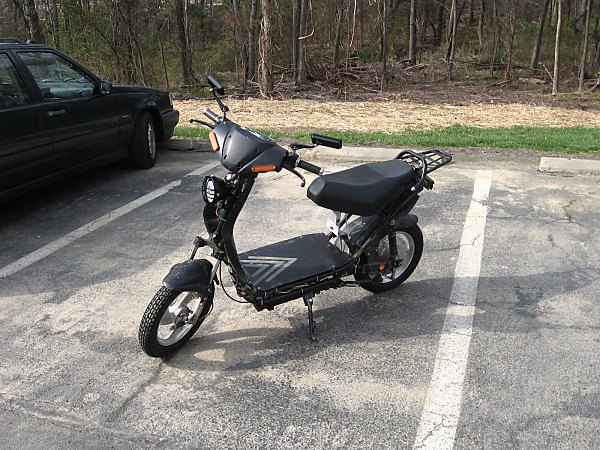
New tires! 90/90-12 (i.e. 12-3.00) from Bikebandit.com arrived. $47 shipped for the two together. They're a slightly tight fit on the rim and take a short while to seat once the tubes are inflated. But it probably would have gone smoother if I had bother to wet the bead of the tire before trying to get them on.
The difference in handling is easily felt. My top speed on level ground is unchanged after recalibrating the bike computer (change in circumference was only 35mm). I now slow down a bit less on hills and the traction improvement is great. No skidding under hard braking, and no sliding on fine gravel.
Of note: If you need to remove the rear wheel you will need a 22mm socket, a monkey wrench, and a pair of tweezers.
You have to unpin the 5-pins from the motor sensing connector and slide the wire through the center of the 22mm socket, then you can snake the socket down the wire insulation onto the axle nuts. You can use the monkey wrench on the 22mm socket to loosen the extremely tight hex nuts.
Re: Extensive XB-600 modifications: no body panels, seat ...
I just bought one of these tires from Bikebandit.com and I am awaiting its arrival. Is the circumference greater or less than that of the stock tire? Also, what did you mean when you said 'wet the bead of the tire'?
Re: Extensive XB-600 modifications: no body panels, seat ...
Spraying on silicone lubricant or glass cleaner around the inside lip of the tire (the bead) will allow you to slip it onto the rim easier with the tire irons.
The replacement tire circumference was only 35mm lager compared to the stock tire. But my stock tires were really worn down.
Re: Extensive XB-600 modifications: no body panels, seat ...
I've been riding around and parking this in torrential rain for the better part of the past month. The only issue I've had is the blinker relay was filled with water. Which resulted in the brake lights being on constant without blinking for 2 days. I no longer have any issues with traction, but driving through very large puddles does negatively effect my range. Getting too wet will drain battery life as something somewhere gets shorted out.
I also had to bring a plastic bin with me to use as a rain shelter for the charger.
I'm currently still debating whether or not I want to upgrade to 72 volts. Doing so would involve adding two relays (ignition and brake), replacing the controller, and making a different charging setup.
I'm disinclined from doing so because I intend to finish my electric motorcycle soon anyways.
Re: Extensive XB-600 modifications: no body panels, seat ...
Well I had one dead battery starting on Wednesday after a dip in a giant puddle shorted it out. I didn't have time to test it and the result is the rest of the pack was overvolted three nights in a row. Three of the five are swollen.
The ignition switch also now appears to be broken.
Tomorrow I will be replacing all five batteries and wiring in a temporary power switch until I can replace the stock ignition with a different keyswitch.
Re: Extensive XB-600 modifications: no body panels, seat ...
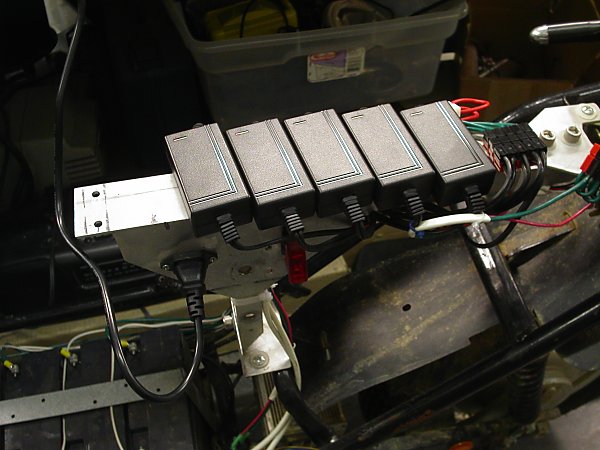
I followed the advice of this excellent guide to series/parallel switching. http://visforvoltage.org/forum/3166-seriesparallel-switching-charge-parallel-part-2-simplified
And installed a bank of 12 volts chargers under the seat.
To drive, I plug in the series connector that connects the 60v pack to the controller.
To charge, I plug in the parallel connector that connects each 12v battery to its individual charger.
I will no longer have any issues with one bad cell in my pack destroying the rest of them. And if I upgrade to a higher voltage later, it won't involve as much rewiring.
Re: Extensive XB-600 modifications: no body panels, seat ...
Hello Captainslug,
I am followin your modifications and kudos for all the creative inventions! The campus that I work at has many hills, and although my range is only about 5 miles a day, I have to go up medium-steep grades. My xb600 does well on flat but way too slow on the climbs. It sounds like a 60V upgrade may be a quick fix to get more climb, but I have no idea where to start. I've read your entries carefully but for someone that doesn't spend time with electricity, I'm fairly lost. If you have a moment and you want to gather the young minds around you and give a quick run down on the 60V upgrade I would love to hear it. I know I need a 12V battery, a 60V charger, and then I plug what to what? I'll look at the diagram so as not to sound like a freeloader, I just don't get it. Thanks, Oscar
Re: Extensive XB-600 modifications: no body panels, seat ...
For going up hills, upping the shunt limit would be more effective than the extra battery, and far simpler, though both risk damaging the scoot. Getting off and walking beside the scoot also works for short steep pitches (and generates a little exercise...).
Also, note that you DON'T need a 60V charger; just follow the directions at:
Using a bank of chargers and attaching the bank in the same pattern to your pack for every charge is NOT a good idea. Any two electronic devices will have SOME differences, and a pack imbalance will creep in. The parallel plug detailed in the above thread stops that completely.


I was looking at the 48V 1KW Regenerative Braking motor controller than Golden Motor offers.

But they won't answer any questions about whether or not it could handle 60 volts. The stock controller for this scooter has motor braking, but it doesn't utilize the current to recharge the batteries.
Golden Motor also offers a 48V 1KW hub motor in a 16" cast aluminum rim that could be a direct replacement for my current one.
A 1KW motor and 1KW motor would result in having a 24 MPH top speed on level ground at only 48V instead of 60V. At higher voltages it would probably end up at a non-legal speed.
But, I think I want to continue on the path of having high voltage and low amperage. I think that will net me a much higher total range, and I'll have the performance figures I'll be happier with (29mph on level ground, 25MPH uphill, 35-40 miles range).
Captain Slug,
Sorry to hear about your controller dying, have you considered this one;
http://goldenmotor.com/e-Bike-DIY/BLDC%20Motor%20Controller%20-%2048V1000W.jpg
I appears to be a drop in replacement for the 600 watt controllers we use on the XB-600, and it is rated at 1000 watts, so you wouldn't need to change the shunt.
Of course it is rated at 48 volts, and might not work at 60 volts, but then it is a lot cheaper ($58) than the regenerative controller you were looking at above.
I am not surprised that they wouldn't answer your questions about whether their regenerative controller would work at 60 volts, since they are selling it to work at 48 volts, and would want to charge more money if they warranted it to work at 60 volts.
Thanks for the pointer to GolderMotors.com, I especially likes the LifePo battery packs they sell on their do it yourself product page;
http://www.goldenmotor.com/e-Bike-DIY/DIY-ebikekit.htm
Tom
I've already ordered a replacement controller as well as a three output DC-DC converter that will replace the two I'm currently using.
The XB-600 controller is actually rated for 800W. But that rating gets altered a good deal when you add the shunt to it.
I decided to just stick with the stock controller, because I know it can easily be upgraded to work at 72V and 1KW by replacing the MOSFETs and capacitors.
Also, that particular 48V 1KW controller does lack the motor-braking feature. Something I don't recommend doing without because the mechanical brakes on the XB-600 are very weak.
I'll think about experimenting with other controllers at a later date, when I have a working scooter again. The one I posted a picture of is the one that would require the least amount of rewiring.
Made a replacement platform/battery cover.

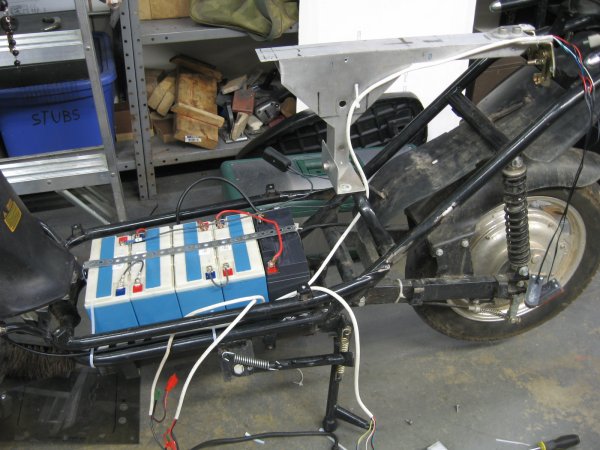


I'm going to be consolidating the batteries, wiring, and controller into the floor of the frame.
Which will leave the area under the seat really empty. At a later date I might make a cargo box for under the seat.
And I cut a mounting hole in the seat frame for the charger receptacle.
Made a replacement brake light. Total consumption is 1 watt braking, 1/3 watt running. Outputs 130 lumens maximum. I had to sand down the lenses of these LEDs because when perfectly clear they were just too painful to look at directly.


And I got the 20 LED running light array wired and tested.
Total consumption is 2 watts. Outputs 120 lumens.
Your bikes looking pretty sweet! keep up the good work and the posts.
The replacement controller came in the mail, but I was still having problems turning it on. The battery set would read 66 volts when charged, but would read 15 volts under load. And the charger would flicker when I tried to plug it into the set.

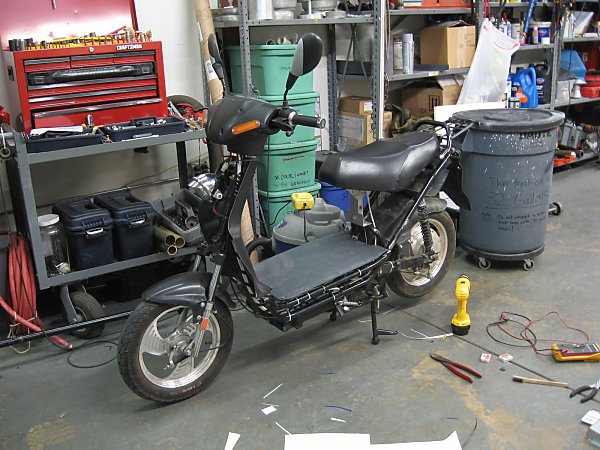
Turns out the set of batteries have a few corroded terminals, which I fixed easily with a wire brush. After that was figured out I got the old controller mounted and all of the wiring cleaned up.
And then I gave the floor pan a coat of vinyl dye and cleaned off one years-worth of dirt.
The replacement DC-DC converter came in the mail too. But I'll have to wait to install it until after the LED headlight is done.
she looks great so far
Replacement turned out to be dead.
So I took apart the 12V-to-5V converter and mounted it there instead. I then repinned the 6-pin connectors to forward the correct lines.
I also added some anti-slip tape to the floor pan, some reflectors to the rear fork and brake light, and change the polycarbonate brake light lens to a polethylene one to help diffuse the light better.
I'm currently contemplating whether or not I want to bother going to 72 Volts. It would involve a great deal of rewiring and soldering. I'm no longer really concerned with my range and if I want a slightly higher top speed the easiest way to obtain it would be to replace the motor.
But I'll set that idea aside for a while. At the moment I just want to get the headlight and front body panel done.
My High Power LED arrived a week late (thanks to it being shipped from Canada).


Today was a day of strange problems.
The Negative pad on the LED dumps heat right onto the back of the LED. So lower wattage soldering irons can't overcome the heatsink effect. If you want to solder onto the trace you have to use at least a 100-watt soldering iron. This is not mentioned in the datasheet and lead to much frustration.
And this isn't so much a problem, as it is very funny. The LED is actually TOO bright. :eek:
It's painful to look at indirectly and even more unbearable to look at directly. I'm going to have to add a diffusor or at least a blinder of some kind to avoid blinding people.
Instructable will be made once I get it back in one piece and working safely enough to put it on the scooter.
Edit: And the headlight is done!


I soldered a capacitor in to bridge the positive and negative of the LED running light array so that I get a fade effect when the headlight is switched to the high beam. Here's an animation of the effect.
The switch from high beam to running light is instantaneous.
Tomorrow I'll have more pictures of the scooter with the headlight installed, as well as an output comparison between the new headlight and the old one.
Complete guide on how to make an LED headlight is now up at Instructables.
http://www.instructables.com/id/LED_Motorcycle_Headlight/
I got a pair of Honda Ruckus style mirrors for Christmas. They looks miles better than the cheap stock Chinese ones.
New tires! 90/90-12 (i.e. 12-3.00) from Bikebandit.com arrived. $47 shipped for the two together. They're a slightly tight fit on the rim and take a short while to seat once the tubes are inflated. But it probably would have gone smoother if I had bother to wet the bead of the tire before trying to get them on.
The difference in handling is easily felt. My top speed on level ground is unchanged after recalibrating the bike computer (change in circumference was only 35mm). I now slow down a bit less on hills and the traction improvement is great. No skidding under hard braking, and no sliding on fine gravel.
Of note: If you need to remove the rear wheel you will need a 22mm socket, a monkey wrench, and a pair of tweezers.
You have to unpin the 5-pins from the motor sensing connector and slide the wire through the center of the 22mm socket, then you can snake the socket down the wire insulation onto the axle nuts. You can use the monkey wrench on the 22mm socket to loosen the extremely tight hex nuts.
I just bought one of these tires from Bikebandit.com and I am awaiting its arrival. Is the circumference greater or less than that of the stock tire? Also, what did you mean when you said 'wet the bead of the tire'?
Thank you for your inventive spirit,
clinton
Spraying on silicone lubricant or glass cleaner around the inside lip of the tire (the bead) will allow you to slip it onto the rim easier with the tire irons.
The replacement tire circumference was only 35mm lager compared to the stock tire. But my stock tires were really worn down.
Slug, my friend, you KICK ASS!
thank you for documenting everything you did. Because of this thread you allowed me to easily build and install my own LED array system into my bike.
Good job. I can't wait to see what else you have in store.
Cheers
Dave
Cheers
Dave
Man, I love the Honda Ruckus look of your scooter. Great job.
I've been riding around and parking this in torrential rain for the better part of the past month. The only issue I've had is the blinker relay was filled with water. Which resulted in the brake lights being on constant without blinking for 2 days. I no longer have any issues with traction, but driving through very large puddles does negatively effect my range. Getting too wet will drain battery life as something somewhere gets shorted out.
I also had to bring a plastic bin with me to use as a rain shelter for the charger.
I'm currently still debating whether or not I want to upgrade to 72 volts. Doing so would involve adding two relays (ignition and brake), replacing the controller, and making a different charging setup.
I'm disinclined from doing so because I intend to finish my electric motorcycle soon anyways.
Well I had one dead battery starting on Wednesday after a dip in a giant puddle shorted it out. I didn't have time to test it and the result is the rest of the pack was overvolted three nights in a row. Three of the five are swollen.
The ignition switch also now appears to be broken.
Tomorrow I will be replacing all five batteries and wiring in a temporary power switch until I can replace the stock ignition with a different keyswitch.
Upgrading to 72 volts may come later, but will have to wait until I finish my other vehicle.
http://visforvoltage.org/forum/5885-nem0-electric-dual-sport-motorcycle
I followed the advice of this excellent guide to series/parallel switching.
http://visforvoltage.org/forum/3166-seriesparallel-switching-charge-parallel-part-2-simplified
And installed a bank of 12 volts chargers under the seat.
To drive, I plug in the series connector that connects the 60v pack to the controller.
To charge, I plug in the parallel connector that connects each 12v battery to its individual charger.
I will no longer have any issues with one bad cell in my pack destroying the rest of them. And if I upgrade to a higher voltage later, it won't involve as much rewiring.
Hello Captainslug,
I am followin your modifications and kudos for all the creative inventions! The campus that I work at has many hills, and although my range is only about 5 miles a day, I have to go up medium-steep grades. My xb600 does well on flat but way too slow on the climbs. It sounds like a 60V upgrade may be a quick fix to get more climb, but I have no idea where to start. I've read your entries carefully but for someone that doesn't spend time with electricity, I'm fairly lost. If you have a moment and you want to gather the young minds around you and give a quick run down on the 60V upgrade I would love to hear it. I know I need a 12V battery, a 60V charger, and then I plug what to what? I'll look at the diagram so as not to sound like a freeloader, I just don't get it. Thanks, Oscar
Going back to green.
For going up hills, upping the shunt limit would be more effective than the extra battery, and far simpler, though both risk damaging the scoot. Getting off and walking beside the scoot also works for short steep pitches (and generates a little exercise...).
Also, note that you DON'T need a 60V charger; just follow the directions at:
http://visforvoltage.org/forum/3166-seriesparallel-switching-charge-parallel-part-2-simplified
Using a bank of chargers and attaching the bank in the same pattern to your pack for every charge is NOT a good idea. Any two electronic devices will have SOME differences, and a pack imbalance will creep in. The parallel plug detailed in the above thread stops that completely.
Pages