I realize that Vectrix has other, bigger issues on their hands, so the chances of seeing this happen are vanishingly small, but it's nice to occasionally ponder "what if" scenarios like this from time to time.
Good idea! I've been pondering it, too.[/quote]
Well, Vectux has bigger issues, too, namely the need to find AU$ 450.- or so to buy CanBus hardware and software.
But I think it will happen sooner or later, and maybe then I can get a few things sorted out (with lots of help by online open software geeks...)
The excessive reduction of available amps from 0-45km/h comes to mind.
I agree that it needs to be limited because a stalled electric engine draws enormous currents and could destroy the electronics, but IMO it is limited too much.
The RETAMPI shows that it does not reach the max amps until about 75km/h; below 30km/h it's a woefully small number!
Some 50cc scooters outrun the Vectrix on the first 20 to 30m off the line!
Mr. Mik
This information may be used entirely at your own risk.
I have now clocked up 690km since the second (proper) repair to the smoldering motor controller board. No further problems there, an inspection during the fuse replacement revealed no further evidence of anything heating up.
And, finally, over one week straight without trouble or problems!
The thermometers are there to help figure out the best way to care for the battery.
The one on the left shows the air temperature under the front fairings, the one on the right shows the temp on the dash and the temp in the battery housing "exhaust".
The RETAMPI still shows the percentage of maximum amps going in or out of the battery.
The work on the automated cooling/charging management system is progressing well.
Mr. Mik
This information may be used entirely at your own risk.
I found an error in the diagram for the battery fan relay system:
The way I had drawn it would cause the right fan to always be on, even when the Vectux electronics try to only switch on the left fan. In that case there might not be sufficient voltage and/or current provided and something in the controller board could potentially fry.
I have finished the work on the Auxiliary Battery Cooling Relay (ABCool) and installed it into the Vectux.
It works a treat so far. The corrected schematic above works.
Only the surge protector (and sometimes the multimeter) go on the road with the Vectux.
There is little additional gain by carrying everything around, because opportunistic charges are usually incomplete charges ending before the battery is almost full, which is when it heats up, and there is usually little time for the battery to self-discharge.
The initial stages of charging cool the battery, anyway.
Click here for a higher resolution picture.
The above picture demonstrates one of the advantages of the ABCool and how I use the thermometers on the dash to determine if Aux cooling is needed.
The picture was taken just after a brief power failure stopped the Vectux recharging in the EC stage. Without the power failure it would have continued fanning the batteries and trickle charging for another 50min or so. This would have reduced the battery temperature to around 28°C or so. The power came back on after a few seconds, and the Vectux started charging again, but when this happens it only charges in EC mode for about 3 minutes, then turns itself off.
As you can see, the battery temp is displayed as 35°C. This temperature would remain this high for many hours without fanning, causing accelerated battery aging and increased spontaneous self-discharge with reduced range for the next ride.
The thermometer probe at the air inlet reports 18.4°C, the temperature on the dash is 19.4°C and the air temperature in the "exhaust" is 25.8°C.
Here is how I approximately calculate the battery temperature without plugging in the charger:
Te + (Te - Ti) = 25.8°C + (25.8°C - 18.9°C) = 32.7°C
That's fairly close to the 35°C that the Vectux electronics report. I have observed it on several occasions so far, and the results using this formula are always within 1-2°C of the reported battery temperature.
It might be more accurate to place a probe deeper inside the battery compartment, but also much riskier and more difficult. This works safely.
Once the Vectux electronics decide to turn the fans off, the auxiliary 12V supply takes over automatically (if the timer 1 is set to "ON") and cools the batteries further.
.
This next picture was taken a little over 2 hours after the last one: Click here for a higher resolution picture.
The temperature was confirmed as 22°C by briefly turning the charger on.
Without cooling the battery temperature would not have been this low even 12 hours later!
Mr. Mik
This information may be used entirely at your own risk.
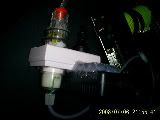
Because the ABCool 12V power supply is rated at 5A and has to supply 4.4A continuously it tends to get quite warm. Although placing it on the swingarm into the air flow from the battery cooling exhaust works well, I wanted to make sure it is ready for summer and to stay inside the under seat storage area when parked outside.
So I found a new purpose for a 12V fan and stuck it on the 12v supply.
It's power now comes directly from the PCB of the 12V supply, there goes another warranty...
I also added a connector into the 12V cable, so that it can be easily disconnected.
The fan only adds 130mA to the power consumption but will keep the temp down very well.
The fan has an interesting history: It was retained when I upgraded the CPU of my first computer to a lightning fast 200MHz processor....
When the computer died (or became totally obsolete) I kept the fan...
Then it was used to help control temperature and humidity in a home-made egg-incubator; the power supply of the old computer was the heater. It worked.
And now it's part of the Vectux!
Mr. Mik
This information may be used entirely at your own risk.
I'll pose a question to you also: for those of us that have intact warranties and want them to remain so, but who are intrigued about what you've done in regards to cooling the batteries without charging them, do you think that there could be a way to force air through the Vectrix's internal battery cooling ducts by means of external fans, pressurized air source, or possibly vacuum?
... do you think that there could be a way to force air through the Vectrix's internal battery cooling ducts by means of external fans, pressurized air source, or possibly vacuum?
I considered those options but found them ineffective.
Vacuuming could possibly be done by reversing the air flow and sucking the air out of the two inlets under the front fairings.
But vacuum cleaners typically make a lot of noise and consume more power than the Vectrix during CP charging!
If you had a quiet and efficient source of "vacuum" available anyways, in a workshop or so, then it might make sense.
Blowing a fan onto the front fairing is something I have actually tried out, but I could not detect any air flow into the inlets or out of the outlet. All the wind created and flowing around the bikes body make it very difficult to detect any little flow induced through the battery compartment. I believe it has jolly little effect.
If you only wanted to do additional cooling at home, then you could build a fan contraption that seals around the air inlets by just leaning against it with a foam seal and blow air through it. That might actually not void the warranty even if Vectrix knows about it, but read the warranty and decide on it yourself.
Make sure both inlets get the same amount of cooling, or there would be potential for parts of the battery regularly cooling more than others and that could be worse than no additional cooling.
I have changed my approach and am also taking the ABCool along for cooling before or after opportunistic charging. With the small fan cooling the 12V supply it can stay in the boot. With all the timers etc. in there the helmet will not fit in, though, but I rarely use it for that, anyway.
The ABCool can however be installed and removed without a trace, if you have the right connectors. All you have to do is unscrew the two screws holding the front seat down, remove the seat, and connect the ABCool to the 3-pole connector going into the battery housing.
Mr. Mik
This information may be used entirely at your own risk.
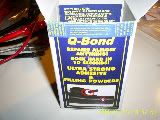
It is mainly due to this double timer with surge protection.
It cost only AU$20.- at Bunnings and I hope it works the way it is supposed to.....
It lacks any information on what kind of surge protection it supposedly provides.
.
.
It's hot-glued to the 12V supply (in a spot that does not hinder the air circulation through it; the little fan sucks air out). Click here for a higher resolution picture.
Click here for a higher resolution picture.
.
It appears sturdy enough to survive "life in the boot". But it has not yet been tested on the road.
.
.
The following settings will hopefully provide an almost "maintenance free" charging and cooling pattern that improves battery life, range and readiness for use - all with just plugging in one plug!
Timer 1 = Vectux charger:
1800 to 1845 Mo - Su
0415 to 0800 Mo - Su
0900 to 1300 Mo - Fr
Timer 2 = ABCool:
1645 to 2100 Mo - Su
0500 to 0900 Mo - Su
1100 to 1500 Mo - Fr
The idea is that the battery gets cooled for a while after coming home in the afternoon, then it gets partially charged in case I need to take a ride unexpectedly, then gets cooled some more until 2100pm.
The final charge starting at 0415 will usually be finished before I take off to work and leave little time for spontaneous discharging to occur.
If the charging finishes early, then the ABCool will switch to the auxiliary 12V supply and keep the fans running until I unplug and ride off.
The charging and cooling times programmed for Mo - Fr during the day are just in case I have to plug in during work hours somewhere.
.
"Normal" charging remains of course 100% possible.
.
Mr. Mik
This information may be used entirely at your own risk.
Finally I have a bit of time to start evaluating the HID lamp upgrade possibility.
A while ago I bought a 35W HID set of two lamps, two ballasts and cables etc, and an additional motor bike harness for one of the lamps.
The HID lamps are the type that has one light emitting part which is switched to a slightly different position by an electro-magnet when "High Beam" is turned on.
(There seem to be other types that have a 35W Halogen globe for low beam, and only turn on the HID lamp when High beam is switched on).
On the bench it turns out that the HID lamp consumes 3.6A continuously at 12V on low beam, and 4.5A continuous at 12V on high beam.
The maximum amperage at startup that I have seen was 8.8A for a split second, most of the time it seems to be around 7A. This then falls over about 7 sec to 5.8A (and further).
5.8A is about what the Vectux headlights consume at 12V when both high and low beam are on at the same time.
.
Potential problems are:
- the higher than usual current at startup might confuse the electronics and cause error messages and/or malfunctions.
- the light might be blinding to other road users.
- the current of 4.6A continuous on high beam might cause more heat than the plastic lamp housing can tolerate without being cooled by wind. The original Vectux electronics will turn off the low beam if both beams are activated and if the scooter stops moving for more than a few seconds; it so prevents this problem.
In other words, the lamp housing might melt.
.
The current draw for just one "Halogen filament" should be about 35W/12V = 2.9A.
I have not measured it.
The continuous current draw of the HID lamp on low beam is therefore 20% higher than what the Vectux electronics allow during standstill. I believe that about 10% of this HID current is used in the "ballast", producing heat there, and that low beam HID would therefore not cause the plastic lens to melt.
I am not so sure if the current on HID high beam will be safe for the plastic parts, though. This current is 65% higher than the 2.9A usually permitted.
If 10% of that gets used (and turned into heat) in the ballast, then that might mean a 39% increase of heat output inside the reflector lamp housing.
The 0.9A difference between high and low beam is probably what the electromagnet uses, and I do not yet understand if that gets turned into heat or not.
How much these heat output values are reduced by the increased luminous efficiency/efficacy/whateveracy is too hard to calculate (for me, anyways) and might be better addressed by real world testing with a thermometer, comparing the temperature with a HID lamp and with the original Halogen lamp whilst standing still for prolonged periods.
The likely disaster scenario:
You plug in your scooter to recharge at home in the garage, and find much later that you had left the key in the "ON" position and your headlamp has melted.....
(During charging the light is off, but once charging has finished the lamp comes on if the key is in the "ON" position.)
Here is a video of the reduction in current draw during startup:
"This tube is filled with both gas and metal salts. The gas facilitates the arc's initial strike. Once the arc is started, it heats and evaporates the metal salts forming a plasma, which greatly increases the intensity of light produced by the arc and reduces its power consumption."
Mr. Mik
This information may be used entirely at your own risk.
The HID lamp works in the Vectux, but the lamp telltale keeps blinking.
Temperature measurement of the front of the headlamp with IR thermometer:
Temperature maximum in 19.5°C ambient temperature after about 30min standing still with OEM low beam on in garage: 47°C. About 40°C just after OEM light was turned off.
Temperature maximum in 17.5°C ambient temperature after 20min with HID on Low beam: 55°C; On High beam: 58°C.
The risk of heat damage to the lamp is therefore quite real - particularly in summer.
The beam of the HID lamp was way too high, but can be adjusted by screwing the 4mm hex pins at the back of the lamp housing in or out.
The light is much brighter than the OEM 35W lamp, even if used with both filaments on together.
.
The ballast fits in in this position: Click here for a higher resolution picture.
.
Below is a video of three test drives on a private property, first with the OEM globe, then with unadjusted HID lamp and finally with height adjusted OEM lamp.
The camera is not really up to recording the dim reflection of a single headlight, but the stark difference can be seen quite well nevertheless:
Mr. Mik
This information may be used entirely at your own risk.
Wow, that video makes it look like the original Vectrix headlamp is nearly useless at night. Maybe it is your camera but the difference between the bulbs is pretty amazing.
Luther Burrell, Mesa, Arizona, USA
Rides: ZuumCraft from zuumcraft.com
Previous Rides: Blue Vectrix Maxi scooter
MOTORBIKE 12V H4 H/L BIXENON HID KIT 35W 6000K , because the lamps in this
NEW H.I.D 12V 35W H4 BI-XENON 6000K HID KIT SPECIAL!!!! appeared the same.
The seller was very helpful and confirmed that I could use one of the lamps for a bike if I buy an additional AU$25.- harness.
So I bought one harness and two HID lamps, and now I have one set of 35W H4 HID gear left over to put into my "In-line-hybrid-electrification-bike-project" one day.
I could probably rig up the harness from other available connectors etc, much easier because I know what the original harness looks like.
The harness is worth AU$25.- unless you are time rich and cash-poor and handy with the existing soldering iron etc etc.
Alternatively I could install both lights into a car. Cheaper than buying a bike set anyway, depending on ebay fortunes...
Mr. Mik
This information may be used entirely at your own risk.
4 weeks straight without any (real) trouble, commuting daily.
Both the additional thermometers failed: The first (older) one on the left just stopped working altogether without apparent reason.
The one on the left got water into it in a massive downpour a few days ago. It's display is garbled now, but it might bounce back yet...
The good news is that the RETAMPI did not get any water problems at the same time. I did a much more thorough job on it with the hot glue than on the added thermometers.
Both the thermometer and the RETAMPI dropped off during the ride through the downpour...I believe the hot glue looses contact with the dash due to water getting in between via capillary forces. No drama, will find some other way to fix it to the dash.
The ABCool works a treat! The only problem is that the double timer is tricky to program and malfunctions if partially reprogrammed.
Also, it looses all programming if the battery door is opened. Annoying to say the least.
I removed the spring holding up the rear seat - I bangs down when touched the slightest bit. Wish I had done that on day one!
Mr. Mik
This information may be used entirely at your own risk.
4 weeks straight without any (real) trouble, commuting daily.
. . .
I removed the spring holding up the rear seat - I bangs down when touched the slightest bit. Wish I had done that on day one!
Good to hear that it's holding up for you, Mik! Remind me again, how many km's is your commute?
Yes, that seat spring is sensitive, but it hasn't annoyed me enough yet to make me want to take it off. I wonder of some sort of quick disconnect could be rigged on it, so as to have the best of both worlds?
Yes, that seat spring is sensitive, but it hasn't annoyed me enough yet to make me want to take it off. I wonder of some sort of quick disconnect could be rigged on it, so as to have the best of both worlds?
20km x 2, but now that I regularly recharge at work I often go other places and it is therefore longer.
I have installed the "Vectrix to Givi M5 plate adapter" which I got of Vectrix months ago so I can show it to people at bike shops and find a box for it.
This doubles as an anchor point for an occi strap that holds the seat up (further than the spring did) when needed.
Without the adapter in place the seat would open further, but I did not test if it opens far enough to just stay open by itself. The adapter prevents it now.
It should be quite possible to add a quick release to the original spring, because any bumping of the spring makes it close, anyway, so it does not need to be very strong.
An alternative would be to add another spring on the other side so bumping one of them would not matter much (I saw 2 springs in a video dug back up by Reikiman recently (Thanks!); the batteries also looked different in that video, silver cover instead of black plastic).
Mr. Mik
This information may be used entirely at your own risk.
I have installed the "Vectrix to Givi M5 plate adapter" which I got of Vectrix months ago so I can show it to people at bike shops and find a box for it.
Could I trouble you for a couple of pictures, or a video even of this adapter and how it mounts to the Vectrix? I'm a bit curious to see more details about it.
Thanks,
Dave
Here it is:
The background and a little warning:
The right side of the passenger hand rail was cracked around one of the screws. I probably over-tightened it.
This crack (and one of the two screws holding down the front seat not gripping any more) are the only broken parts after numerous times of taking it apart to get to the batteries and motor controller / fuse.
Many thanks for posting the bracket pictures, Mik! While I agree that the actual cost of the brackets is high for what they are, I'm of the group that has too little time to do the fabrication myself. I admire that you've apparently got the time and skills to do many interesting experiments and projects on your scooter. I enjoy reading about them.
Many thanks for posting the bracket pictures, Mik! While I agree that the actual cost of the brackets is high for what they are, I'm of the group that has too little time to do the fabrication myself. I admire that you've apparently got the time and skills to do many interesting experiments and projects on your scooter. I enjoy reading about them.
I did not make it myself, it's an original part as far as I know. But it would be easy to make if you can weld.
I have installed the "Vectrix to Givi M5 plate adapter" which I got of Vectrix months ago.
I am sure I could weld easy jobs with a bit of practice, though, I just have not learned it yet and do not have a welder! ;-)
I might very well end up buying a welder instead of a BLACK top box and expensive GIVI plate etc.
I could not find a white box so far. They are also not as streamlined as they could be.
I am pondering removal of the passenger seat and putting in a tail akin to the thing behind formula 1 race car drivers. That could possibly have enough space for an on-board diesel (or vegie-oil??) generator to recharge when needed, and would increase the range and decrease the helmet noise by a large amount.
Mr. Mik
This information may be used entirely at your own risk.


Good idea! I've been pondering it, too.[/quote]
Well, Vectux has bigger issues, too, namely the need to find AU$ 450.- or so to buy CanBus hardware and software.
But I think it will happen sooner or later, and maybe then I can get a few things sorted out (with lots of help by online open software geeks...)
The excessive reduction of available amps from 0-45km/h comes to mind.
I agree that it needs to be limited because a stalled electric engine draws enormous currents and could destroy the electronics, but IMO it is limited too much.
The RETAMPI shows that it does not reach the max amps until about 75km/h; below 30km/h it's a woefully small number!
Some 50cc scooters outrun the Vectrix on the first 20 to 30m off the line!
Mr. Mik
This information may be used entirely at your own risk.
There is always a way if there is no other way!
I have now clocked up 690km since the second (proper) repair to the smoldering motor controller board. No further problems there, an inspection during the fuse replacement revealed no further evidence of anything heating up.
And, finally, over one week straight without trouble or problems!
Therefore I put in an effort and cleaned up the somewhat messy dashboard.
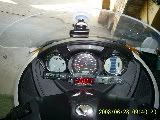 Click here for a higher resolution picture.
The camera is now mounted to the top of the windscreen (with hot glue, of course!)
The RETAMPI and two thermometers are at the bottom, and there is even enough space to velcro the altimeter on or off as needed.
Here is the view from the camera:( It can be swiveled to give a full forward view of the road, too)
 Click here for a higher resolution picture.
The thermometers are there to help figure out the best way to care for the battery.
The one on the left shows the air temperature under the front fairings, the one on the right shows the temp on the dash and the temp in the battery housing "exhaust".
The RETAMPI still shows the percentage of maximum amps going in or out of the battery.
The work on the automated cooling/charging management system is progressing well.
Mr. Mik
This information may be used entirely at your own risk.
There is always a way if there is no other way!
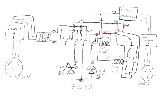
I found an error in the diagram for the battery fan relay system:
The way I had drawn it would cause the right fan to always be on, even when the Vectux electronics try to only switch on the left fan. In that case there might not be sufficient voltage and/or current provided and something in the controller board could potentially fry.
The diagram below has the amendments in red:
 Click here for a higher resolution picture.
Mr. Mik
This information may be used entirely at your own risk.
There is always a way if there is no other way!
I have finished the work on the Auxiliary Battery Cooling Relay (ABCool) and installed it into the Vectux.
It works a treat so far. The corrected schematic above works.
Here are some pictures:
.
This is the setup with two timers:
The timer on the left provides power to the auxiliary 12V supply, also on the left.
On the right are connected a timer (set to be "ON " from 0300am to 0800am), a mains-multimeter and a surge protector.
Only the surge protector (and sometimes the multimeter) go on the road with the Vectux.
There is little additional gain by carrying everything around, because opportunistic charges are usually incomplete charges ending before the battery is almost full, which is when it heats up, and there is usually little time for the battery to self-discharge.
The initial stages of charging cool the battery, anyway.
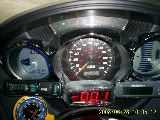
The above picture demonstrates one of the advantages of the ABCool and how I use the thermometers on the dash to determine if Aux cooling is needed.
The picture was taken just after a brief power failure stopped the Vectux recharging in the EC stage. Without the power failure it would have continued fanning the batteries and trickle charging for another 50min or so. This would have reduced the battery temperature to around 28°C or so. The power came back on after a few seconds, and the Vectux started charging again, but when this happens it only charges in EC mode for about 3 minutes, then turns itself off.
As you can see, the battery temp is displayed as 35°C. This temperature would remain this high for many hours without fanning, causing accelerated battery aging and increased spontaneous self-discharge with reduced range for the next ride.
The thermometer probe at the air inlet reports 18.4°C, the temperature on the dash is 19.4°C and the air temperature in the "exhaust" is 25.8°C.
Here is how I approximately calculate the battery temperature without plugging in the charger:
Te + (Te - Ti) = 25.8°C + (25.8°C - 18.9°C) = 32.7°C
That's fairly close to the 35°C that the Vectux electronics report. I have observed it on several occasions so far, and the results using this formula are always within 1-2°C of the reported battery temperature.
It might be more accurate to place a probe deeper inside the battery compartment, but also much riskier and more difficult. This works safely.
Once the Vectux electronics decide to turn the fans off, the auxiliary 12V supply takes over automatically (if the timer 1 is set to "ON") and cools the batteries further.
 Click here for a higher resolution picture.
.
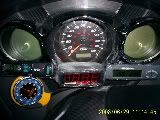
This next picture was taken a little over 2 hours after the last one:
Approximate battery temperature: 21.2°C + (21.2°C - 19.2°C) = 23.2°C
The temperature was confirmed as 22°C by briefly turning the charger on.
Without cooling the battery temperature would not have been this low even 12 hours later!
Mr. Mik
This information may be used entirely at your own risk.
There is always a way if there is no other way!
Here are the distances I have clocked up so far:
5018km total on both scooters together.
1400km on the first Vectrix.
3618km total on the second Maxi scooter.
2488km on the second Vectrix until the warranty was voided.
1130km total as the Vectux so far, since the first (incorrect) motor controller repair.
795km since the second motor controller board repair.
513km since the replacement of the fuse with a Bussman fuse and the "Eagle" improvement to the gear box, running evenly since then.
One week with increased range due to time-delayed charging.
Two days with ABCool working very well.
The side stand repair and the RETAMPI continue to work well.
Mr. Mik
This information may be used entirely at your own risk.
There is always a way if there is no other way!
Because the ABCool 12V power supply is rated at 5A and has to supply 4.4A continuously it tends to get quite warm. Although placing it on the swingarm into the air flow from the battery cooling exhaust works well, I wanted to make sure it is ready for summer and to stay inside the under seat storage area when parked outside.
So I found a new purpose for a 12V fan and stuck it on the 12v supply.
It's power now comes directly from the PCB of the 12V supply, there goes another warranty...
I also added a connector into the 12V cable, so that it can be easily disconnected.
The fan only adds 130mA to the power consumption but will keep the temp down very well.
The fan has an interesting history: It was retained when I upgraded the CPU of my first computer to a lightning fast 200MHz processor....
When the computer died (or became totally obsolete) I kept the fan...
Then it was used to help control temperature and humidity in a home-made egg-incubator; the power supply of the old computer was the heater. It worked.
And now it's part of the Vectux!
Mr. Mik
This information may be used entirely at your own risk.
There is always a way if there is no other way!
Two straight weeks without trouble today!
10 commutes on the Vectux in a row, that Camry is getting lonely standing around unused.
Now We're Getting Somewhere!!!
"We can choose what we choose to believe" (Crowded House)
Mr. Mik
This information may be used entirely at your own risk.
There is always a way if there is no other way!
Congratulations Mik!!!
Glorious feeling, having it work, and work because of your hard work!
Do you reckon the no-frills use you're getting now, could be attained in a stock Vectrix, or only by Vectuxing it?
Starting our silent revolution...
Thanks!
A perfectly set up Vectrix would probably perform at least a bit better!
Except maybe for the battery management - I believe the battery will probably last significantly longer due to the added cooling.
Mr. Mik
This information may be used entirely at your own risk.
There is always a way if there is no other way!
I'll add my congratulations to the list, Mr. Mik!
I'll pose a question to you also: for those of us that have intact warranties and want them to remain so, but who are intrigued about what you've done in regards to cooling the batteries without charging them, do you think that there could be a way to force air through the Vectrix's internal battery cooling ducts by means of external fans, pressurized air source, or possibly vacuum?
Regards,
DaveD
I considered those options but found them ineffective.
Vacuuming could possibly be done by reversing the air flow and sucking the air out of the two inlets under the front fairings.
But vacuum cleaners typically make a lot of noise and consume more power than the Vectrix during CP charging!
If you had a quiet and efficient source of "vacuum" available anyways, in a workshop or so, then it might make sense.
Blowing a fan onto the front fairing is something I have actually tried out, but I could not detect any air flow into the inlets or out of the outlet. All the wind created and flowing around the bikes body make it very difficult to detect any little flow induced through the battery compartment. I believe it has jolly little effect.
If you only wanted to do additional cooling at home, then you could build a fan contraption that seals around the air inlets by just leaning against it with a foam seal and blow air through it. That might actually not void the warranty even if Vectrix knows about it, but read the warranty and decide on it yourself.
Make sure both inlets get the same amount of cooling, or there would be potential for parts of the battery regularly cooling more than others and that could be worse than no additional cooling.
I have changed my approach and am also taking the ABCool along for cooling before or after opportunistic charging. With the small fan cooling the 12V supply it can stay in the boot. With all the timers etc. in there the helmet will not fit in, though, but I rarely use it for that, anyway.
The ABCool can however be installed and removed without a trace, if you have the right connectors. All you have to do is unscrew the two screws holding the front seat down, remove the seat, and connect the ABCool to the 3-pole connector going into the battery housing.
Mr. Mik
This information may be used entirely at your own risk.
There is always a way if there is no other way!
I may have missed, Mik, but how many Amperes of current is there when your RETAMPI shows 100?
Also, can you make a test on a flat terrain - at which constant speed is the current 1C = 3,7KW? Thanx!
I have posted some explanation and a video here.
It gives you an impression of how challenging the conditions for the Vectux are.
That makes it difficult to compare range.
Mr. Mik
This information may be used entirely at your own risk.
There is always a way if there is no other way!
I don't know.
It just means 100% of the maximum that it gets too.
Mr. Mik
This information may be used entirely at your own risk.
There is always a way if there is no other way!
I have found a way to improve the ABCool 12V power supply and shrink it so that the helmet fits in again!
 Click here for a higher resolution picture.
It is mainly due to this double timer with surge protection.
 Click here for a higher resolution picture.
It cost only AU$20.- at Bunnings and I hope it works the way it is supposed to.....
It lacks any information on what kind of surge protection it supposedly provides.
.
.
It's hot-glued to the 12V supply (in a spot that does not hinder the air circulation through it; the little fan sucks air out).
.
It appears sturdy enough to survive "life in the boot". But it has not yet been tested on the road.
.
.
The following settings will hopefully provide an almost "maintenance free" charging and cooling pattern that improves battery life, range and readiness for use - all with just plugging in one plug!
Timer 1 = Vectux charger:
1800 to 1845 Mo - Su
0415 to 0800 Mo - Su
0900 to 1300 Mo - Fr
Timer 2 = ABCool:
1645 to 2100 Mo - Su
0500 to 0900 Mo - Su
1100 to 1500 Mo - Fr
The idea is that the battery gets cooled for a while after coming home in the afternoon, then it gets partially charged in case I need to take a ride unexpectedly, then gets cooled some more until 2100pm.
The final charge starting at 0415 will usually be finished before I take off to work and leave little time for spontaneous discharging to occur.
If the charging finishes early, then the ABCool will switch to the auxiliary 12V supply and keep the fans running until I unplug and ride off.
The charging and cooling times programmed for Mo - Fr during the day are just in case I have to plug in during work hours somewhere.
.
"Normal" charging remains of course 100% possible.
.
Mr. Mik
This information may be used entirely at your own risk.
There is always a way if there is no other way!
Finally I have a bit of time to start evaluating the HID lamp upgrade possibility.
A while ago I bought a 35W HID set of two lamps, two ballasts and cables etc, and an additional motor bike harness for one of the lamps.
The HID lamps are the type that has one light emitting part which is switched to a slightly different position by an electro-magnet when "High Beam" is turned on.
(There seem to be other types that have a 35W Halogen globe for low beam, and only turn on the HID lamp when High beam is switched on).
On the bench it turns out that the HID lamp consumes 3.6A continuously at 12V on low beam, and 4.5A continuous at 12V on high beam.
The maximum amperage at startup that I have seen was 8.8A for a split second, most of the time it seems to be around 7A. This then falls over about 7 sec to 5.8A (and further).
5.8A is about what the Vectux headlights consume at 12V when both high and low beam are on at the same time.
.
Potential problems are:
- the higher than usual current at startup might confuse the electronics and cause error messages and/or malfunctions.
- the light might be blinding to other road users.
- the current of 4.6A continuous on high beam might cause more heat than the plastic lamp housing can tolerate without being cooled by wind. The original Vectux electronics will turn off the low beam if both beams are activated and if the scooter stops moving for more than a few seconds; it so prevents this problem.
In other words, the lamp housing might melt.
.
The current draw for just one "Halogen filament" should be about 35W/12V = 2.9A.
I have not measured it.
The continuous current draw of the HID lamp on low beam is therefore 20% higher than what the Vectux electronics allow during standstill. I believe that about 10% of this HID current is used in the "ballast", producing heat there, and that low beam HID would therefore not cause the plastic lens to melt.
I am not so sure if the current on HID high beam will be safe for the plastic parts, though. This current is 65% higher than the 2.9A usually permitted.
If 10% of that gets used (and turned into heat) in the ballast, then that might mean a 39% increase of heat output inside the reflector lamp housing.
The 0.9A difference between high and low beam is probably what the electromagnet uses, and I do not yet understand if that gets turned into heat or not.
How much these heat output values are reduced by the increased luminous efficiency/efficacy/whateveracy is too hard to calculate (for me, anyways) and might be better addressed by real world testing with a thermometer, comparing the temperature with a HID lamp and with the original Halogen lamp whilst standing still for prolonged periods.
The likely disaster scenario:
You plug in your scooter to recharge at home in the garage, and find much later that you had left the key in the "ON" position and your headlamp has melted.....
(During charging the light is off, but once charging has finished the lamp comes on if the key is in the "ON" position.)
Here is a video of the reduction in current draw during startup:
I think these sentences in Wikipedia explain what happens there:
Mr. Mik
This information may be used entirely at your own risk.
There is always a way if there is no other way!
The HID lamp works in the Vectux, but the lamp telltale keeps blinking.
Temperature measurement of the front of the headlamp with IR thermometer:
Temperature maximum in 19.5°C ambient temperature after about 30min standing still with OEM low beam on in garage: 47°C. About 40°C just after OEM light was turned off.
Temperature maximum in 17.5°C ambient temperature after 20min with HID on Low beam: 55°C; On High beam: 58°C.
The risk of heat damage to the lamp is therefore quite real - particularly in summer.
The beam of the HID lamp was way too high, but can be adjusted by screwing the 4mm hex pins at the back of the lamp housing in or out.
The light is much brighter than the OEM 35W lamp, even if used with both filaments on together.
 Click here for a higher resolution picture.
.
The ballast fits in in this position:
.
Below is a video of three test drives on a private property, first with the OEM globe, then with unadjusted HID lamp and finally with height adjusted OEM lamp.
The camera is not really up to recording the dim reflection of a single headlight, but the stark difference can be seen quite well nevertheless:
Mr. Mik
This information may be used entirely at your own risk.
There is always a way if there is no other way!
Wow! What a difference!
So both OEM and HID lamps are 35W?
Wow, that video makes it look like the original Vectrix headlamp is nearly useless at night. Maybe it is your camera but the difference between the bulbs is pretty amazing.
Luther Burrell, Mesa, Arizona, USA
Rides: ZuumCraft from zuumcraft.com
Previous Rides: Blue Vectrix Maxi scooter
I did not buy this
MOTORBIKE 12V H4 H/L BIXENON HID KIT 35W 6000K , because the lamps in this
NEW H.I.D 12V 35W H4 BI-XENON 6000K HID KIT SPECIAL!!!! appeared the same.
The seller was very helpful and confirmed that I could use one of the lamps for a bike if I buy an additional AU$25.- harness.
So I bought one harness and two HID lamps, and now I have one set of 35W H4 HID gear left over to put into my "In-line-hybrid-electrification-bike-project" one day.
I could probably rig up the harness from other available connectors etc, much easier because I know what the original harness looks like.
The harness is worth AU$25.- unless you are time rich and cash-poor and handy with the existing soldering iron etc etc.
Alternatively I could install both lights into a car. Cheaper than buying a bike set anyway, depending on ebay fortunes...
Mr. Mik
This information may be used entirely at your own risk.
There is always a way if there is no other way!
Now that I (and up to 5 other EV'ers) have an official place to recharge at work I improved the logo a wee bit:
They will not get too much free advertising out of me without some support!
This information may be used entirely at your own risk.
There is always a way if there is no other way!
Have you found the built-in glove and boot dryer, yet?
Up to 5 hours of warm air being blown around down there, might as well use it!
Perfect for drying leather.
Mr. Mik
This information may be used entirely at your own risk.
There is always a way if there is no other way!
4 weeks straight without any (real) trouble, commuting daily.
Both the additional thermometers failed: The first (older) one on the left just stopped working altogether without apparent reason.
The one on the left got water into it in a massive downpour a few days ago. It's display is garbled now, but it might bounce back yet...
The good news is that the RETAMPI did not get any water problems at the same time. I did a much more thorough job on it with the hot glue than on the added thermometers.
Both the thermometer and the RETAMPI dropped off during the ride through the downpour...I believe the hot glue looses contact with the dash due to water getting in between via capillary forces. No drama, will find some other way to fix it to the dash.
The ABCool works a treat! The only problem is that the double timer is tricky to program and malfunctions if partially reprogrammed.
Also, it looses all programming if the battery door is opened. Annoying to say the least.
I removed the spring holding up the rear seat - I bangs down when touched the slightest bit. Wish I had done that on day one!
Mr. Mik
This information may be used entirely at your own risk.
There is always a way if there is no other way!
Good to hear that it's holding up for you, Mik! Remind me again, how many km's is your commute?
Yes, that seat spring is sensitive, but it hasn't annoyed me enough yet to make me want to take it off. I wonder of some sort of quick disconnect could be rigged on it, so as to have the best of both worlds?
20km x 2, but now that I regularly recharge at work I often go other places and it is therefore longer.
I have installed the "Vectrix to Givi M5 plate adapter" which I got of Vectrix months ago so I can show it to people at bike shops and find a box for it.
This doubles as an anchor point for an occi strap that holds the seat up (further than the spring did) when needed.
Without the adapter in place the seat would open further, but I did not test if it opens far enough to just stay open by itself. The adapter prevents it now.
It should be quite possible to add a quick release to the original spring, because any bumping of the spring makes it close, anyway, so it does not need to be very strong.
An alternative would be to add another spring on the other side so bumping one of them would not matter much (I saw 2 springs in a video dug back up by Reikiman recently (Thanks!); the batteries also looked different in that video, silver cover instead of black plastic).
Mr. Mik
This information may be used entirely at your own risk.
There is always a way if there is no other way!
Could I trouble you for a couple of pictures, or a video even of this adapter and how it mounts to the Vectrix? I'm a bit curious to see more details about it.
Thanks,
Dave
Here it is:
The background and a little warning:
The right side of the passenger hand rail was cracked around one of the screws. I probably over-tightened it.
This crack (and one of the two screws holding down the front seat not gripping any more) are the only broken parts after numerous times of taking it apart to get to the batteries and motor controller / fuse.
I used this stuff to repair it, so far, so good:
 Click here for a higher resolution picture.
Whilst the rail was off there was a good opportunity to install the luggage box adapter:
 Click here for a higher resolution picture.
Here is part one installed:
You should be able to make a custom bracket for just about any box system, not just Givi, along the lines of theses photos.
If you have the workshop and some scrap material, then it will also be cheaper than the AU$139.- plus postage I was quoted for it!
Mr. Mik
This information may be used entirely at your own risk.
There is always a way if there is no other way!
Very intresting to read all your topic. ypu really have the pioneering spirit!
Keep it up!
Many thanks for posting the bracket pictures, Mik! While I agree that the actual cost of the brackets is high for what they are, I'm of the group that has too little time to do the fabrication myself. I admire that you've apparently got the time and skills to do many interesting experiments and projects on your scooter. I enjoy reading about them.
I did not make it myself, it's an original part as far as I know. But it would be easy to make if you can weld.
I am sure I could weld easy jobs with a bit of practice, though, I just have not learned it yet and do not have a welder! ;-)
I might very well end up buying a welder instead of a BLACK top box and expensive GIVI plate etc.
I could not find a white box so far. They are also not as streamlined as they could be.
I am pondering removal of the passenger seat and putting in a tail akin to the thing behind formula 1 race car drivers. That could possibly have enough space for an on-board diesel (or vegie-oil??) generator to recharge when needed, and would increase the range and decrease the helmet noise by a large amount.
Mr. Mik
This information may be used entirely at your own risk.
There is always a way if there is no other way!
Pages