Vectrix VX-1 HID Bi-Xenon Headlight Conversion
This is a quick guide to converting your Vectrix headlamp to HID. In my view the standard headlight is pants and replacing the 'standard' (it isn't) H4 bulb with a higher wattage one will probably fry the DC DC converter or other parts of the electrics. HID bulbs typically run at around 35W which is what the standard Vectrix bulb is rated at so it doesn't use more power and is twice as bright. Standard H4, dual element (main & dipped beams) bulbs a rated at 60W per filament. There are variations that use more or less power with varying amounts of light output (lumens or candela) and at differing colour temperatures (light colour).
You need the 'Bi'-type of HID kit which provides high and low (dipped) beams in one package. The dipping is achieved thusly... The stem holding the glass bead containing the discharge lamp is mechanically extended 6mm or so from the bulb base using a solenoid-type mechanism. In the extended position the beam is on 'high'. The disadvantage of this is that it allows the stem to wobble about vertically a bit causing the high beam to 'shake'. Not much but significantly. It does not affect its use though.
I found a suitable HID kit on eBay for around UK£45 which satisfies my main 2 criteria - 1/ it has no direct connection to the battery and so just connects to the existing H4, 3-prong bulb connector making fitting MUCH easier. 2/ The turn-on current draw is only 5.4A (cold) and this drops to 3.5A running.
The bottom line is you get a very bright and effective light for the same power drain as the standard bulb.
In order to avoid any issues though, I recommend not having the brake light on when you start the bike as the brake light is probably the biggest current draw on the DC/DC converter other than the head light itself. Other Vectrix owners have suggested a link between fitting HID lights and the rear stop light failing (see other posts for more on this).
Two thing to note:- if you use the 'both headlight filaments on at once' Easter Egg facility all you will get is a dipped beam all the time. So, I recommend you don’t use it. It is pointless anyway.
Second, you will get a flashing warning light on the dash (blue for main beam and green for dipped) with the HID lamp fitted. This is something to do with the Vectrix thinking the head light bulb is defective. Quite why you would need a warning light anyway is beyond me. After all, you've only got the one headlight. If it isn't working it's going to be pretty obvious, no (unlike a car)? I have tried to eliminate the flashing low and high beam warning lights to no avail. I read up on other vehicle's solution - mainly involving using a resistor (10 to 1000 ohms appropriately rated) in parallel with the original H4 bulb contacts but it made no difference - either introducing them with the ignition and light already on as well as when off and then switching on... one at at time and both at a time.
I also tried using a 10W filament bulb instead of the resistors - again, no joy. So I expect I shall just stick a piece of black insulation tape or something equally removable over the low beam light and put up with the flashing high beam warning light. At least it is blue and therefore not as distracting as the green low beam warning light is - too close to the (same) green coloured indicator warning light.
Anyway, onwards and upwards...
.
TOOLS REQUIRED:
Metric socket set (1/4 inch or 3/8" drive) - particularly 10 and 13mm sockets.
Phillips No2 screwdriver.
6mm flat bladed screwdriver.
Small pair of tin snips or similar.
Fine (2mm) indelible black felt tip pen.
Pair of pliers.
20mm (3/4") Jubilee-type hose clip (or similar - see Pic 8)
So, the kit I bought (from eBay seller 'gps-ppc' - enormous feedback - nearly 50k @ 99.7%) comes in a nondescript box containing 3 smaller ones containing - HID bulb, wiring loom, ballast + plastic ties and instructions. It is my impression that the kits sold on eBay change so regularly that it is unlikely that, over a period of time, the same kit will be sold by the same seller with the same auction title, let alone the same link. But here is mine anyway...
http://cgi.ebay.co.uk/ws/eBayISAPI.dll?ViewItem&item=220511471667&ssPageName=ADME:L:OC:GB:3160
The instructions are a bit superfluous but read them anyway. DO NOT touch the glass bit of the HID bulb as the oil from your fingers will ruin the thing. It is quite hard to do this as it is nearly all covered by a metal (dipped beam) shroud - more on this later.
To get the head light out, it is only necessary to do the following:-
.
HEAD LIGHT UNIT (HLU) REMOVAL
1/ Remove the 2 'louvers' as Vectrix calls them - the black vent-looking plastic pieces on each side of the headlamp unit (HLU) by removing the 4 phillips screws - 2 on each side.
2/ Note how the two black windscreen screw plates are orientated. Mine were reversed when I took them off! Remove the 4 x 5mm hex drive, silver, large flat headed, windscreen screws and remove the windscreen.
3/ Remove the steel-backed cork windscreen mounting washers or you will lose them. Then remove the 'console top cover' beneath - it just un-clips.
4/ Remove the 4 x 10mm hex head coach screws clamping the head light unit in place. Obviously, all 4 must be removed. Note how this works for reassembly as the screw does NOT go through the holes in the HLU - it really is 'clamped' into place.
5/ Loosen the fairing bolt on the RHS ONLY. This is the larger 13mm hex head bolt whose head lies more or less horizontal on each side of the centrally mounted aluminium box, directly above the HLU. You shouldn't need to remove the bolt completely but if you do, catch the clear plastic shims that are under the bolt. Leave the LHS one alone.
6/ This should allow you to pry the RHS fairing out enough to remove the HLU and disconnect the headlight connector and running light bulb from the HLU and you are then ready to continue with the HID installation.
.
HID INSTALLATION
Find somewhere dry, rigid and away from other wires and circuitry (we don't want the relatively high EMF from the ballast to upset the CANBUS etc) to mount the ballast. This is the big square thing. I sandwiched a piece of rubber foam between the ballast and the mount to help it sit better and avoid too much high shock vibration. Use at least 2 of the plastic ties to mount the ballast and pull them tight! Ideally put another at right-angles to the first 2 to stop the ballast from sliding out as the ties slacken with age/vibration.
Connect the loom to the ballast and move on to fitting the HID bulb.
This is a bit fiddly but not difficult for anyone with modest DIY skills and basic tools (see above).
.
.
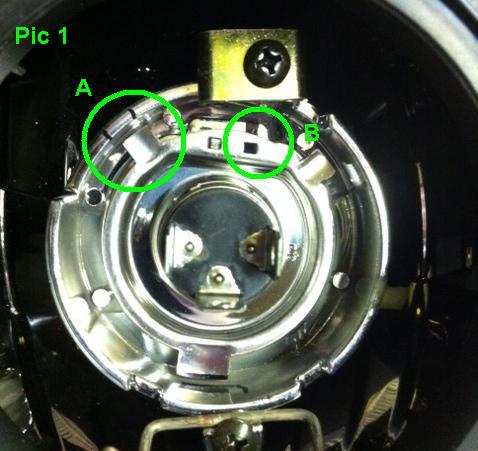
Pic 1 shows the existing H4 bulb in place. 'B' shows the non-standard tags that are punched through the bulb shroud which engage in the mating indent in the head-lamp unit. This (and the other one to the left) locate the bulb and appear to provide a slight non-vertical alignment of the dipped beam - to the left. LHD Vectrixes (ones that drive on the right-hand side of the road, I mean!) will probably have this reversed. I have also marked the position of the RH tag on the headlamp body above so that when I replace the standard bulb with the HID replacement I can transfer the mark to the HID shroud for cutting.
'A' shows marks I have made with a fine indelible pen on the head-lamp unit matching the location of the standard H4 bulb shroud tab - these are not used in the Vectrix - for some inexplicable reason (probably because they are different power ratings).
Next, remove the existing bulb and insert the HID one …
.
.
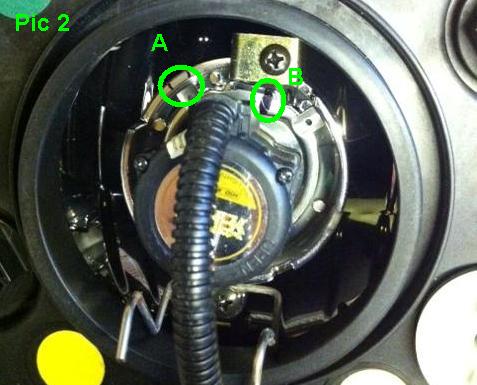
So, in Pic 2 you can see that I have positioned the HID bulb shroud tab by the marks 'A' and marked the position of the new tag I need to cut at 'B'.
Next, we need to cut the new tag…
.
.
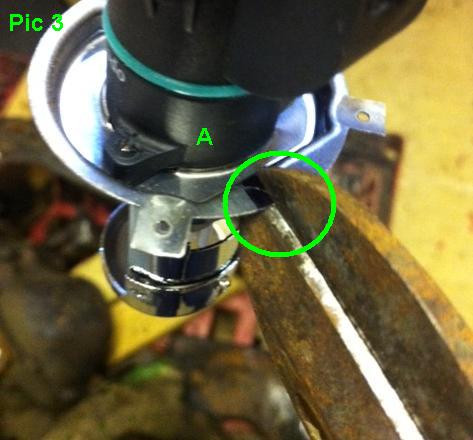
In Pic 3 you can see a pair of tin snips aligned along one side of the new tab cutting it. The cut needs to be about 4-5mm deep. A second cut is made on the left side of the mark leaving a tab about 2mm wide. This is then bent down (away from the base - toward the bulb) gently with a flat bladed screwdriver (or a pair of fine needle-nosed pliers if you have them).
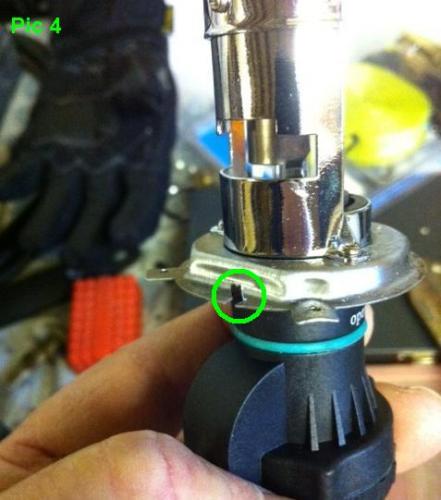
Pic 4 - You should end up with this (circled)…
.
.
Try it in place in the head lamp unit… The new tab is engaged properly and the shroud tab still aligns with the marks made earlier. If you want to be really thorough, you could cut two tags to match the original. If the bulb clip were more flimsy I would have done this but it is quite strong, so...
.
.
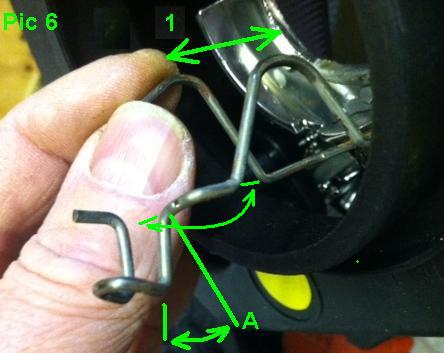
Next (Pic 6) we have to alter the spring clip a bit to fit the much bigger HID body.
1/ Splay the 2 sides of the clip by about 6-8mm - it is not critical.
2/ Bend out the clip at 'A' by about 30 degrees and at 'B' about the same. This is a bit difficult to indicate but you will get the idea of what is needed when you try to clip to HID bulb in place.
All this allows the existing clip to work without cutting it.
.
.
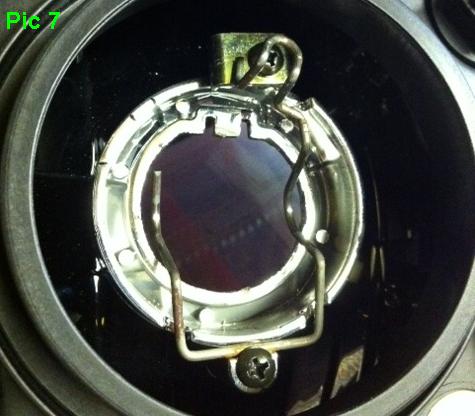
This (Pic 7) is how it needs to look.
.
.

You will need a screwdriver (or similar) to engage the clip with the HID bulb in situ as there is no room anymore to get your finger in there. The clip needs to just hold the bulb in place - it is not a precision job! Just try to avoid having the clip bear on the plastic body of the HID bulb base - it really should only be clamping the metal bulb shroud.
.
.
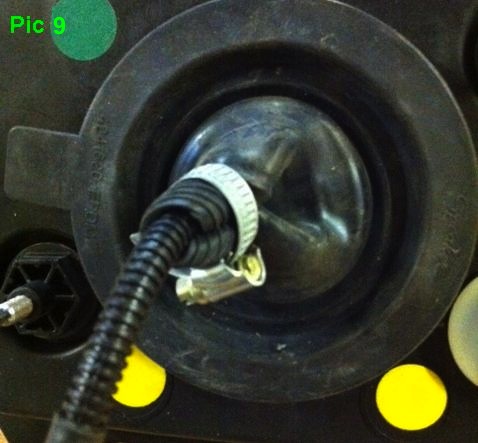
Invert the 'cone' of the rubber cover (Pic 9), pass the 3 wires through the cone and clamp it to avoid water getting in. It will be high enough up from the wheel to avoid getting wet from puddles and rain generally but the drier it is in there the better. I have used a jubilee-type clip - anything non perishable would do - a piece of solid copper wire etc.
Connect the 3 wires from the HID bulb to the ballast using the loom and re-assemble the head lamp. Don’t forget to insert the running lamp.
NOTE 1:! Please have consideration for your fellow motorists (and don't brake the law!) by ensuring that the angle of the dipped beam does not dazzle other vehicles drivers/riders, either in front of you via their rear view mirrors or coming toward you directly. Utilise a friend in a car to achieve this if necessary.
NOTE 2:! If you use handlebar muffs, please ensure that they are not causing your brake lights to come on when the brake levers are not being pulled (ie when you are not braking). This is sensible anyway for various, obvious reasons but it also could lead to the rear brake light failure mentioned earlier.
Lastly, keep your head light glass clean, as a build up of grime causes the light to be diffused in all directions again causing the HID light to dazzle other road users - and, of course, reducing its light output. I try to clean mine every day especially when its been raining and doubly so when they have been gritting the roads.
That should be it!
.
.
.
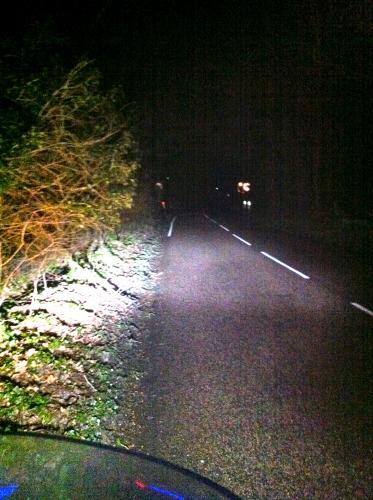
An update 300 miles later... HID headlight still working fine with no issues. Couple of pics of the beam - I didn't fancy doing it in the middle of the road but I think you get some idea of the improvement...
Dipped beam...
.
.
Main beam...


Who's online
There are currently 0 users online.
Who's new
- eric01
- Norberto
- sarim
- Edd
- OlaOst
Support V is for Voltage
